About Alison Hardy

Alison Hardy Alison is a freelance copywriter and content marketer. She specialises in dynamic online copy that helps small businesses reach and connect with the people that need them.

With a Southern Pommie accent and an unAustralian dislike for seafood, Alison came to Australia at the end of the last century. Despite these obvious disadvantages, she was offered a job in the ecommerce department of a local Internet company and has been working in digital communications ever since.

In the heady days of the first dot com boom, before she became a queen of copy, Alison helped produce websites. But project management wasn’t creative enough for this sassy lassie so she switched her attention to marketing and communications. Much more fun!

She spent the next 10 years in marketing roles, promoting businesses in the education, art, technology and online retail industries. This invariably involved writing persuasive copy online, offline and sometimes even in the line at the post office. Her talents helped her produce powerful copy for a wide range of purposes like websites, flyers, adverts, enewsletters, emails, social media and blog posts.

In 2012, she became one of the growing number of fearless people who take a leap of faith to work for themselves. Nowadays, you will find her in her slippers with a cat on her lap, wrestling sentences to create smart content to bring businesses to life.

A wordsmith, online champion, creative problem solver and a lover of strong tea, Alison has been working with us at Spiffy Stores for many years. She has helped us with marketing advice and writing content for our website, blog and knowledge base.

She’s pretty nice to work with, and thankfully has learnt to polish off a prawn or two so she can’t be all that bad. If you would like to hire her to write great copy for your website or marketing materials, visit www.alisonhardy.com for samples of work and her contact details.

Do you have these important pages on your ecommerce website?

In addition to the nuts and bolts of your online store, like your product collections, there is other crucial content you must include.

Your customers need to understand how you conduct business and how it may affect them. Information such as your terms and conditions, shipping and returns information, and your privacy policy should be clearly laid out in policy documents and made available on your website.

Shipping and returns

Lack of shipping and returns information is a major source of frustration for online shoppers and can be the difference between a sale and an abandoned cart. Make sure your store visitors can find your shipping and returns policies quickly and easily so they don’t have to go through the checkout process to discover you can’t deliver to their area.

Privacy statement

As you’ll be collecting personal information such as name, address and payment details on your online store, you must publish a statement on your website detailing how that information is used. More information on national Privacy Principles can be found here for Australia and here for New Zealand.

Terms and conditions

You are required to display the terms and conditions under which you operate on your website. Terms and conditions should include elements such as your payment terms, refund and exchange policies, disclaimers and copyright claims.

All the above information should be available to your customers at all stages of the purchase process. Create separate pages for your policies and make each one accessible from every page of your website – by linking to them in the footer, for example.

Crate your own policy pages using our sample templates here.

Protect your customers and your business. Ensure you have the correct and legally compliant information you need on your ecommerce store.

NB: This article is for information only, it is not legal advice. Talk to a lawyer about the legal requirements and responsibilities of doing business.

How to spread your message with a sassy guest post


guest-postingWouldn’t it be great if you could get yourself and your business in front of thousands of readers of someone else’s blog without paying a cent for it?

You can!

It’s called guest posting and it’s mighty popular.

Guest posting – writing an article or blog post that’s published on another website – is a tried and tested marketing technique to get you more:

  • Exposure for your products
  • Traffic to your Spiffy store
  • Social media likes and shares
  • Backlinks
  • Potential sales

It’ll also help build your personal profile as a knowledgeable authority in your niche. How nice is that!

Don’t tell me. You heard that Google frowns on guest posting, did you?

Well, yes. And no.

It depends how you’re going about it.

There’s guest posts and then there’s ‘guest posts’

If you’re going to throw together a weak and thinly veiled sales piece and stick it up anywhere that will have it, then yes, Google’s not a fan. And anyway, your unlikely to get the attention or traffic you’re after.

But if you spend time creating a unique and helpful solid article that offers value to the reader, and it’s published on a popular and relevant site. Well, that’s bingo baby!

Where to start

Step 1 – Do your research

I don’t want to sound too obvious here, but to stand any chance of getting published on a decent blog or website, you’ll need to produce content that’s relevant and interesting to their audience.

Say you sell beautiful decorative beads. Don’t try to get your fabulous post about ‘beads of the world’ in the Gardening Wonderblog. They want what their readers expect, and I’ll bet it’s not beads. However, the Popular Crafts Wonderblog might prick up their ears!

So you’ll need to find relevant online publications and blogs that cater for an audience that’s the right fit for your products.

> Search for “xxx blog” (where xxx is a keyword related to your business) and go through the results to find websites whose audience you think would want to read what you have to offer.

You can also try using keywords in your search like “guest post” (use the quote marks), which will help you find the ones that accept guest posts quicker.

> Visit blog directories like www.alltop.com and search using your keywords discover blogs in related categories

> Once you’ve identified the target blogs, check if they accept guest posts. Browse their website for information or guidelines on guest posting or send them a polite email asking if they accept guest posts.

> If they do, make a list of these websites somewhere safe.

> Now read through each blog you’ve identified to get a feel for what’s popular with their audience and the type of topics they like to cover. And you’ll want to target blogs that get a decent amount of comments and shares on their posts. After all, you don’t want to spend all that time writing a super-duper post only for it to fall on deaf ears.

And while you’re at it, take note of their guest post guidelines if they have them and stick to them. It’ll save you pain later.

Step 2 – Play nice

Thought you were going to head straight to the writing bit? Think again!

Start up a relationship by playing nice with the guy or girl you hope will help you out with a guest post opportunity. Call it a sweetener. Take time to comment on their articles and share them in social media. And just a one off won’t cut the mustard either. Go back several times and give them a hand.

Not only will it show you’ve bothered to get to know what they’re all about, it’ll show you’re willing to give and take.

Step 3 – Get writing!

Now that you’ve found the blogs you want to feature in, and the blogger has hopefully noticed your interest in their stuff, it’s down to the writing business.

Create a unique article that you really think would interest that audience and give them something of value. Don’t be lightweight here, you need to write something meaty. Think comprehensive tips sheet, how-to article or, in the case of the bead shop, a very visual guide to the world’s most beautiful beads.

If you’d like some tips about blog writing, check out my post on blogging.

Finish off your article with a short “About the Author” paragraph. Something along the lines of “Mimi is the owner of Mimi’s beads, an online store that specialises in beads from around the world, www.mimisbeadstore.com.au“

Step 4 – Send it in

Before you send in your guest post, double and triple check the format, grammar and spelling. Quality website owners and bloggers won’t publish it if it reflects badly on them and makes their site look amateurish. And you don’t want to look silly either.

When you send in your article, summarise it briefly in the email and explain why you think their readers would benefit from it. It saves the recipient time. And attach the image(s) to accompany it.

Step 5 – The waiting game

With any luck, the blogger will like what you’ve done and will feature your guest post on their blog.

But that’s not always the case. Don’t expect your piece will be automatically accepted.

If you don’t get a reply after a week, follow up with a short, polite email asking if they’ve had time to read your post and if they thought their readers might like it.

If you don’t get a response after that, or if your post is turned down (you may get this a lot from more popular blogs), try sending it to another blog on your target list. Just go through the steps above to make sure it will fit the other blog and tweak if necessary.

Or you can add it to your own blog.

Step 6 – Tell the world

Whatever you decide, promote the heck out of it on social media once it’s live and respond to any comments. Promoting it is just as important, if not more so, than creating it.

And keep going with other blogs!


How to use Pinterest to promote your online store

You must have been living under a rock if you haven’t heard of Pinterest, the “scrapbook” website that lets its users collect images in themed albums called ‘boards’.

It’s a very powerful social network that’s inspired people all over the world to share their interests and ideas through images, and connect with others by liking, commenting and re-pinning to their own boards.

Pinterest was launched in 2010 and has been growing at a mind-blowing rate. It now gets around 1.5 million unique visitors a day and boasts nearly 73 million monthly active users, making it the fourth most popular social media platform in the world.

Pinterest is a gift for retailers

Because Pinterest is so visual, it’s a great promotional platform for companies selling products like yours.

If you’re looking to get more traffic, exposure and attention for your Spiffy store, tap into Pinterest’s enormous popularity. A US RichRelevance Shopping Insights study has found that Pinterest users deliver a bigger average order value on retail sites than those coming from Facebook or Twitter!

Get ready to pin your wares

Before you dive in and start pinning your goodies up for all to see, ensure your website content is optimised. You’ll be pinning product images directly from your Spiffy store, so you’ll need great quality photos and clear descriptions (these encourage Pinterest likes and “re-pins”, which will widen your audience).

> Make sure your product photos are high quality, well lit and appealingly shot. I can’t stress this enough. Images are the currency of the Pinterest community so if your images aren’t great, you won’t attract attention or sharing!

> Give your product pages clear, specific descriptions and tags containing that product’s keywords so that Pinterest can index them easily. Think about the words and phrases people would type into search engines when looking for products like yours and use these when you write.

Once that’s taken care of, it’s time to set your brand up on Pinterest. This is the fun part! Pinterest have put together a simple guide to pinning to explore to get to know the platform better. In addition, I’ve made a few notes to get you started.

Set up your account

Jump onto https://business.pinterest.com/en  and click “join as a business” to sign up for a free business account.

Fill in the requested fields in the sign up form and make sure you read their terms for business use and are willing to comply with them.

Pinterest will then ask you to choose some board categories to follow as a starting point. It makes sense to pick ones closely related to your business.

Next, you’ll be offered the Pinterest browser button. Take it! It’s the easiest way to pin images you find all over the web to your boards. Once it’s downloaded, it’ll sit patiently at the top of your browser window waiting for you to click it and send an image you’ve found to one of your boards.

Once Pinterest has had a few seconds to digest all the information you’ve just given it, you’ll find yourself in your homepage – a visually rich scrolling page full of images. These images have come from the category choices you made a few minutes earlier.

The next step is to customise your page.

Brand your profile

At the top right of your page, you’ll see your user name (it should be your business name) in a button. Click it and you’ll be taken to a page where you can design your profile for you brand. Add your logo and fill out the other fields available, not forgetting to add your business keyword term in the description.

Have a good snoop around

Before you start creating your own boards, I suggest you do some simple research. Type your keywords and your competitors’ names into the Pinterest search box at the top of the page and see what comes up. Notice how products like yours are shown, how others title their boards and what’s popular. These insights will be helpful as you set up your own boards.

Create your own boards

Once you’re more familiar with Pinterest, start creating your own boards. You can do this by clicking the ‘create a board’ box on your profile page and filling out a few details.

Click on the board to choose an image to pin to it.

Don’t limit your boards to just your product categories; play around with different themes such as Christmas presents, best sellers and cocktail hour etc. Have fun with the board titles too – clever titles seem to attract more attention!

Social networking is all about authentic connections, so you might like to also set up a couple of boards on your own interests. This will help personalise your brand.

Pin images to your boards

Pin your product images directly from your online store to your boards so when a visitor clicks on the image, they’ll get sent directly to your website. Once you’ve pinned your images, you can edit the board cover to show the image that best reflects the board’s content.

When you’re exploring the web, use the Pinterest browser button to pin images you like to your boards. See, I told you it would come in handy!

Don’t just stick to standard pictures of your products – make your images as unique as you can. Try including photos or videos showing different uses for your products, or photograph them from different angles and in different lights. Files can be uploaded directly from your computer so they don’t have to be on your web store already.

Create detailed descriptions for each of your pinned images. Include your keywords when you write and put them in #hashtags at the end of the description. Add the link to your website product page and the price.

And there’s more!

Become an active member of the Pinterest community – it is a social network after all! Repin content you like that fits your brand, follow other people’s boards and comment on other pins. You can use the @ in front of a username to address them personally in a comment. This is not only fun but it’ll increase your exposure and number of followers.

Place Pinterest sharing and follow buttons on your product pages so that visitors to your Spiffy store can follow you and share your things on the network.

Install the Pinterest App onto your smartphone so you can browse boards, take snaps and pin on the move.

When you’re set up and have some good content, invite your connections to visit your board. Send out an email to your mailing list, and compose a tweet, blog or Facebook post that links to your Pinterest page and ask what they would like to see more of.

And finally, keep it up!

Keep pinning. People are more likely to come back if there is new content and it’ll widen your appeal.

Keep exploring and engaging in Pinterest. Continue to repin and engage with others on the network. Short but regular activity on Pinterest is better than a big push once in a blue moon.

Keep up with how others interact with your content. The number of likes, repins and comments you receive will reveal what the customers want from you.

As with all social media, you will have to devote time and effort to keep it fresh and interesting. But in return you’ve got a free promotional platform for your online store that can reach millions of people.

So go forth and pinnify!


Get to know SEO so you don’t get ripped off!

learn seoWe’ve all had those uninvited emails.

The ones kindly telling you that you’re not ranking well on search engines like Google, and their Search Engine Optimisation (SEO) services will bring you lots of web traffic and a position on the first page of Google results.

Tempted? Take a deep breath and think again.

No one can guarantee a #1 ranking on Google.”

 How do I know? Cause that quote is taken directly from Google’s support website.

A brief history of SEO

Search engines like Google want to be able to show you the most valuable and relevant web pages for your search query. To be able to do that, they first crawl web pages and use very complicated algorithms to rank them in an index.

Very early on, people started gaming the system using tricks known as ‘black hat’ techniques to try to outwit the algorithms and jump up the rankings.

These tactics included:

  • Stuffing the keyword phrase into the page (both visibly and invisibly) as many times as possible
  • Buying and swapping links, or listing on poor quality web directories, to get as many backlinks as possible
  • Spamming the comments section on blogs and forums just to get a backlink
  • Spinning low quality versions of an article onto lots of different sites
  • Technical trickery like doorway pages, cloaking and redirects

As a result, Google began to update its algorithms to reward top quality content and filter out pages that used dubious methods to try and win their attention.

And it’s got very good at it.

Play nice or face the consequences

Many dodgy SEO tactics are still being used by unscrupulous companies, even though the Google algorithms have been updated numerous times to recognise and penalise these tactics.

These methods are useless at best and downright dangerous at worst. And who gets penalized for these actions? The website owner. That’s you.

So if you want to steer clear of a Google penalty that bombs your search rankings, you need to make sure any SEO activities for your website are best practice.

What is good SEO?

Good SEO is about giving Google what it wants. Which is all about giving the user what they want…

> top quality, helpful content (web pages, video, pdfs etc)

> relevant to the search query

> on an easy-to-use website (technically sound)

> that other people recommend (through quality, earned backlinks)

So what are your options?

Firstly, do yourself a red hot favour and learn some SEO basics.

>>> Start with this article, or this one, by yours truly, written as a simple intro to SEO for people with little or no prior knowledge.

>>> Read up about SEO. There are a huge amount of free resources online like this SEO guide from Google itself.

>>> Take an introductory online SEO course like the one run by my pal Kate Toon called “The Recipe for SEO Success”.

When you’re up to speed (it doesn’t take much to learn the basics!), you’ll have a choice to either pay an SEO specialist to do the work for you, or do it yourself.

Use your smarts when you pick an SEO supplier

If you’re going to employ a specialist, please don’t randomly pick one (or reply to one of those unsolicited emails). Speak to other business people to find out who they use and recommend, and search online for good reviews.

A legitimate SEO company should be able to

  • explain the SEO techniques it uses
  • show you examples of their work
  • put you in touch with happy customers
  • provide detailed reporting of their work and the results it’s getting

Their services should include

  • keyword research for your specific niche
  • an SEO audit of your current website with advice on what to fix to make it more SEO friendly
  • a strategy and support to build quality backlinks
  • help with content development

With a good understanding of SEO at your disposal, you should be able to weed out any dodgy dealers.

The takeaway?

Don’t waste your time and precious cash trying to outwit Google. Understand how to work with them, not against them.

Whether you choose to hire an SEO specialist or DIY, maintain a good quality website and you’ll enjoy a stream of visitors who want to be there.


19 ways to promote a new product on the web for free

free-signSo you’ve got some pretty cool new stock for your online store – bonza!

Once you’ve got that sparkly item beautifully photographed and loaded safely in your Spiffy Store, it’s time to go to town with your marketing.

You don’t have to have a big marketing budget to promote your new product online.

Here are 19 ideas that will cost you nothing but a little bit of your time.

  1. Post a photo of your new product on your Facebook page, linking directly back to the product page on your store
  2. Tweet that cool photo and link out on your Twitter account
  3. Post the image and link on your Pinterest page
  4. Post the image and link on your Google+ page
  5. Make a creative photo on Instagram
  6. Write an update for your LinkedIn company page
  7. Take a short video of the product on your smartphone and load it onto your YouTube channel
  8. Post the video out on your other social networks too
  9. Use a #hashtag on social media whenever you mention your new product. For example, #shoes or #goldsandals.
  10. Post on social media more than once. If you do it just once, it may get lost in the noise of the newsfeed.
  11. Feature the product in your next newsletter
  12. Mention it in your email signature with a link
  13. Write a blog post about it. If it’s something to wear, you could discuss different ways to wear it. Remember to use the product name in the page title and headline.
  14. Write a traditional press release and post it on PR sites like Newsmaker. If you’re not sure how to do that, check out my post on how to write a press release.
  15. Monitor sourcebottle.com for free publicity opportunities and giveaway requests that would fit your product. You can sign up for alerts on the site.
  16. Search for popular blogs in your niche (fashion, lifestyle etc) using Google Blog Search or Alltop and send the blogger some information about your product along with some nice images. They might feature it.
  17. When you ship your new product, invite your customers to post a snap of them using it on social media with a #hashtag so you can follow the activity
  18. Slip a note about the new item into the package when you ship other goods
  19. Add a note and link in your automated emails to check out the new product in the store

There you go. A bunch of online marketing ideas for you that don’t cost a cent!

How to advertise on YouTube

video advertisingDo you know you can run display and video ads on YouTube? Cool!

If you want to run video ads, you’ll need your own YouTube channel. That’s where you’ll store the videos. To find out how to go about setting your business up on YouTube, check out my post “Grab some YouTube action for your online store”.

The ad formats

There are a number of different ad formats on offer on this mother of all video channels. Before you begin creating your ad, it’s worth checking the AdWords policy page to understand the video specs you’ll need to adhere to and their advertising regulations.

In-stream ads – these are short video ads that play before or during a YouTube video, or on a Google Display Network video game or app. As the viewer can skip the ad after the first 5 seconds, you’ll only be charged if your ad’s watched for 30 seconds or more (or in its entirety if it’s shorter). That’s up to 30 seconds of free advertising!

In-display ads – these ‘static’ ads generally appear next to YouTube videos, in YouTube search results or the Google Display Network. They’re made up of a preview image and text. You’ll only be charged when someone clicks on the ad to view the video, so again, a certain amount of free advertising is available.

If you’re unsure what to make as a video, or how to go about it, read my post on creating video for your online store.

Set up YouTube advertising in AdWords

YouTube video ads are managed through Google AdWords. If you don’t have an AdWords account, head on over to our step-by-step guide and find out how to set one up. It’s not difficult.

To run YouTube ads, first link your AdWords and YouTube accounts via the ‘AdWords for video’ side navigation menu on any AdWords for video campaign page.

Set up a video advertising campaign in AdWords

To create your first video campaign, follow the simple step-by-step set up. Click ‘New campaign > Online video’ above the campaign table. Give the campaign a name, set the daily budget and choose your target locations and languages.

Create your ad

Next you get to create your video ad. Pick the video you want to use (remember it needs to be in your YouTube account), choose the format – in-stream or in-display – and fill in the ad details as requested.

Choose the type of people you want to see your ad

You can target your YouTube ads so they’ll only appear in front of the audience you choose. That way you’re not wasting money on people you don’t want to attract.

Select your target audience by typical demographics like age and interests. There’s also advanced targeting features like the contextual keyword option, so you can choose to show your ads near content relevant to those words.

If you want to ensure, or avoid, your ads appearing on specific pages in YouTube, the Managed Placements option will let you do that. It’s handy for targeting channels where the audience may be particularly tempting to you.

Once you’ve set up your ads, you’re good to go!

Check what’s working and what’s not

Just like text or display ads, AdWords offers you performance reporting on video ads. The reports reveal key data like which ads are the most popular and how much of the video is being watched.

By combining these insights with YouTube analytics reports, you’ll get a good picture of what’s working and what’s not so you can work on getting the best bang for buck!


Grab some YouTube action for your online store

man watching video wallHere’s something that may surprise you. YouTube is the second most popular search engine after the almighty Google. It gets more than 1 billion visitors a month looking for news, entertainment and answers.

If you want to create attention for your store and show off the cool things you sell, putting short videos on YouTube can open up a whole new audience for you.

It’s also worth mentioning that Google owns YouTube. You do the maths!

Setting up a business presence on YouTube

If you already have a Google account (ie: you use any of Google’s products like Gmail, AdWords or Google+), use those log in details to sign in at www.youtube.com.

If you don’t have a Google account, go to YouTube and click ‘Sign in’ on the top right of the page. Click ‘Create Account’ and fill in the required information.

Once you’re signed in, you’re free to watch the videos, but you need to create a ‘channel’ (like a profile page) to be able to load your own.

NB: YouTube accounts are linked to a Google+ page. If you don’t already have a Google+ page as you set up your channel, it’s going to make one for you! Don’t worry, I’ve got a great post about using Google+ to promote your business too.

Create your YouTube business channel

These steps apply to desktop or laptop users, using a browser. Some of the options are different for mobile/app users.

Once you’re signed into YouTube, click on the profile image top right, and then on the cog next to the ‘Creator Studio’ button in the drop down box. This will take you to an ‘overview’ page.

On the overview page, click through the ‘Create a channel’ link next to your email address. On the following screen, click ‘To use a business or other name, click here’. If you have a Google+ business page, you’ll see this as a channel option on the following page. If not click the ‘Create a new channel’ button to make a new one.

Now you have a new channel and you’re ready to make yourself at home!

Customise your channel for your brand

Just like other social media profiles, you can customise the content of your YouTube channel to reflect your business and brand personality.

Your main channel page contains a number of menu items including ‘Home’ and ‘About’. If you can’t see them, click on the ‘My Channel’ menu item to the left of your screen.

Your small square channel icon feeds in from your Google+ page (you need to go there to change it) but you can add a big image as your channel header. Colourful images are great for attracting the eye so use it to show off your product ranges or another image that supports your brand.

To make changes to the channel header area, hover over the cover photo area to reveal the pencil icon to the right. Click on it to change the image, or add links to your website and any other social media accounts you have.

You can also add ‘Featured channels’ you like in the box to the right.

Next, head over to the ‘About’ tab and write an interesting description for your users in the ‘Channel description’ box. It will take up to 1,000 characters.

Upload your videos

YouTube lets you upload videos in any of the following file formats: .MOV, .MPEG4, .MP4, .AVI, .WMV, .MPEGPS, .FLV, .3GPP, .WebM. If you want to change the default settings for the videos you load, go to your ‘Video manager’, click ‘Channel settings’ and then ‘Default’.

To load a video onto your channel, click the ‘Upload’ button at the top of the page and browse for the file you want to upload. You can even create videos here!

To make the most of web searches, use appropriate keywords in the title and description of your video and use the tags facility.

When you’ve chosen your video, select the privacy setting and hit ‘Publish’, ‘Done’ or ‘Share’ (it’s different for each privacy setting) to send it to your live channel.

To learn more about making video for your business, check out my last post.

Promote your YouTube presence

Your hard work’s not over yet! To get the most attention to your new channel, add a link to it on your Spiffy Store, in your newsletters and other social networks you play in. And keep making those videos!


Want your store to stand out? Start making videos!

video playerEven with a unique product and an enticing web store full of tempting goodies, you still need that little bit extra to stand out online.

Video is fast becoming the favourite way to add that extra bit of personality to a business and help increase sales. Search engines like Google rate web pages with video highly, so they can also bring you more search traffic.

Without too much effort, you can harness its power for your online store. Yes you can.

Why does video make a difference?

The education industry has known for a long time that audio-visual materials help you understand content better than just words on page. It’s just the way our brains are wired. Video stimulates the visual learning part of the brain, making it easier to soak up information. And with our subconscious love of storytelling, video is a great way to get your message into people’s minds.

If you’re still not convinced, here are some more figures that might interest you!

> Shoppers who view video are almost twice as likely to purchase than those who don’t

> Retailers cite 40% increases in purchases as a result of video

> 71% of consumers say that video is the best way to bring product features to life

> Video has been seen to help attract two to three times as many monthly web visitors and increase organic traffic from search engines by 157%

> A web page with video is 53 times more likely to come up in the first page of a Google search, compared with a text-only web page with the same content

Excited by the possibilities for your business now? Thought so.

Let’s look at some of the cool stuff you can create in a video format.

Live action or animation?

Video doesn’t mean just live action filming in real life. You can create an animation like a cartoon to get your point across too. It’s very effective!

Which one you choose will depend on the purpose of your video, the audience and the content. If you’re showcasing your products, you’d choose live action. If you want to explain a concept or tell an entertaining story, animation is an entertaining way to go.

A third style of video is a screencast, you can see an example of that as the Feature Tour video on the Spiffy Stores homepage (yes, that’s me in the voiceover!) Unless you’re making a tutorial of an online process, you’re unlikely to use it much, so I’ve not covered it in this article.

Where to start

A professional video made from scratch can cost thousands of dollars, so why not make one yourself? There are heaps of tools now available for hardly any extra cost (you already have a camera in your smart phone for a start), so it’s well within anyone’s reach. Turning your hand to it can be lots of fun and you’ll learn a lot!

And once you’ve made it, you’ll have a valuable piece of marketing material you can use as long as you want.

Here are 10 steps to get you started.

  1. Set your goals

As in all things marketing, decide on the goal for your video. Why are you making it and what effect do you want to have on the viewer? Keep it clear and simple. Once you have the outcome you want in mind, you’ll be able to focus the content more effectively.

  1. Define your audience

Who are your target audience for the video? A broad range, or a specific group of people?

  1. Brainstorm ideas

With your goals and audience in mind, jot down lots of ideas for the video. You could:

  • Create an entertaining introduction to your business, showing what you do and why it’s important/unique
  • Sit in front of a camera and talk about your blog subject instead of writing about it
  • Show off new products you’ve just received
  • Take your viewers on a sneak peek behind the scenes of your business
  • Announce a special sale or promotion
  • Answer a customer question you’re often asked
  • Demonstrate the various features of your products in video product guides
  • Create a ‘how to’ tutorials. If you sell scarves, for example, a short video showing the different ways to tie them would be really useful!

You could even ask happy customers if they would mind making a video testimonial (get written permission from them to use it online).

  1. Write the script

Whether you’re producing live action, a screencast or an animation, most videos need a script.

The key to this type of writing is to be conversational and write like you talk. As a guideline, 150 words will take about 1 minute to speak (you need to speak a bit slower for video). Get someone to read it back to you once you’re done to make sure it sounds OK and it’s the right length.

As attention spans online are short, try keeping your video under 2 minutes long. If you’re preparing a tutorial or video blog though, you may need to go longer.

  1. Create the storyboard

Unless you’re intending to just sit in front of the camera and talk, you’ll probably have a story running through your mind as you write your script. Once you’ve got the script down, turn that ‘mind movie’ into a storyboard to map out how the audio and the visual will come together. It doesn’t have to be fancy; I make mine as a two-column chart in Word – script to the left, matching screen action on the right.

  1. Create the video – Live action

Recording

If you don’t have a video camera, your smart phone or even your laptop is a good substitute. If you’re using a camera or smartphone to record you talking to the camera, you’ll need a tripod to keep it steady.

Make sure you have decent lighting for your filming, the more natural the better. If you’re filming a ‘talking head’, keep the light source coming from the front (like a window) and watch out for shadows. If you want to be really polished, use an external microphone to get better sound.

If you make a mistake, just record it again – you can edit the goof out in the next stage.

Wistia have a great library of short video tutorials that go into more detail. I recommend a look.

Editing

Once you’ve created your video footage, you’ll need to edit it to get rid of any mistakes and add things like music or titles. Download your video to your laptop or desktop (if it isn’t on it already) and you’re ready to begin the edit.

Both Apple and Microsoft offer free video editing software for your desktop or laptop. If you use a PC, it’s Windows Movie Maker, if you’re on a Mac, it’s iMovie.

If you want to edit online, there are plenty of options, like WeVideo or Wideo.

Whatever your choice, make sure you check the video format you export when it’s finished works with the hosting platform where you’ll keep it (see below).

  1. Create the video – animation

If you’re after an animation, there are a growing number of online animation tools that makes it really simple to create your own cartoons. Check out the fun stuff you can do at GoAnimate, PowToon and Wideo.

  1. Hosting

Your fabulous video is going to need to live somewhere that’s Internet accessible. From a quality and control aspect, use a video hosting platform like Wistia or Vimeo. They both have several pricing options, including a free plan. Some online video editors also offer hosting as part of the package.

From a search engine and traffic perspective, it’s a good idea to also load your video on YouTube too.

  1. Put the video on your website

Once you’ve made your video and loaded it onto a hosting platform, put it into a page on your website. You can easily copy ‘embed’ code from the hosting platform and paste it straight into the editor of your Spiffy Store web page where you want the video to appear.

  1. Get the word out

Once you’ve got the video on your website, you’re ready to promote it! Post the web page link on your social media channels and let your email subscribers know it’s arrived.

Go on, have a crack at it. Let your inner Spielberg or Disney shine!

(statistical sources: Invodo, Multichannel Merchant, MarketingSherpa, Forrester Research)


10 ways to promote your store using LinkedIn

You might not think it, but there are plenty of ways to promote your online store using the professional network, LinkedIn. Here’s 10 for you!

1. Set up a Company PageLinked Laptops

Just as you can create a personal LinkedIn profile to showcase yourself, you can do the same for your business. They’re called Company Pages and they provide you with a free and easy way to promote your store online.

Before you can set up a Company Page, you need to have your own personal LinkedIn page (if you don’t yet have one, head over to my previous post on LinkedIn profiles for some tips on getting started).

It’s quite easy to launch a Company Page, but there are a few requirements you need to meet before you can go ahead, so read through those first or you may quickly get frustrated!

When you’re ready, here’s how to make it happen. Continue reading

A simple guide to Twitter for online retailers

Birds tweeting

Let me introduce you to Twitter, the social network where a little goes a long way.

According to one of their recent studies, 60% of the respondents had bought from a small business because of Twitter.

It’s certainly an opportunity to be considered.

Set up a free account

Just like any other social network, you’ll need to set up an account profile.

Head over to www.twitter.com to start.

As you go through the sign up process, you’ll be asked to create a username or ‘handle’ (@xxxxxx) of 15 characters or less. This is the name you’ll be known as on Twitter, so use your business name or a version of it if the exact name isn’t available.

Add your logo as your profile photo, a 160 character ‘bio’ and header image to reflect your business’s personality, and your website url. If you’re on other social media channels, your profiles should all say a similar thing to keep your brand consistent.

Ready for action? Start following!

Start your Twitter action by following a bunch of accounts that post information that would be useful to you and your customers. Their tweets will then appear in your own feed. You can also follow your competitors and keep an eye on their activities.

You can find them using the search box on the top right of your twitter profile. The basic search function here is fairly generic and brings up a wide range of results so I like to use Advanced Search https://twitter.com/search-advanced (you can also find this on the left hand panel once you’ve performed a regular search). This will give you a more targeted search. It’s also a nice way to find things to pass along.

What to do with 140 characters or less

Twitter only allows you to post a maximum of 140 characters, so you’ll need to get to the point pretty quickly!

With some high level marketing objectives in mind, like driving traffic to your website, growing your reach and creating leads, you can dive straight in and start posting. Hit the blue ‘tweet’ button in the top right corner of your Twitter page to begin.

Here are some of the things you can do with a tweet, but in general, as long as you behave like a human being, not a business or a brand, you’ll win friends.

> Point to some interesting content you’ve found on the web. Because of it’s brevity, Twitter is mostly used to post links to interesting content, yours or elsewhere on the web. Start with a tempting sentence to encourage a click and follow it with the url of the content.

> Retweet interesting tweets you find. Hit the ‘turn left’ symbol below a juicy tweet and it will appear in your followers’ feeds.

> Reply to other tweets. Start a conversation by hitting the ‘loop’ symbol below a tweet and type a reply. This conversation only appears in the feeds of people who follow you both, but there’s a neat trick to get all your followers to see it. Put a full stop (.) in front of the @handle of the person you’re replying to.

> Tweet a question. Do you want to know what your followers think about your products? Ask them! They may give you ideas for new stock, for example.

> Tweet a promotion. Do you have a sale coming up or new stock in? Use a tweet to promote it to your followers and include an image. Don’t do it too often though. Followers like information and too frequent promotions will make you come across as pushing sales.

> Offer a quick tip. Share a nugget of advice with your followers. Perhaps a cool way to use your products.

To increase your chances of being found, use a # (hashtag) in front of a relevant term, like #shirts, or #kitchen. Keep it down to one or two per tweet – too many and it gets confusing!

When you need privacy, send a Direct Message

If you want a private exchange with another follower, use a Direct Message instead of a tweet. You can only send and receive Direct Messages with someone who is following you, and visa versa.

Twitter is the new customer service tool

In addition to building a sense of community around a brand, Twitter is fast becoming a popular customer service tool for businesses.

If they’re already on Twitter, people will often use the network to ‘talk’ directly to a company rather than use the phone or email. As a business owner, this is both good news (It’s quick and inexpensive to use) and bad news (complaints are in public view). But ignore it at your peril!

If you’re not sure how to manage this kind of activity in the public domain, read my post on handling complaints on social media. It’s full of tips.

Paying to advertise on Twitter

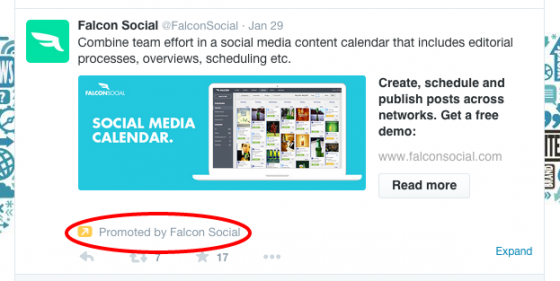
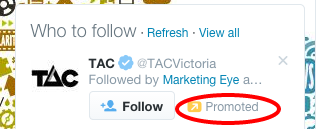
Just like the other major social networks, Twitter offers business users paid advertising so you can get in front more people. Here are a few examples.

twitter ad example

Twitter ad example 2

Twitter Ads campaigns are focused on a marketing goal, like getting more followers or website visits.

The ads are based on a pay-per-action model, so you’ll only pay when someone interacts with the ad, not for just for displaying it. And because you can target the audience very tightly, there’s less budget wastage.

The easy-to-use set up tool walks you through the process from ad creation to selecting the audience and budget so you can be up and running in no time. The Twitter Campaigns dashboard will show you how your ads are performing so you can make any necessary adjustments like increasing the budget if you’re seeing the results you want.

I’ve only scratched the surface of Twitter Ads here. Visit their business website to discover more and sign up to play.

Now you’re up and running, don’t forget to add a Twitter follow icon, linking to your account, to your Spiffy store, and put a link in your email signature for good measure!