About Alison Hardy

Alison Hardy Alison is a freelance copywriter and content marketer. She specialises in dynamic online copy that helps small businesses reach and connect with the people that need them.

With a Southern Pommie accent and an unAustralian dislike for seafood, Alison came to Australia at the end of the last century. Despite these obvious disadvantages, she was offered a job in the ecommerce department of a local Internet company and has been working in digital communications ever since.

In the heady days of the first dot com boom, before she became a queen of copy, Alison helped produce websites. But project management wasn’t creative enough for this sassy lassie so she switched her attention to marketing and communications. Much more fun!

She spent the next 10 years in marketing roles, promoting businesses in the education, art, technology and online retail industries. This invariably involved writing persuasive copy online, offline and sometimes even in the line at the post office. Her talents helped her produce powerful copy for a wide range of purposes like websites, flyers, adverts, enewsletters, emails, social media and blog posts.

In 2012, she became one of the growing number of fearless people who take a leap of faith to work for themselves. Nowadays, you will find her in her slippers with a cat on her lap, wrestling sentences to create smart content to bring businesses to life.

A wordsmith, online champion, creative problem solver and a lover of strong tea, Alison has been working with us at Spiffy Stores for many years. She has helped us with marketing advice and writing content for our website, blog and knowledge base.

She’s pretty nice to work with, and thankfully has learnt to polish off a prawn or two so she can’t be all that bad. If you would like to hire her to write great copy for your website or marketing materials, visit www.alisonhardy.com for samples of work and her contact details.

Get the most out of LinkedIn to support your online business

Linking-networkIf you think LinkedIn is only the domain of corporate climbers like sales reps and CEOs, think again!

The world’s most popular professional online network is useful for everyone in business, from online retailers and software developers to nannies and gardeners.

Use it to connect with suppliers and potential business partners, develop new business and grow your own brand. You can even publish your own articles.

And it’s free. So let’s get cracking.

Set up your personal profile

If you haven’t created a LinkedIn personal profile yet, your first step is to visit www.linkedin.com and make one. Grab a few materials to help you with this, like your CV and a decent photo, and follow the simple step-by-step instructions.

Here are a few tips:

  • Use your headline to describe what you do. You can be creative if you work for yourself, so if you want to be “head honcho” then go ahead.
  • Upload a smiley professional photo. You don’t need to pay for a formal shot, but make sure the one you choose reflects you as a trustworthy professional, not a surfer girl or party boy (unless that’s your brand!).
  • Fill in as many fields you can on your profile. You don’t need to list everything you’ve ever done, but do be proud of your achievements! Include as much information as possible about your business as well to ensure people using LinkedIn to search for information can find you.
  • Write about yourself in the first person, not the third (ie: use I, not “Clare”) and don’t be stuffy or officious-sounding. Write how you talk and let your personality shine through.
  • Use the words and phrases you’d like to be found for online, like your products and your store’s name.
  • Check your account privacy and settings to control the finer details of your LinkedIn account, like who sees what. Roll over your tiny photo, top right, and choose “Privacy and Settings”.

Connect with other professionals on LinkedIn

Connections are the key to success on LinkedIn. When you’re set up, invite other professionals you know to join your network.

LinkedIn makes it easy to do so with an automated tool during the set up process. Once you’ve done that, you can search for other suppliers and business partners to connect with using the search bar.

Ramp up your LinkedIn presence

There’s so much more you can do than just list your professional history on your profile page and build your connections.

Try these next activities on a regular basis to help raise your profile.

  • Like, share and comment on interesting content that drops into your newsfeed from your connections and the companies and groups you follow.
  • Ask connections you’ve worked in the past, like employers, clients and suppliers, for a recommendation of your business skills to display on your profile. You can easily do this via a simple request form you’ll find under “Privacy and Settings > Profile > Manage Recommendations”. It’s helpful to give out recommendations where you can, even if you’re not asked first.
  • Follow companies you’re interested in and their LinkedIn posts will show up in your newsfeed. It’s a great way to keep an eye on your competitors! Find companies to follow using the search bar at the top of your LinkedIn page.
  • Join LinkedIn Groups to expose yourself to conversations in your niche. Look for existing groups that interest you and join them to contribute ideas, answer questions and post your own. Search for groups to join under “Interests > Groups” and click the blue “find a group” button.
  • Find and follow influential LinkedIn users in the Pulse section of your profile. You’ll find their posts under “Interests > Pulse”

Get into a routine of checking your LinkedIn account often and growing your connections. It could lead to new business, suppliers or referrals. Next up, I’ll look at how to launch a LinkedIn Business page. Stay tuned!

Next up, I’ll look at how to launch a LinkedIn Business page. Stay tuned!

Reach more people on Facebook with Facebook ads

Facebook-audienceHaving a free Facebook Page for your store is a great start to growing your online community, but it doesn’t guarantee that everything you post will get in front of everyone that likes and follows you.

If you want to reach more people on Facebook, you can back up the free activity you’re enjoying on your Page with paid Facebook ads.

These ads are charged on an impression basis, not per click like Google AdWords, so you’ll pay every time your ad appears to someone. Your message can be super-targeted though, so you only be reaching the kind of people you really want.

Get your strategy worked out before you begin

Before you leap into creating ads, you’ll need a campaign strategy. Answer these key questions to focus your campaign and help you get better results.

Why are you creating this campaign? Are you after more likes on your Page? More sales on your website? Be sure of your goal as it’ll shape the whole campaign. Boosting sales on your website can be a good objective for online retailers.

What are you going to promote? Based on your campaign goals, choose what you’re going to promote. Is it a specific product or category of products, or a will it be a post, your latest offer, or an event?

Who do you want to see your ads? Facebook ads can be ultra-targeted, so decide on the characteristics of the person you want exposed to your ad. What type of people do you think would respond best?

When are you going to advertise, and for how long?

Once you’ve worked out your campaign strategy, you can get to work on your ads!

The three types of ads available to you

Facebook currently has three different ad formats. The images are from Facebook’s handy ads guide.

  1. Post ads for the desktop news feed

Facebook-desktop-ad

This large ad appears as a post in someone’s newsfeed as viewed on a desktop or laptop.

It’s particularly good for encouraging comments or actions on your posts as readers can interact with them just like regular posts from their connections. You can use it, for example, to push a post you’ve already made to a bigger audience.

  1. Post ad for the mobile news feed

Facebook-mobile-ad

These post ads are built specifically for use with mobile-optimised sites. Only use this if your site has a responsive theme.

  1. Right column ads

Facebook-rcolumn-ad

These ads appear in the right hand column of a Facebook newsfeed.

Ready to start making ads?

Just one more thing. Make sure you understand Facebook’s advertising rules before you start. Once you’ve read them, hop over to their site to create your ad.

>> Choose an objective for your campaign

You’ll need to choose a campaign objective as the first step in creating a Facebook ad (see, that bit about strategy above has come in handy already!)

Once you do that, the ad tool will prompt you what to do next as you go through the ad creation process.

>> Create your ad

Specific details to create the ad layouts can be found here.

You’ll need upload at least one high quality image for your ad (the recommended image size for most ads is 1200 x 627 pixels) and come up with a headline, text, landing page address and call to action button if applicable to that ad type.

When you write your ad copy, keep your headline under 25 characters and your ad text under 90 characters. This will help it display better. Focus on just one thing as you write and try to show the reader the benefit they’ll get from whatever you’re promoting.

If you’re advertising a product, don’t make your homepage the landing page. Point people to the specific product page so they can buy the item straight away and not have to look for it.

As you create your ad, remember you’re advertising on a social media network. Make your ads friendly, likeable and interesting. You’ll be able to preview the ad in each of the formats when you’re done to make sure it looks good and reads well.

>> Select your target audience

Because Facebook holds detailed information about its users, you can target your ad very tightly. This saves paying to advertise to people you’re not interested in reaching. Location, age, gender, relationship status and even interests are all options available.

As you make your selections, Facebook will indicate the number of people who fit that criteria and could see your ad. The number of those you actually get in front of will be limited by your budget.

>> Define your ad budget and schedule

You can set a budget to be spent per day, or over a specific timeframe, and schedule your ads to run continuously or within a set timeframe. Don’t forget to set an account spend limit to ensure your ads stop running once you’ve spent this amount.

Once your ads have been approved and your billing information is recorded, you’re good to go!

Finally, monitor your ad

Every time your ad shows, you’ll be charged a fee, so keep checking your campaign performance in the ads manager.

If you’re not seeing the results you want, try testing out other versions of ad content. Changing the image, text and landing page may get you better results.

Launch a Facebook Business Page to grow your online community

Facebook is the world’s largest social network.

Over a billion people use it to connect and share things that touch their lives.

Its sheer size and level of interactivity makes it a good way to build relationships for your business too.

Here’s how to get started.

Set up a separate Facebook Page for your business

Many of you will already have a personal Facebook Profile, linking you with your friends and family across the world. But personal Profiles are not intended to be commercial, and friends don’t like being sold to much anyway!

It’s better to set up a separate Facebook Page for your online store. Pages are built specifically for businesses, and offer unique tools to help with marketing. As it’s separate from your own profile, you won’t bother your pals too much either!

Go to https://www.Facebook.com/pages/create.php and choose your business type to start. Then fill in the form fields and follow the onscreen instructions.

Just like a personal Facebook Profile, you can add a profile picture and cover photo to customise your Page. I suggest loading your logo (min 180 x 180 pixels) as the profile pic and a creative, high quality image depicting what you sell (min 399 x 150 pixels) as the cover photo.

Get your Page working for you

Once you’ve filled in all the basic information for your page, and added any extra tabs and apps you want, it’s time to get to work promoting your business.

> Invite your Facebook friends and contacts to like your Page

> Grab a username: Make a unique web address for your Page. It’ll make it easier to promote in places where you can’t put a link, like business cards or flyers. Go to https://www.facebook.com/username for instructions.

> Make posting a habit: Start by posting something every day if you can, and respond to any comments you get the same day. Remember, it’s a conversation, not a broadcast!

> Post a variety of content: The key to keeping your followers is posting a variety of interesting content, not just boring one-liners. Mix up sales promotions with other non-salesy material that a typical customer would enjoy like:

  • Photos and videos – a 2012 Hubspot study found that photos on Facebook generate 53% more likes than the average post. So have fun with images like pictures of your latest products, behind the scenes photos or inspiring images you’ve found (take care with copyright). You can use free online tools like Canva to create quality images with text on top.
  • News – new product in your store? Opening up in the real world? Let your followers know with a friendly news post.
  • Promotional offers – spread the word about a sale, discount or freebie.
  • Blog posts – post a link to new articles on your blog.
  • Harmless funnies – don’t be afraid to use humour. Posting a relatable funny can put a smile on someone’s face and make you more human.
  • Questions – want to know what your audience thinks? Ask them! Question posts are popular for attracting comments, and the feedback can be useful for product development or service improvements.
  • Tips – show the different ways to use your products.
  • A trending topic – if something in the news is relevant, just jump on that media bandwagon!
  • Other articles – link to articles from around the web that your audience may like.

You can discover which types of post are most popular with your audience in your Page Insights report, and do more of the same.

> Boost your posts: Facebook doesn’t guarantee all your posts will show in your followers feeds, so you can boost important ones by paying and hopefully reaching more people.

> Promote your Page on your Spiffy Store: Check your theme documentation for details on how to do this.

Pages are a useful way to build your online audience for free, but they aren’t the only way to promote your store on Facebook. In the next marketing post, we’ll look at using Facebook paid advertising to tell even more people about your cool stuff.

9 simple ways to earn backlinks to your store

link buildingInbound links (backlinks) are important to the success of your ecommerce site for two reasons:

1. They bring visitors to your site from all over the web, and

2. They help push you up search engine rankings

Search engines love links

Google has always considered backlinks when assessing web pages for search engine results. In their eyes, it’s a vote for your content; so it’s got to mean it’s pretty good and deserves to be promoted, right?

But over the years, link building has been abused and search engines have made it tougher to get the kind of links you need.

Gone, thankfully, are the days of buying masses of irrelevant links to get better search rankings (if you’re approached by a company saying they can get you lots of cheap links, run!). That just annoyed everyone.

Now, the quality and relevance of backlinks are more important than quantity. The ones you want should come from good quality, reputable websites.

Here are 9 ways you can get these precious links.

Earn them with your awesomeness

The preferred method.

1. Create interesting and useful pages on your website, packed full of information and images.
A frequently updated blog is great way to provide this kind of content. Read our post explaining how to write good quality posts. Make sure each blog post havs social media share buttons so it’s easily spread around.

2. Establish and build your social media presence.
Social media is one of the best ways to promote your awesome content (see above point) to attract more traffic and natural links.

As well as maintaining a profile on the obvious networks – Facebook, Twitter, LinkedIn, Google+, Pinterest and YouTube – explore others like StumbleUpon, Tumblr, Delicious and SlideShare and see how you can get involved with those audiences.

3. Reach out to popular bloggers in your niche.
Earning a mention on a popular blog can bring you instant results. If you have a unique product or piece of content you think their audience would like to hear about, offer to send it to the blogger to consider reviewing or promoting.

Search online for popular blogs whose audience may be interested in your products (use Alltop or google “xxx blogs”). Then send the blogger a short, friendly email introducing yourself and explaining why they’d be interested in featuring it (what’s in it for them). Don’t be salesy, be tempting and compelling!

4. Try guest blogging.
Writing unique content that’s published on other blogs is known as guest blogging. It takes more effort than blogger outreach, but can open more doors if your content’s really useful. Again, when you look for popular blogs to approach, ensure your ideas will be relevant to their audience.

Create them

Use with caution and remember the golden rule – quality and relevance. And don’t buy them. Ever.

5. Email your suppliers and business partners and ask if they’d be happy to mention you on their website and link back to your store.

6. List your store in relevant and reputable online directories
As I mentioned above, search engines got smart to the hundreds of poor quality backlinks coming from free directories and will downgrade or exclude sites that use this tactic. Only list in a handful of authority directories. Start with True local (AU), Yellow pages, Dmoz.org, Hotfrog and Yahoo! Directory Listings.

7. Look for opportunities to add your business to professional association websites.
They may have a member directory, for example.

8. Check backlinks to your competitors’ sites and see if they could work for you too.
It’s handy to know where your competitors are getting link love. There could be some goodies there you can go after. Type the website address you want to check in link checking tools like open site explorer. It can be an eye opener!

9. Sign up for alerts from online PR sites.
Journalists looking for sources for their stories often use sites like Sourcebottle to find them. Sign up for email alerts and keep an eye out for opportunities to promote your goods or your expertise.

OK. I think that’s given you enough to think about for now.

Building backlinks to increase traffic and impress search engine takes time but it’s worthwhile in the long run. Keep chipping away at it!

How to improve your store’s AdWords campaigns

success dialSo, you’ve got an AdWords campaign for your online store up and running. Good for you! If you’re anything like me, you’ll be checking in on the data frequently to see what’s happening to your hard earned marketing dollars.

Here are a few tips to help you get the best value out of your campaigns.

Bring important data together

Start off by getting as much performance information as possible.

> Connect your AdWords and Google Analytics accounts
By connecting these powerful tools, you can get a more complete picture of your online performance. Follow the steps on this Google help page to link the accounts.

> Add extra columns to your AdWords Keywords report
The ‘bid’, or price you’re willing to pay for a click, is a key element in determining your ad’s position. But it can be hard to know an appropriate amount. By adding the estimated first page and top page bid columns to your Keywords report, you can tell if your bid is enough for a good position.

On the Keywords report, click the Columns tab > Customize columns > Attributes, and add ‘Est. first page bid’ and ‘Est. top page bid’. These columns will then show in your Keywords report.

> Set up conversion tracking
Conversion tracking reveals which keywords and campaigns are bringing in business. It’s important for optimising your return on investment as it will show where your budget is likely to be more profitable.

Google have a comprehensive guide to help you set up conversion tracking.

Understand Quality Score and why it’s important

Google uses a calculation called Quality Score to help decide when and where your ads show up in search results. It’s based on the quality (relevance) of your ads, keywords and landing page (where you send the visitor when they click each ad).

Quality Score is ranked 1 to 10. The higher the Quality Score, the more likely the ad will get a higher position in the search results and a lower CPC. You should aim to get the highest Quality Score you can by tweaking and improving your ads, keywords and landing pages.

Improve your keyword performance

1. Make sure your keyword bids are competitive. The new columns ‘Est. first page bid’ and ‘Est. top page bid’ you’ve added will show the estimated cost of a good ad position. If your bid is way below the amount needed, you can adjust it.

2. Remove any underperforming keywords (leaving them in will reduce your campaign performance).

  • If a keyword hasn’t triggered any ad impressions after a couple of weeks, and its Quality Score and bid are OK, think about removing it. There may not be enough people searching on that term.
  • If a keyword hasn’t produced any click throughs after a month, pause or remove it.
  • If a keyword is getting clicks but these are not converting, think about lowering the bid as it’s eating away at your budget. If you’re not seeing a positive return on investment (sales) after around 200 clicks, it’s time to consider removing the keyword.
  • If you see a keyword that’s converting well, you could add more budget to it to get more impressions.

Repeat keyword housekeeping regularly to keep your campaigns in top shape!

3. Use keyword matching to increase ad relevance

I’ve written about the importance of relevance in the search world many times. Keyword matching is an easy way to increase relevance by ‘tagging’ your keywords for broad, phrase, exact and negative match varieties.

Broad match is the default and has no specific tags around the keyword. Broad match means your ad can be triggered if the search term contains your keywords in any order, including additional words. For example, if your keyword is gold jewellery your ad may show for the search term buy gold men’s jewellery Sydney.

Using phrase match (putting your keyword in speech marks – “xxx”) means your ad only shows if your keywords appear together in the right order in a search query. For example, your keyword gold jewellery” only triggers your ad for a search like men’s gold jewellery, but not gold and diamond jewellery.

Exact match (putting your keyword in square brackets – [xxx]) is the most precise tagging. Using it means your ads only appear when someone searches for your exact keyword as it stands, without any other words in the search. For example, your keyword [gold jewellery] only triggers your ad for the search gold jewellery.

The other important match type for any AdWords campaign is negative match (putting a minus sign ‘–‘ in front of a keyword). This means your ad won’t show if a search term contains the negative keyword. It’s a useful way to prevent paying for irrelevant clicks.

Using keyword matching will affect number of times your ad shows for that keyword. Exact match keywords will trigger ads less times than broad match but the query is likely to be more relevant for you. If you’re getting too many irrelevant queries on your broad match keywords, you can change the match type and tighten it up.

4. Check which search terms are triggering your ads. To find out the actual search terms used by the people clicking on your ads, go to ‘Keywords > Details > SEARCH TERMS > All’. If you’re getting clicks from searches that don’t apply to your business, make them negative keywords.

Improve your ad performance

Make sure your ads are as enticing as possible with these tips: 

1. Use the keyword you’re targeting in the ad headline. You can do this automatically with dynamic keyword insertion.

Dynamic keyword insertion

This nifty little piece of code will insert the keyword that triggered the ad into your ad text. It can make your ads more relevant to the search and can improve the click through rate.

You can add the code anywhere in your ad – the headline, descriptions, URLs – as many times as you want, but be careful not to overdo it. Your ad still needs to make sense or you could turn people away!

When you use dynamic keyword insertion, check that all of the keywords in your ad group make sense where you’re going to display them in the ad, and the landing page is still relevant to those variations. This is especially important in ecommerce sites where your ad may point to a very specific product page.

The code you’ll need is: {keyword:default text} 

Replace ‘default text’ with words you’d like to appear when a keyword can’t be dynamically inserted. Make sure your keywords are short enough to keep your ad within the character limits. If not, the ad’s default text will be used instead.

Try one keyword insertion ad in each ad group, and set the default text that’s relevant to the theme.

2. Use Title Case Capitalisation (Used in this Sentence) Throughout your Headline and Body Copy to Help your Ad Stand Out.

3. Use a call to action like “Find out how” or “Get in touch” in your ad copy to make it obvious what you want the reader to do next.

4. Try including a couple of key selling points like prices, discounts, product names or free shipping.

5. Add ad extensions. It doesn’t cost anything to add extra information to your ad in the form of ad extensions, and it helps you stand out. As an online store owner, product extensions can be helpful. Find out more on the Google AdWords support site.

6. Create a display URL (web page address) that’s short, simple and contains your keyword. You can make the display url that shows in your ad different to the actual page url, as long as they’re both on the same domain. For example you could make the display url for the landing page “www.mystore.com.au/collections/gold-jewellery/products/wedding-rings” into “www.mystore.com.au/wedding-rings”. Google will show up to 35 characters in the ad.

7. Create three or four different ads for each ad group to see which messages and calls to action get the best results.

When you want to make changes to an ad, create a new ad rather than edit the exiting one, as you’ll loose the old ad’s data. Just pause the ones you’re replacing.

Improve your landing page

If you’re getting clicks on your ads, but a high bounce rate on your landing page and little or no conversions, your visitors might not be seeing what they expected when they clicked through.

Make sure there’s a logical connection between the wording in your ads and the landing page. Match the messages and copy and repeat any offers you mention in the ad on the landing page. The best way to make this obvious is to use the same wording in the landing page headlines and subheadings.

I hope that helps! It may look a bit daunting, but once you’ve used AdWords a few times, it’ll become second nature. Remember that your AdWords performance will need monitoring and optimising regularly.

How to set up Google AdWords to get more traffic to your online store

getting-traffic-to-your-storeOne of the quickest and easiest ways to get traffic to your online store is through paid ads on search engines like Google. It’s great for bringing people to your site when you first launch.

But wait, I hear you say, why pay when I can get listed in search engine results for free?

OK. Here’s a quick recap on the difference between the two types of search engine results listings.

Organic (free) listing

Appearing for free in search engine results is known as an organic listing. You can’t buy the placement – it’s made by the search engine based on its assessment of the content on your web page and its relevance to the search term. It looks at about 200 factors to help it make that decision.

Paid listing

Paying for a listing in search engine results is known as Search Engine Marketing (SEM) or pay-per-click (PPC) advertising.

These ad listings show up in the top positions on the first page of search results, and in a column down the right hand side. They look very similar to other listings, but they’re labelled ‘ads’ or ’sponsored links’. And if you look closely, you’ll see they read a little differently. AdWords is Google’s paid advertising program.

It doesn’t cost anything for your ad to show, but you’ll be charged a small amount when your ad is clicked on. The charge varies depending on the relevance of your ad and web page to the search term, and how much you’ve offered to pay for that click.

Why would you pay?

Well, put simply, it can be hard to get in the top search results otherwise.

The algorithms that calculate the position a web page is given in the free search results are highly complex. Trying to get a high ranking can take a lot of time, effort and specialist knowledge and you’ll be competing with countless other businesses trying to do the same.

And when the algorithms are updated (which happens a lot), you can find your page rankings change overnight.

Google AdWords gives your web page a much better chance to appear on the first page results for your chosen keywords, and you can do it really quickly.

Ready to give it a go? Here’s how to get started

Don’t be tempted to rush in to creating your ads before you’ve done steps 1 and 2. They’re crucial!

1. Get into your customers heads

Before you create your first campaign, write down everything you know about your customers. It’ll help you create better campaigns if you’re seeing your offerings from their perspective.

Who are they? What would they type into the Google search box to if they were looking for products like yours? Where do they live?

2. Draw up a list of keywords related to your business and products

Make a list of the search terms you’d expect your customers to use to find your products. These are your keywords.

Don’t be too general in your choice. A one-word term is usually expensive for a click because it’s so generic and popular, and you can end up paying for traffic that’s looking for something you may not stock.

Aim for keywords of two or three words, and include brand names, colours, and your location. A jewellery store keyword list might include high-level keywords like “gold jewellery”, as well as more specific categories like “gold and diamond wedding rings”. As a rule, the more specific the keywords, the closer the visitor is likely to be to buying as they’ve already narrowed down their choices.

Your web analytics software might give you some insights into the terms people are already using to find your web pages. This is not as easy as it was though, as the most common web analytics tool, Google Analytics, has stopped sharing that information. Grrr.

3. Set up your AdWords account

Now you’ve done your homework, head over to https://adwords.google.com and follow the instructions to set up your AdWords account.

If you’ve already got a Google account (like Gmail), you can use that email address and password to sign in. You can also create a separate account if you’d prefer to keep your business and personal activities separate.

4. Set up your first AdWords campaign

Once you’ve signed up and verified your email, you’ll be taken to the “Your first campaign” page.

It’s important to know your goal for the campaign before you start so you can tell if it’s effective. Generating sales is probably the main goal for an online store, but you can use AdWords to bring in just leads or traffic too.

Each AdWords campaign has its own settings that let you define the budget and where want your ads to appear. These settings will apply to all ads within the same campaign.

It’s very easy to set up a campaign – just fill in the fields displayed:

Set-up-campaign-AdWords

Your budget – this is the most you’re willing to pay per day for traffic to the ads in this campaign. You can change it at any time if you find you’re not getting the results you want.

Locations – these are the geographical places where you want your ads to display.

Networks – these are the online networks where you want your ads to show; Search Network is the default but you can also choose Display Network to have your ad show on Google partner websites too.

Keywords – This is where you list the keywords you want to use to bring traffic to your ads. This field will be pre-filled with suggestions and their approximate search volumes but you can delete the ones you don’t want and add your own. Don’t go mad here, use around 10-20 keywords per campaign to keep it manageable.

Bid – this is the most you want to pay for a click on your ad. You can set your bids for a click manually, or let AdWords do it. When you’re starting out, it may be easier to let AdWords do it for you. If you choose the manual option, enter a default bid as well. This will be the most you want to pay for a click.

Write your ad – this is where you put together your AdWords text ad. There are other types of ad you can make but this is the easiest and most popular.

  • Landing page: this is the actual web page the visitor will land on when they click the ad.
  • Headline: 25 character limit. The headline should be highly relevant to the search query you’re expecting for this ad.
  • Line 1: 35 character limit. Mention your unique value or problem you solve here.
  • Line 2: 35 characters. Continue, and add a call to action here to encourage a click.

Here’s an example of one of our Spiffy Stores text ads.

spiffy-adwords-ad

A word about: relevance

Relevance is the currency of search. It’s the most important aspect of your ads. Clear, persuasive ad text, that’s highly relevant to your keywords and the content of the page it leads to, will get better results. And as AdWords uses both quality (relevance) and bid ($) to determine your ad’s position, you can get a higher position, sometimes at a lower price, with highly relevant keywords and ads.

5. Complete your payment details

As this is your first AdWords campaign, you’ll need to fill out your payment information. Then, once your ad is approved (yes, it has to go through Google’s approval scheme), it will be active. You can ‘deactivate’ it by pausing the ad and it won’t show up in search results.

6. Keep an eye on your AdWords results

AdWords is not a set and forget exercise.

To get the most out of it and not waste money, you’ll need to keep coming back to analyse the results and make any changes that will improve your ads performance. More on how to do that later.

In the second post in this series, we’ll look into some of the ways you can optimise your ad. Stay tuned!

How to handle customer complaints on social media

how-to-handle-customer-complaints-on-social-media
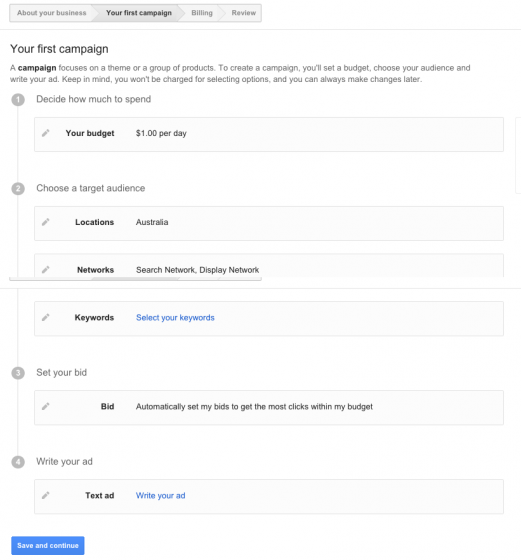
It’s inevitable in business. Now and again you’re going to do something that annoys a customer and they’ll want to complain about it.

Dissatisfied customers used to pick up the phone or pen you a stern letter to air their grievances. But now it’s easier, and perhaps more satisfying for them, to jump onto social media and give your business a good ear bashing in full public view.

It’s like your dirty laundry hanging out for the world to see.

Fret not! You can take steps to improve the situation. Here are some suggestions for dealing with those unmentionables.

DO…

DO keep your virtual ears open for signs of discontent

Monitoring what’s being said about your business online will give you valuable insights in general, but it will also alert you to customer issues that need addressing.

Check your social networks for new comments every day and sign up for free tools like Google Alerts and Social Mention so you watch for conversations across the wider web.

DO keep any negativity in perspective

People are more likely to shout out when they’re unhappy than when everything is just fine. See a negative review or comment as an opportunity to improve and impress.

DO respond quickly

As soon as you’re aware of a problem, jump in and respond. The longer you leave it, the more disillusioned the individual may grow as they feel you’re not listening to them.

DO take action

Unhappy customers don’t just want an apology – they want to know how you’re going to fix their problem. If you’ve mucked up, apologise sincerely and explain what you are going to do to rectify the situation. Show them you’re human and show you care.

If the complaint is a misconception, reply with polite but factual information.

DO take the conversation offline if you need to

Once you have publicly acknowledged the feedback, take angry or aggressive customers away from the public forum and resolve their issues by phone or email directly. You can return to the public forum once the issue is resolved to post a friendly follow up.

DON’T…

DON’T ignore or delete negative comments

You’ll infuriate an unhappy customer if you ignore or delete their feedback and this can lead to further aggravated remarks. Reply to negative comments openly and respectfully and only delete comments if they are actually offensive or illegal.

DON’T get emotional

Whilst it’s natural to feel defensive when your business is under attack, put your emotions aside whilst you deal with the complaint. Try to understand that your customer is just disappointed because you didn’t meet their expectations in some way.

DON’T keep your strategy for handling complaints to yourself

Make sure any of your staff that may be exposed to negative comments about your business understands how you want them handled.

Overall, focus on giving your customers a great experience. Lessen the likelihood of negative feedback by always putting the customer first. After all, prevention is better than cure!

Store of the moment: Aromatix

aromatix-online-store

Spurred by the birth of her first baby, Aromatix owner Amanda set out on a mission to find truly pure and natural products for her family from local suppliers. She even studied beauty and skincare in her journey to find solutions that reduced exposure to potentially harmful ingredients.

Amanda has scoured the length and breadth of the country to bring you Australian natural & organic products to delight your body, mind and home. And she knows you’re going to love them as much as she does.

Many of them are based on the principles of Aromatherapy, which means they are not only good for you but they smell great too!

Check out her Spiffy Store at www.aromatix.com.au

Vintage: a fully responsive theme from Spiffy Stores

We’re proud and delighted to announce we’ve given birth to a new theme for Spiffy Stores. And it’s a cracker!

Vintage-theme-devices
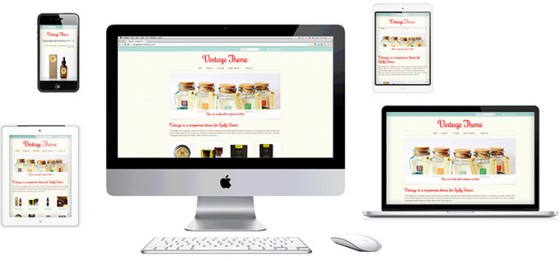
Vintage, our most flexible theme yet, is a fully responsive design. The layout will automatically adapt to the screen size it’s viewed on, whether that’s a smart phone, a tablet or a laptop. In fact, it will always look its best on any screen width from 320 pixels to over 2500.

The Vintage theme gives you 6 elegant styles to choose from: Cupcakes, Fresh Linen, Natural, Vintage Velvet, Mellow Yellow, plus a bonus “Not So Vintage” style.  You can re-colour each of these styles to get it looking exactly how you want too!

And we’ve included a bucket load of customisable features such as…

  • 4 levels of drop-down menus so you can make really specific product categories
  • Cool 5-image homepage slideshow, with 3 different transitions, captions and links, so you can tailor each one to a different message
  • 24 funky heading typefaces and unlimited colour schemes so you can style it just the way you like it
  • Customisable product pages with custom product fields, dynamic image zoom and related product up-sells
  • Display featured collections on your home page with support for collection images (new feature!).
  • Featured collection pages with support for collection images (new feature!) so you can show off your different product categories on one page.
  • Social media integration to grow your audience on your Facebook, Google +, Twitter, Pinterest, Instagram, Flickr, YouTube and LinkedIn pages
  • Newsletter integration with MailChimp, Campaign Monitor or Mad Mimi so you can sign up visitors to your email list through our simple form.
  • Built-in icons for payment methods like PayPal, Visa, MasterCard, AMEX, and Bank Deposit.
  • Matching checkout styles with your logo and colours.

Sound good? Why not take a look around this baby in the Vintage theme demo store we’re building. While you’re there, try clicking and dragging the bottom right corner of your browser window in and out. You’ll see the seamless and dynamic resize in action!

If you want to apply the Vintage theme to your store, just navigate to the “Design & Assets > Theme gallery” section of your Toolbox and update your templates with one click. Don’t forget to save your current theme by downloading it first so you can restore it later if you’d prefer to use it instead.

Instructions on how to make changes to the Vintage theme to get it to suit you perfectly, along with previews of the different built-in styles and fonts can be found in the Vintage theme guide in our Knowledge Base.

4 new payment gateways supported by Spiffy Stores

ecommerce payment gatewayDon’t say we don’t spoil you!

We’ve connected up 4 extra payment gateways to give you even more choices for processing credit card payments.

You can now add the following gateways to your online store. Yay!

Pin Payments – Australia’s first all-in-one online payment system. You don’t even need a merchant account to make use of their solution. You’re up and running right away.

Merchant Warrior – An Australian–based payment gateway that caters for all sizes of business from SME to the big end of town.

SwipeHQ Checkout – New Zealand-based SwipeHQ payment gateway also allows you to send invoices with credit card payment links, create ‘buy now’ buttons and run MOTO transactions.

… and already supported, but now available in Australia…

Braintree – An all-in-one platform from the US that provides a merchant account, payment gateway, recurring billing and credit card storage in the one spot.

You can select these providers, and many others, in your store Toolbox, under “Preferences > Checkout & Payment”.

More information about payment gateways compatible with Spiffy Stores can be found in our knowledge base.