Grab some YouTube action for your online store

man watching video wallHere’s something that may surprise you. YouTube is the second most popular search engine after the almighty Google. It gets more than 1 billion visitors a month looking for news, entertainment and answers.

If you want to create attention for your store and show off the cool things you sell, putting short videos on YouTube can open up a whole new audience for you.

It’s also worth mentioning that Google owns YouTube. You do the maths!

Setting up a business presence on YouTube

If you already have a Google account (ie: you use any of Google’s products like Gmail, AdWords or Google+), use those log in details to sign in at www.youtube.com.

If you don’t have a Google account, go to YouTube and click ‘Sign in’ on the top right of the page. Click ‘Create Account’ and fill in the required information.

Once you’re signed in, you’re free to watch the videos, but you need to create a ‘channel’ (like a profile page) to be able to load your own.

NB: YouTube accounts are linked to a Google+ page. If you don’t already have a Google+ page as you set up your channel, it’s going to make one for you! Don’t worry, I’ve got a great post about using Google+ to promote your business too.

Create your YouTube business channel

These steps apply to desktop or laptop users, using a browser. Some of the options are different for mobile/app users.

Once you’re signed into YouTube, click on the profile image top right, and then on the cog next to the ‘Creator Studio’ button in the drop down box. This will take you to an ‘overview’ page.

On the overview page, click through the ‘Create a channel’ link next to your email address. On the following screen, click ‘To use a business or other name, click here’. If you have a Google+ business page, you’ll see this as a channel option on the following page. If not click the ‘Create a new channel’ button to make a new one.

Now you have a new channel and you’re ready to make yourself at home!

Customise your channel for your brand

Just like other social media profiles, you can customise the content of your YouTube channel to reflect your business and brand personality.

Your main channel page contains a number of menu items including ‘Home’ and ‘About’. If you can’t see them, click on the ‘My Channel’ menu item to the left of your screen.

Your small square channel icon feeds in from your Google+ page (you need to go there to change it) but you can add a big image as your channel header. Colourful images are great for attracting the eye so use it to show off your product ranges or another image that supports your brand.

To make changes to the channel header area, hover over the cover photo area to reveal the pencil icon to the right. Click on it to change the image, or add links to your website and any other social media accounts you have.

You can also add ‘Featured channels’ you like in the box to the right.

Next, head over to the ‘About’ tab and write an interesting description for your users in the ‘Channel description’ box. It will take up to 1,000 characters.

Upload your videos

YouTube lets you upload videos in any of the following file formats: .MOV, .MPEG4, .MP4, .AVI, .WMV, .MPEGPS, .FLV, .3GPP, .WebM. If you want to change the default settings for the videos you load, go to your ‘Video manager’, click ‘Channel settings’ and then ‘Default’.

To load a video onto your channel, click the ‘Upload’ button at the top of the page and browse for the file you want to upload. You can even create videos here!

To make the most of web searches, use appropriate keywords in the title and description of your video and use the tags facility.

When you’ve chosen your video, select the privacy setting and hit ‘Publish’, ‘Done’ or ‘Share’ (it’s different for each privacy setting) to send it to your live channel.

To learn more about making video for your business, check out my last post.

Promote your YouTube presence

Your hard work’s not over yet! To get the most attention to your new channel, add a link to it on your Spiffy Store, in your newsletters and other social networks you play in. And keep making those videos!


Want your store to stand out? Start making videos!

video playerEven with a unique product and an enticing web store full of tempting goodies, you still need that little bit extra to stand out online.

Video is fast becoming the favourite way to add that extra bit of personality to a business and help increase sales. Search engines like Google rate web pages with video highly, so they can also bring you more search traffic.

Without too much effort, you can harness its power for your online store. Yes you can.

Why does video make a difference?

The education industry has known for a long time that audio-visual materials help you understand content better than just words on page. It’s just the way our brains are wired. Video stimulates the visual learning part of the brain, making it easier to soak up information. And with our subconscious love of storytelling, video is a great way to get your message into people’s minds.

If you’re still not convinced, here are some more figures that might interest you!

> Shoppers who view video are almost twice as likely to purchase than those who don’t

> Retailers cite 40% increases in purchases as a result of video

> 71% of consumers say that video is the best way to bring product features to life

> Video has been seen to help attract two to three times as many monthly web visitors and increase organic traffic from search engines by 157%

> A web page with video is 53 times more likely to come up in the first page of a Google search, compared with a text-only web page with the same content

Excited by the possibilities for your business now? Thought so.

Let’s look at some of the cool stuff you can create in a video format.

Live action or animation?

Video doesn’t mean just live action filming in real life. You can create an animation like a cartoon to get your point across too. It’s very effective!

Which one you choose will depend on the purpose of your video, the audience and the content. If you’re showcasing your products, you’d choose live action. If you want to explain a concept or tell an entertaining story, animation is an entertaining way to go.

A third style of video is a screencast, you can see an example of that as the Feature Tour video on the Spiffy Stores homepage (yes, that’s me in the voiceover!) Unless you’re making a tutorial of an online process, you’re unlikely to use it much, so I’ve not covered it in this article.

Where to start

A professional video made from scratch can cost thousands of dollars, so why not make one yourself? There are heaps of tools now available for hardly any extra cost (you already have a camera in your smart phone for a start), so it’s well within anyone’s reach. Turning your hand to it can be lots of fun and you’ll learn a lot!

And once you’ve made it, you’ll have a valuable piece of marketing material you can use as long as you want.

Here are 10 steps to get you started.

  1. Set your goals

As in all things marketing, decide on the goal for your video. Why are you making it and what effect do you want to have on the viewer? Keep it clear and simple. Once you have the outcome you want in mind, you’ll be able to focus the content more effectively.

  1. Define your audience

Who are your target audience for the video? A broad range, or a specific group of people?

  1. Brainstorm ideas

With your goals and audience in mind, jot down lots of ideas for the video. You could:

  • Create an entertaining introduction to your business, showing what you do and why it’s important/unique
  • Sit in front of a camera and talk about your blog subject instead of writing about it
  • Show off new products you’ve just received
  • Take your viewers on a sneak peek behind the scenes of your business
  • Announce a special sale or promotion
  • Answer a customer question you’re often asked
  • Demonstrate the various features of your products in video product guides
  • Create a ‘how to’ tutorials. If you sell scarves, for example, a short video showing the different ways to tie them would be really useful!

You could even ask happy customers if they would mind making a video testimonial (get written permission from them to use it online).

  1. Write the script

Whether you’re producing live action, a screencast or an animation, most videos need a script.

The key to this type of writing is to be conversational and write like you talk. As a guideline, 150 words will take about 1 minute to speak (you need to speak a bit slower for video). Get someone to read it back to you once you’re done to make sure it sounds OK and it’s the right length.

As attention spans online are short, try keeping your video under 2 minutes long. If you’re preparing a tutorial or video blog though, you may need to go longer.

  1. Create the storyboard

Unless you’re intending to just sit in front of the camera and talk, you’ll probably have a story running through your mind as you write your script. Once you’ve got the script down, turn that ‘mind movie’ into a storyboard to map out how the audio and the visual will come together. It doesn’t have to be fancy; I make mine as a two-column chart in Word – script to the left, matching screen action on the right.

  1. Create the video – Live action

Recording

If you don’t have a video camera, your smart phone or even your laptop is a good substitute. If you’re using a camera or smartphone to record you talking to the camera, you’ll need a tripod to keep it steady.

Make sure you have decent lighting for your filming, the more natural the better. If you’re filming a ‘talking head’, keep the light source coming from the front (like a window) and watch out for shadows. If you want to be really polished, use an external microphone to get better sound.

If you make a mistake, just record it again – you can edit the goof out in the next stage.

Wistia have a great library of short video tutorials that go into more detail. I recommend a look.

Editing

Once you’ve created your video footage, you’ll need to edit it to get rid of any mistakes and add things like music or titles. Download your video to your laptop or desktop (if it isn’t on it already) and you’re ready to begin the edit.

Both Apple and Microsoft offer free video editing software for your desktop or laptop. If you use a PC, it’s Windows Movie Maker, if you’re on a Mac, it’s iMovie.

If you want to edit online, there are plenty of options, like WeVideo or Wideo.

Whatever your choice, make sure you check the video format you export when it’s finished works with the hosting platform where you’ll keep it (see below).

  1. Create the video – animation

If you’re after an animation, there are a growing number of online animation tools that makes it really simple to create your own cartoons. Check out the fun stuff you can do at GoAnimate, PowToon and Wideo.

  1. Hosting

Your fabulous video is going to need to live somewhere that’s Internet accessible. From a quality and control aspect, use a video hosting platform like Wistia or Vimeo. They both have several pricing options, including a free plan. Some online video editors also offer hosting as part of the package.

From a search engine and traffic perspective, it’s a good idea to also load your video on YouTube too.

  1. Put the video on your website

Once you’ve made your video and loaded it onto a hosting platform, put it into a page on your website. You can easily copy ‘embed’ code from the hosting platform and paste it straight into the editor of your Spiffy Store web page where you want the video to appear.

  1. Get the word out

Once you’ve got the video on your website, you’re ready to promote it! Post the web page link on your social media channels and let your email subscribers know it’s arrived.

Go on, have a crack at it. Let your inner Spielberg or Disney shine!

(statistical sources: Invodo, Multichannel Merchant, MarketingSherpa, Forrester Research)


Customer accounts now available

customer-accounts-now-availableNew feature! And it’s free!

We have been working on major improvements, and we’re delighted to announce that we now have full customer login and management available in all stores. This update includes the following features…

  • Make customer accounts optional or required.
  • Apply credits to your customer’s accounts, so they can purchase using their store credit.
  • Enable wholesale prices for specific customers.
  • Customisable search filtering of your customers for easy management.
  • Group your customers using tags for easier management.
  • Create shopping cart-based discounts using customer tags to give your special customers a discount… without having to remember a coupon code.
  • Customers can log in using their email address & password, or skip the hassle of remembering a password and log in the easy way with social login using Facebook or Google.
  • Full mobile compatibility in responsive themes.
  • Customer login allows the customer to view the order history and fulfilment status of their orders, update address details and any account credit.

Whilst the new features are awesome, this update does require that you update your theme to support the new customer functionality.

We have added several new templates to our themes to provide the new customer functionality. The first themes to receive the updates are the Vintage, Minimal, Georgia, Antiqua and Fresh themes. New versions of these themes are now available in the Theme Gallery section of your store. You’ll need to download a backup of your current theme before applying the new theme to your store.

Once you have updated your theme, it’s likely that you’ll need to update your settings in your theme editor. We have a guide below on what has changed in each theme so you can be better prepared for the update. If the version of your theme is quite old, you might find that there are also some nice surprises!

Continue reading

10 ways to promote your store using LinkedIn

You might not think it, but there are plenty of ways to promote your online store using the professional network, LinkedIn. Here’s 10 for you!

1. Set up a Company PageLinked Laptops

Just as you can create a personal LinkedIn profile to showcase yourself, you can do the same for your business. They’re called Company Pages and they provide you with a free and easy way to promote your store online.

Before you can set up a Company Page, you need to have your own personal LinkedIn page (if you don’t yet have one, head over to my previous post on LinkedIn profiles for some tips on getting started).

It’s quite easy to launch a Company Page, but there are a few requirements you need to meet before you can go ahead, so read through those first or you may quickly get frustrated!

When you’re ready, here’s how to make it happen. Continue reading

A simple guide to Twitter for online retailers

Birds tweeting

Let me introduce you to Twitter, the social network where a little goes a long way.

According to one of their recent studies, 60% of the respondents had bought from a small business because of Twitter.

It’s certainly an opportunity to be considered.

Set up a free account

Just like any other social network, you’ll need to set up an account profile.

Head over to www.twitter.com to start.

As you go through the sign up process, you’ll be asked to create a username or ‘handle’ (@xxxxxx) of 15 characters or less. This is the name you’ll be known as on Twitter, so use your business name or a version of it if the exact name isn’t available.

Add your logo as your profile photo, a 160 character ‘bio’ and header image to reflect your business’s personality, and your website url. If you’re on other social media channels, your profiles should all say a similar thing to keep your brand consistent.

Ready for action? Start following!

Start your Twitter action by following a bunch of accounts that post information that would be useful to you and your customers. Their tweets will then appear in your own feed. You can also follow your competitors and keep an eye on their activities.

You can find them using the search box on the top right of your twitter profile. The basic search function here is fairly generic and brings up a wide range of results so I like to use Advanced Search https://twitter.com/search-advanced (you can also find this on the left hand panel once you’ve performed a regular search). This will give you a more targeted search. It’s also a nice way to find things to pass along.

What to do with 140 characters or less

Twitter only allows you to post a maximum of 140 characters, so you’ll need to get to the point pretty quickly!

With some high level marketing objectives in mind, like driving traffic to your website, growing your reach and creating leads, you can dive straight in and start posting. Hit the blue ‘tweet’ button in the top right corner of your Twitter page to begin.

Here are some of the things you can do with a tweet, but in general, as long as you behave like a human being, not a business or a brand, you’ll win friends.

> Point to some interesting content you’ve found on the web. Because of it’s brevity, Twitter is mostly used to post links to interesting content, yours or elsewhere on the web. Start with a tempting sentence to encourage a click and follow it with the url of the content.

> Retweet interesting tweets you find. Hit the ‘turn left’ symbol below a juicy tweet and it will appear in your followers’ feeds.

> Reply to other tweets. Start a conversation by hitting the ‘loop’ symbol below a tweet and type a reply. This conversation only appears in the feeds of people who follow you both, but there’s a neat trick to get all your followers to see it. Put a full stop (.) in front of the @handle of the person you’re replying to.

> Tweet a question. Do you want to know what your followers think about your products? Ask them! They may give you ideas for new stock, for example.

> Tweet a promotion. Do you have a sale coming up or new stock in? Use a tweet to promote it to your followers and include an image. Don’t do it too often though. Followers like information and too frequent promotions will make you come across as pushing sales.

> Offer a quick tip. Share a nugget of advice with your followers. Perhaps a cool way to use your products.

To increase your chances of being found, use a # (hashtag) in front of a relevant term, like #shirts, or #kitchen. Keep it down to one or two per tweet – too many and it gets confusing!

When you need privacy, send a Direct Message

If you want a private exchange with another follower, use a Direct Message instead of a tweet. You can only send and receive Direct Messages with someone who is following you, and visa versa.

Twitter is the new customer service tool

In addition to building a sense of community around a brand, Twitter is fast becoming a popular customer service tool for businesses.

If they’re already on Twitter, people will often use the network to ‘talk’ directly to a company rather than use the phone or email. As a business owner, this is both good news (It’s quick and inexpensive to use) and bad news (complaints are in public view). But ignore it at your peril!

If you’re not sure how to manage this kind of activity in the public domain, read my post on handling complaints on social media. It’s full of tips.

Paying to advertise on Twitter

Just like the other major social networks, Twitter offers business users paid advertising so you can get in front more people. Here are a few examples.

twitter ad example

Twitter ad example 2

Twitter Ads campaigns are focused on a marketing goal, like getting more followers or website visits.

The ads are based on a pay-per-action model, so you’ll only pay when someone interacts with the ad, not for just for displaying it. And because you can target the audience very tightly, there’s less budget wastage.

The easy-to-use set up tool walks you through the process from ad creation to selecting the audience and budget so you can be up and running in no time. The Twitter Campaigns dashboard will show you how your ads are performing so you can make any necessary adjustments like increasing the budget if you’re seeing the results you want.

I’ve only scratched the surface of Twitter Ads here. Visit their business website to discover more and sign up to play.

Now you’re up and running, don’t forget to add a Twitter follow icon, linking to your account, to your Spiffy store, and put a link in your email signature for good measure!

Get the most out of LinkedIn to support your online business

Linking-networkIf you think LinkedIn is only the domain of corporate climbers like sales reps and CEOs, think again!

The world’s most popular professional online network is useful for everyone in business, from online retailers and software developers to nannies and gardeners.

Use it to connect with suppliers and potential business partners, develop new business and grow your own brand. You can even publish your own articles.

And it’s free. So let’s get cracking.

Set up your personal profile

If you haven’t created a LinkedIn personal profile yet, your first step is to visit www.linkedin.com and make one. Grab a few materials to help you with this, like your CV and a decent photo, and follow the simple step-by-step instructions.

Here are a few tips:

  • Use your headline to describe what you do. You can be creative if you work for yourself, so if you want to be “head honcho” then go ahead.
  • Upload a smiley professional photo. You don’t need to pay for a formal shot, but make sure the one you choose reflects you as a trustworthy professional, not a surfer girl or party boy (unless that’s your brand!).
  • Fill in as many fields you can on your profile. You don’t need to list everything you’ve ever done, but do be proud of your achievements! Include as much information as possible about your business as well to ensure people using LinkedIn to search for information can find you.
  • Write about yourself in the first person, not the third (ie: use I, not “Clare”) and don’t be stuffy or officious-sounding. Write how you talk and let your personality shine through.
  • Use the words and phrases you’d like to be found for online, like your products and your store’s name.
  • Check your account privacy and settings to control the finer details of your LinkedIn account, like who sees what. Roll over your tiny photo, top right, and choose “Privacy and Settings”.

Connect with other professionals on LinkedIn

Connections are the key to success on LinkedIn. When you’re set up, invite other professionals you know to join your network.

LinkedIn makes it easy to do so with an automated tool during the set up process. Once you’ve done that, you can search for other suppliers and business partners to connect with using the search bar.

Ramp up your LinkedIn presence

There’s so much more you can do than just list your professional history on your profile page and build your connections.

Try these next activities on a regular basis to help raise your profile.

  • Like, share and comment on interesting content that drops into your newsfeed from your connections and the companies and groups you follow.
  • Ask connections you’ve worked in the past, like employers, clients and suppliers, for a recommendation of your business skills to display on your profile. You can easily do this via a simple request form you’ll find under “Privacy and Settings > Profile > Manage Recommendations”. It’s helpful to give out recommendations where you can, even if you’re not asked first.
  • Follow companies you’re interested in and their LinkedIn posts will show up in your newsfeed. It’s a great way to keep an eye on your competitors! Find companies to follow using the search bar at the top of your LinkedIn page.
  • Join LinkedIn Groups to expose yourself to conversations in your niche. Look for existing groups that interest you and join them to contribute ideas, answer questions and post your own. Search for groups to join under “Interests > Groups” and click the blue “find a group” button.
  • Find and follow influential LinkedIn users in the Pulse section of your profile. You’ll find their posts under “Interests > Pulse”

Get into a routine of checking your LinkedIn account often and growing your connections. It could lead to new business, suppliers or referrals. Next up, I’ll look at how to launch a LinkedIn Business page. Stay tuned!

Next up, I’ll look at how to launch a LinkedIn Business page. Stay tuned!

Reach more people on Facebook with Facebook ads

Facebook-audience
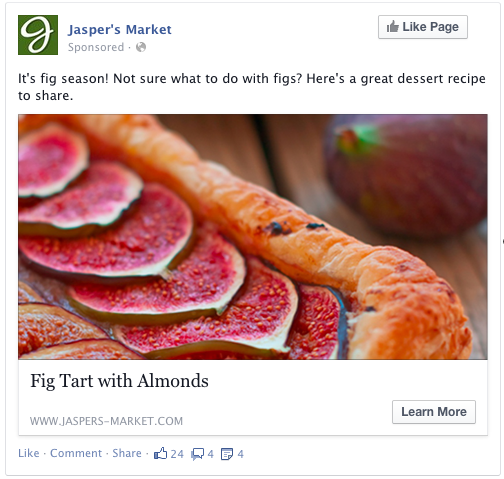
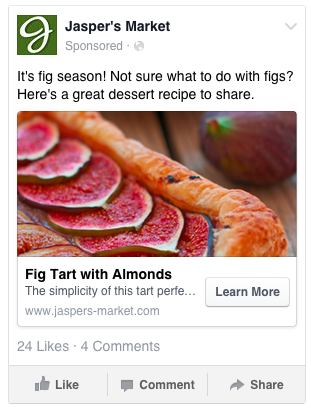
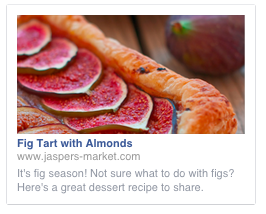
Having a free Facebook Page for your store is a great start to growing your online community, but it doesn’t guarantee that everything you post will get in front of everyone that likes and follows you.

If you want to reach more people on Facebook, you can back up the free activity you’re enjoying on your Page with paid Facebook ads.

These ads are charged on an impression basis, not per click like Google AdWords, so you’ll pay every time your ad appears to someone. Your message can be super-targeted though, so you only be reaching the kind of people you really want.

Get your strategy worked out before you begin

Before you leap into creating ads, you’ll need a campaign strategy. Answer these key questions to focus your campaign and help you get better results.

Why are you creating this campaign? Are you after more likes on your Page? More sales on your website? Be sure of your goal as it’ll shape the whole campaign. Boosting sales on your website can be a good objective for online retailers.

What are you going to promote? Based on your campaign goals, choose what you’re going to promote. Is it a specific product or category of products, or a will it be a post, your latest offer, or an event?

Who do you want to see your ads? Facebook ads can be ultra-targeted, so decide on the characteristics of the person you want exposed to your ad. What type of people do you think would respond best?

When are you going to advertise, and for how long?

Once you’ve worked out your campaign strategy, you can get to work on your ads!

The three types of ads available to you

Facebook currently has three different ad formats. The images are from Facebook’s handy ads guide.

  1. Post ads for the desktop news feed

Facebook-desktop-ad

This large ad appears as a post in someone’s newsfeed as viewed on a desktop or laptop.

It’s particularly good for encouraging comments or actions on your posts as readers can interact with them just like regular posts from their connections. You can use it, for example, to push a post you’ve already made to a bigger audience.

  1. Post ad for the mobile news feed

Facebook-mobile-ad

These post ads are built specifically for use with mobile-optimised sites. Only use this if your site has a responsive theme.

  1. Right column ads

Facebook-rcolumn-ad

These ads appear in the right hand column of a Facebook newsfeed.

Ready to start making ads?

Just one more thing. Make sure you understand Facebook’s advertising rules before you start. Once you’ve read them, hop over to their site to create your ad.

>> Choose an objective for your campaign

You’ll need to choose a campaign objective as the first step in creating a Facebook ad (see, that bit about strategy above has come in handy already!)

Once you do that, the ad tool will prompt you what to do next as you go through the ad creation process.

>> Create your ad

Specific details to create the ad layouts can be found here.

You’ll need upload at least one high quality image for your ad (the recommended image size for most ads is 1200 x 627 pixels) and come up with a headline, text, landing page address and call to action button if applicable to that ad type.

When you write your ad copy, keep your headline under 25 characters and your ad text under 90 characters. This will help it display better. Focus on just one thing as you write and try to show the reader the benefit they’ll get from whatever you’re promoting.

If you’re advertising a product, don’t make your homepage the landing page. Point people to the specific product page so they can buy the item straight away and not have to look for it.

As you create your ad, remember you’re advertising on a social media network. Make your ads friendly, likeable and interesting. You’ll be able to preview the ad in each of the formats when you’re done to make sure it looks good and reads well.

>> Select your target audience

Because Facebook holds detailed information about its users, you can target your ad very tightly. This saves paying to advertise to people you’re not interested in reaching. Location, age, gender, relationship status and even interests are all options available.

As you make your selections, Facebook will indicate the number of people who fit that criteria and could see your ad. The number of those you actually get in front of will be limited by your budget.

>> Define your ad budget and schedule

You can set a budget to be spent per day, or over a specific timeframe, and schedule your ads to run continuously or within a set timeframe. Don’t forget to set an account spend limit to ensure your ads stop running once you’ve spent this amount.

Once your ads have been approved and your billing information is recorded, you’re good to go!

Finally, monitor your ad

Every time your ad shows, you’ll be charged a fee, so keep checking your campaign performance in the ads manager.

If you’re not seeing the results you want, try testing out other versions of ad content. Changing the image, text and landing page may get you better results.