Information about your customers
From Spiffy Stores Knowledge Base
Information about your customers is collected whenever a customer places an order or registers for an account with your store. You can also import existing customer information from a previous online store or from marketing campaigns that you've used to build up a customer database.
Customers can register for an account from which they can view their orders, and manage their contact details, shipping and billing addresses. They can login to their accounts using either a password or a Facebook or Google account.
Access to customer accounts can be secured via an encrypted session using SSL to keep all customer data safe.
As a store owner, you can add and delete customer accounts, add store credit to the account which can be used for future purchases, create groups of customers and create shopping cart or coupon code discounts for use only by those customers. Also, if you want to support wholesale pricing for your store, you can grant wholesale status to specific customers, who will then be eligible to purchase goods at your wholesale price, rather than the default retail price.
Customer accounts are only available when your theme includes the customer specific templates necessary to support this functionality. Our newer themes all include support for customer accounts, and we are working to add this required support to our range of older themes. For existing stores, your theme will probably need to be updated to support customer accounts. This can be done by loading a new customer account enabled theme from the theme gallery. If your theme has been customized in any way, then you can contact us at support@spiffystores.com.au for advice on how to upgrade your theme.
Contents
- 1 Viewing a List of Your Customers
- 2 Viewing an Individual Customer Record
- 3 Editing an Individual Customer Record
- 4 Additional Customer Information
- 5 Customer Tags
- 6 Updating a Group of Customers
- 7 Sending account invitations to customers
- 8 Disabling a customer's account
- 9 Adding Credit to a Customer Account
- 10 Enabling Wholesale Prices on a Customer Account
- 11 Further Reference
Viewing a List of Your Customers
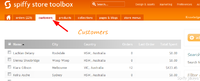
Customers

You can view all your customer data from your Toolbox by clicking on the customers tab. This will give you an overview of all your customers, showing the customer's name, city, country, number of orders, the last order and the total amount that the customer has spent.
As with the other overview pages in the Toolbox, you can quickly navigate around your customer data by using the pagination links at the bottom of the page to navigate to a specific page in the data if you have a large number of customers.
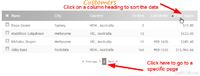
Sorting and Pagination

The customer overview page also allows you to click on any of the column headings to sort the display in ascending or descending order using the column data to reorder the customers. Repeatedly clicking on the column header changes the sorting order from ascending to descending and then back to ascending order as indicated by the little up or down arrow next to the column heading.
If you want to change the sorting order to use a different column, just click on that column heading in the same manner.
Viewing an Individual Customer Record
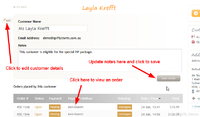
A customer record

You can choose to view the information about a specific customer by clicking anywhere on the line containing the desired customer. Note however that if the customer record shows an order in the Last Order column, then clicking on that link will take you to the order record.
Once you have selected a customer to view, you will see the customer's record detail as shown in the image to the right.
If you want to add or update any notes associated with the customer, just edit the Notes field and click on the Save notes button.
You can view any of the customer's orders by clicking on the respective order lines in the list of orders at the bottom of the screen. As with other lists in your Toolbox, the list of orders may be paginated, and you can choose the sorting order for the list by clicking on the desired column heading to choose whether to sort the data in ascending or descending order.
Editing an Individual Customer Record
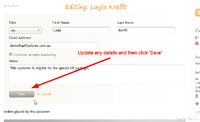
Editing a customer record

If you want to change other parts of the customer record, click on the edit tab on the upper left of the customer details area, which will take you to the edit screen for the customer.
Once you're done updating the record, then click the Save button to commit your changes. Please note that if you are editing the email address, you will not be able to change it to another address if that address is already in use by another customer account. Each customer account is identified by the email address, so two customer accounts cannot share the same email address.
Additional Customer Information
Additional customer information

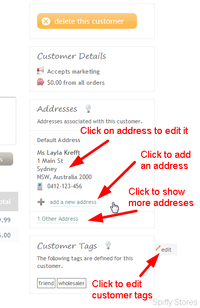
In the sidebar, to the right of the customer details, you will find a number of boxes that contain additional information about your customer.
At the top of the screen is a delete this customer button, which will let you delete the customer record as long as there are no associated orders for the customer.
Under this, you will find a small information box labelled Customer Details. This box contains some summary information about the customer, such as the total spent in orders and whether the customer accepts marketing emails.
The next section contains information about the address records that are associated with the customer. Each customer will have a default address record, and optionally one or more additional records. Normally, only the default address record is shown. If you want to see the other address records, click on the Other Addresses link, if it exists.
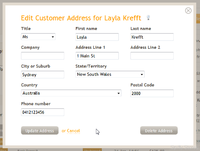
Editing a customer address

You can edit an address record by clicking on the address record. An edit dialog box will pop up containing the address record information for you to change. Make the required updates, then click on the Update Address button to save the changes.
If you want to delete this address, click on the Delete Address button instead. Note, however, that you can't delete all the addresses, and at least one must exist for each customer.
When you are editing one of the additional addresses, there is an option to make the address the new default address. Tick this box before saving the record if you want to change the default address record for the customer.
Finally, if you want to add a new address, then click on the add a new address link, add the new address details in the pop-up dialog and then click on the Create Address button to save your new address.
Customer Tags
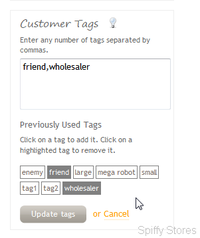
Adding customer tags

Customer tags are words or phrases that you choose to add to groups of customers to enable them to be distinguished or categorized in some way.
For example, you might choose to add the tag friend to all your customers who are friends so that you can offer them special discounts if you wish.
Similarly, you could add the tag family to customers who are family members.
You can use customer tags to create customer groups and these customer groups can be used in conjunction with other customer view filters to provide qualified discounts, for example.
An example of this would be a customer group that is created consisting of friends who have made more than five purchases and you would like to offer this group a special discount of 50% off.
Tags may also be used in combination, so you would be able to create a customer group consisting customers who are both family and friend, assuming that there are some members of your family that you don't like!
Customer tags can also be used for reporting purposes, to allow you to find particular groups of customers easily. For example, you might want to find all your wholesalers who have purchased over $1,000 worth of goods in the last month. Tagging all your wholesalers with the tag wholesale will enable you to do this.
Note: The ability to create discounts based on customer groups will be available if your current theme includes support for customer accounts.
Adding and Removing Tags
When editing the customer tags, you can either provide a string of tag names, separated by a comma, or you can click on the array of previously used tags. If the tag block is solid, then it's currently in use. Click it to remove the tag from the list. Click on an empty tag block to add the tag to the list.
Once you're happy with the tags you've added for the customer, click on the Update tags button to save your changes.
Updating a Group of Customers
Updating groups of customers

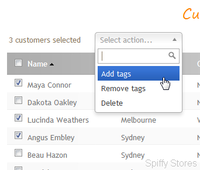
You can choose to apply some actions to a group of customers in a single operation.
From the customer list, just select the customers you wish to apply the action to by ticking the check box against each customer record, at the beginning of each row.
You can also choose to select all customers shown on the page, by ticking the check box in the column header of the list. Ticking this box again will clear the selection of all the customers in the list.
Once you have made your selection of customers, you should see a label above the column headers indicating how many customers you have selected, with a drop-down box labelled Select action....
Choose an action from
- Add tags
- Remove tags
- Delete
These actions allow you to add or remove a set of tags from the selected customers, or delete a number of customers.
Please note that when attempting to delete customers, you will not be able to delete any customer record where that customer has any orders.
Sending account invitations to customers
If your customer accounts are set to optional or required, you can send customers direct invitations to encourage them to activate an account. They'll receive an email prompting them to create their own password.
There are two ways to generate customer account activation emails:
- Individually
- In bulk
Sending individual account invitations
To send an account invite to a single customer:
- From your store's admin, click Customers to go to your Customers page.
- Click the name of the customer you're targeting
- When the customer's information page opens, click Send invitation.
- An email with a link to activate their account is then sent to the customer. The link expires after 24 hours, so if the customer contacts you because they received the error "Password Token Expired", just re-send the invitation.
Sending account invitations in bulk
- From your store's Toolbox, click Customers to go to your Customers page.
- If necessary, filter your customer list.
- Check the boxes next to the name of every customer you want to invite (or click the box next to Name to select them all.)
- In the Bulk actions drop-down, click Invite selected customers.
- An account activation email is sent to each selected customer. The link in the email expires after 24 hours, so if the customer contacts you because they received the error "Password Token Expired", just re-send the invitation.
Disabling a customer's account
If your customer accounts are required, you can disable an account if you want to prevent a particular customer from placing an order with you:
- From your store's Toolbox, click Customers to go to your Customers page.
- Click the name of the customer whose account you want to disable.
- When the customer's information page opens, click the Disable customer button.
Adding Credit to a Customer Account
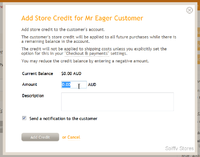
Adding Customer Credit

You can add a credit to a customer's account. Typically you would do this in the case where a product was returned, or you have offered the customer a store credit to compensate them for some sort of problem with their purchase.
- From your store's admin, click Customers to go to your Customers page.
- Click the name of the customer you want to add a credit to.
- When the customer's information page opens, click 'on the "add a credit" button. Note: This button will only appear for customers who have an account that has been activated. The customer account should be "Active". You cannot add a credit to a "Guest" account.
- In the dialog, simply add the amount of the credit to add, write something to document the reason for adding the credit and optionally tick the box to send a notification to the customer. Click the "Add Credit" button to save the updates.
If you need to make an adjustment to the customer's credit, then you can also add negative amounts if necessary.
The credit in a customer's account will be applied to all future purchases automatically until the credit is used up. You can choose to have the credit applied to the purchase only, excluding shipping or or can apply the credit to the total amount of the invoice.
You can make this choice when you configure the customer account settings in the "Checkout & payments" settings page.
Enabling Wholesale Prices on a Customer Account
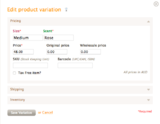
Enabling wholesale prices

Enabling wholesale prices

To enable wholesale prices in your store, you first need to make sure you have enabled Advanced product options. To Enable Advanced product options, go to theYour Settings section of your store's Toolbox, tick the Enable advanced product options option, and click Save changes.
Now when you edit a product variation, you will see the Wholesale Price option.
You can enable wholesale prices on customer accounts that have an Active or Invited status. Guest accounts can not be enabled, as there is no password assigned to them.
To enable wholesale prices on a customer account, click on the "Edit" link when viewing the customer's record. This should enable you to edit the customers' details. Tick the Customer uses wholesale prices option, and then click Save.