Difference between revisions of "Using Australia Post MyPost Business"
From Spiffy Stores Knowledge Base
m |
m |
||
| Line 13: | Line 13: | ||
You can pay for your shipments using a credit card or by using an existing Australia Post charge account. You will need to provide credit card details in order to proceed. | You can pay for your shipments using a credit card or by using an existing Australia Post charge account. You will need to provide credit card details in order to proceed. | ||
| − | + | == 2. Connect MyPost Business to Spiffy Stores == | |
| − | |||
| − | |||
| − | == | ||
| − | |||
| − | |||
| − | |||
| − | |||
| − | |||
| − | |||
| − | |||
| − | |||
| − | |||
| − | |||
| − | |||
| − | |||
| − | |||
| − | |||
| − | |||
| − | |||
| − | |||
| − | |||
| − | |||
| − | |||
| − | |||
| − | |||
| − | |||
| − | |||
| − | |||
| − | |||
| − | |||
| − | |||
| − | |||
| − | |||
| − | |||
| − | |||
| − | |||
| − | |||
| − | |||
| − | |||
| − | |||
| − | |||
| − | |||
<gallery widths="200px" heights="200px" class="right"> | <gallery widths="200px" heights="200px" class="right"> | ||
| − | Image: | + | Image:Mpb setup1.jpg|Access your Business Details |
</gallery> | </gallery> | ||
| − | + | Login to your MyPost Business account, and find the ''Business details'' link in the drop-down menu at the top right-hand corner of the page under your account name. | |
| − | |||
| − | |||
| − | |||
| − | |||
| − | |||
| − | |||
<gallery widths="200px" heights="200px" class="right"> | <gallery widths="200px" heights="200px" class="right"> | ||
| − | Image: | + | Image:Mpb setup2.jpg|Select Platform Partners |
</gallery> | </gallery> | ||
| − | + | From the ''Business details'' page, select the ''Platform Partners'' page. | |
<gallery widths="200px" heights="200px" class="right"> | <gallery widths="200px" heights="200px" class="right"> | ||
| − | Image: | + | Image:Mpb setup3.jpg|Connect to Spiffy Stores |
</gallery> | </gallery> | ||
| − | + | Scroll down until you find the ''Spiffy Stores'' entry in the list. Click on the ''Connect'' button. This will generate a unique Partners Token for you. | |
| − | |||
| − | |||
| − | |||
| − | |||
| − | |||
| − | |||
| − | |||
| − | |||
| − | |||
| − | |||
| − | |||
| − | |||
| − | |||
| − | |||
| − | |||
| − | |||
| − | |||
| − | |||
| − | |||
| − | |||
| − | |||
| − | |||
<gallery widths="200px" heights="200px" class="right"> | <gallery widths="200px" heights="200px" class="right"> | ||
| − | Image: | + | Image:Mpb setup4.jpg|Copy Partners Token |
</gallery> | </gallery> | ||
| + | Once the token has been generated, click on the ''Copy Token'' button to copy it to your computer's clipboard. | ||
| − | |||
| − | |||
| − | |||
| − | |||
Once this step is complete, you're ready to [[Activating Australia Post eParcel Fulfilment|activate the eParcel fulfilment service in your store]] using your eParcel Account number, API Key and password. | Once this step is complete, you're ready to [[Activating Australia Post eParcel Fulfilment|activate the eParcel fulfilment service in your store]] using your eParcel Account number, API Key and password. | ||
| Line 114: | Line 41: | ||
* [[Using a fulfilment service]] | * [[Using a fulfilment service]] | ||
* [[Shipping Products using a fulfilment service]] | * [[Shipping Products using a fulfilment service]] | ||
| − | * [[Activating Australia Post | + | * [[Activating Australia Post MyPost Business Fulfilment]] |
* [[Shipping Orders with batch fulfilment]] | * [[Shipping Orders with batch fulfilment]] | ||
Revision as of 11:22, 1 September 2022
Spiffy Stores provides an easy to use integration with MyPost Business. There are a number of steps that you need to go through in order to connect your store to your Australia Post MyPost Business account.
You can read more about how the integration between Spiffy Stores and MyPost Business works here -
https://auspost.com.au/business/shipping/mypost-business/print-shipping-labels.
Australia Post have also provided a getting started guide on how to connect your store to your MyPost Business account and you can view it here -
1. Establish a MyPost Business account with Australia Post
You can sign up for a new account at https://auspost.com.au/business/shipping/mypost-business
You can pay for your shipments using a credit card or by using an existing Australia Post charge account. You will need to provide credit card details in order to proceed.
2. Connect MyPost Business to Spiffy Stores
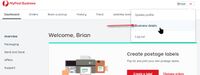
Access your Business Details

Login to your MyPost Business account, and find the Business details link in the drop-down menu at the top right-hand corner of the page under your account name.
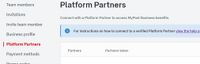
Select Platform Partners

From the Business details page, select the Platform Partners page.

Connect to Spiffy Stores
Scroll down until you find the Spiffy Stores entry in the list. Click on the Connect button. This will generate a unique Partners Token for you.

Copy Partners Token
Once the token has been generated, click on the Copy Token button to copy it to your computer's clipboard.
Once this step is complete, you're ready to activate the eParcel fulfilment service in your store using your eParcel Account number, API Key and password.