Difference between revisions of "Selling on Facebook"
From Spiffy Stores Knowledge Base
| (47 intermediate revisions by the same user not shown) | |||
| Line 1: | Line 1: | ||
| − | Creating a feed of your products for Facebook | + | Creating a feed of your products for Facebook allows you to show your product catalogue in your own store on your Facebook business page. This allows users to easily discover your products, share them with friends, and click through to your store to order. |
Facebook has over 1 billion active users every month and is the largest social network in the world. Users spend an average of 50 minutes a day using its services. The sheer size of the network — coupled with the level of engagement by its users — makes it an ideal marketplace to promote your products and raise brand awareness. | Facebook has over 1 billion active users every month and is the largest social network in the world. Users spend an average of 50 minutes a day using its services. The sheer size of the network — coupled with the level of engagement by its users — makes it an ideal marketplace to promote your products and raise brand awareness. | ||
| − | There is no additional cost to use Facebook Shop and it is available | + | There is no additional cost to use Facebook Shop and it is available on all Spiffy Stores Plans. |
| − | + | If you already have a Facebook shop setup with a different ecommerce provider, you will need to remove that catalogue altogether and create a new one. | |
| − | |||
| − | |||
| − | |||
| − | == | + | ==Part 1 - Setting Up a Product Feed in Your Store== |
| + | # Log in to your store<br><br> | ||
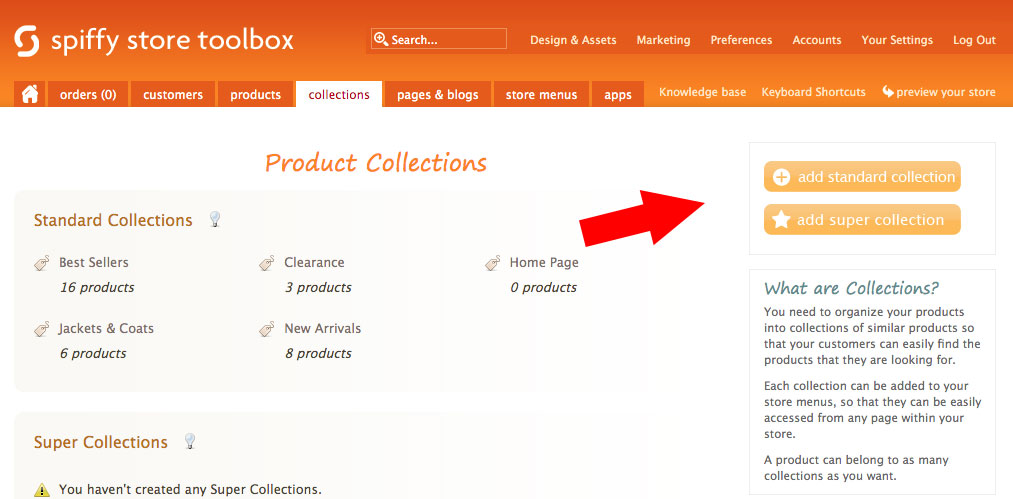
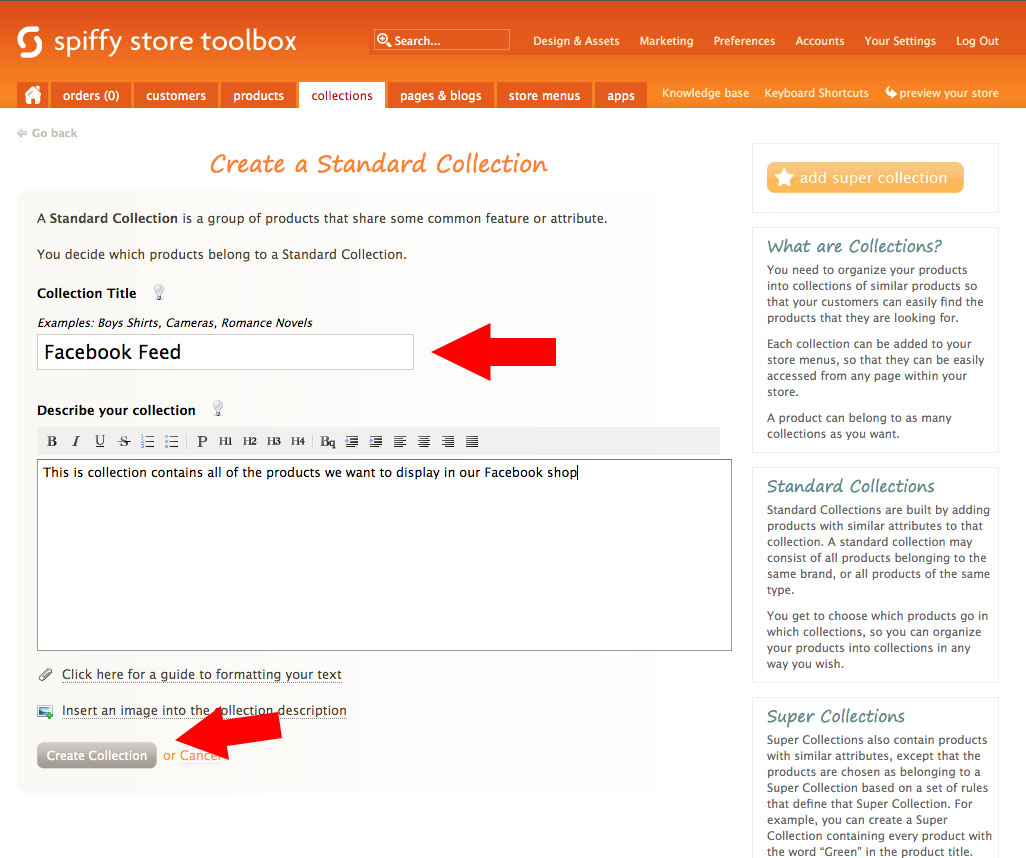
| + | # Create a collection that will contain all of the products you want to show on Facebook. It can be either a Standard Collection or a Super Collection. A Super Collection makes it easier to set up. '''Note: Every product must have a unique SKU to show up in your feed.''' <br><br>[[File:Sell-on-facebook-001.jpg]]<br><br>[[File:Sell-on-facebook-002.jpg]]<br><br> | ||
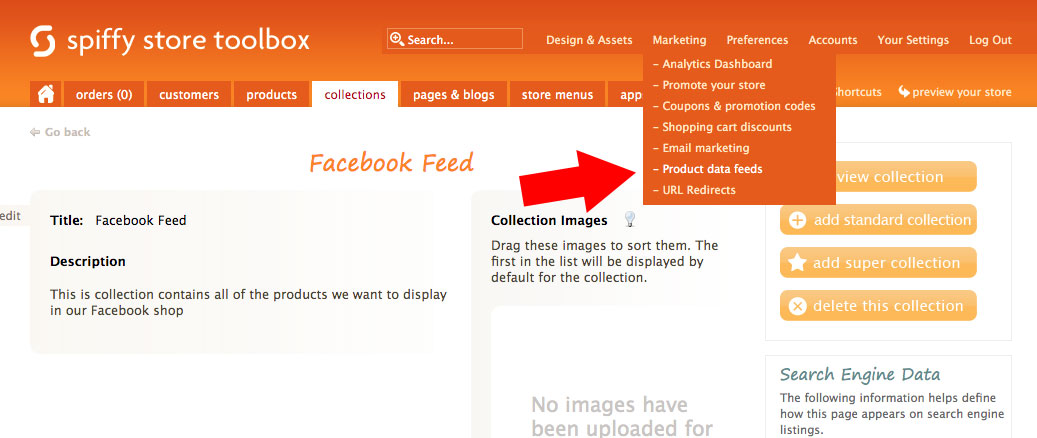
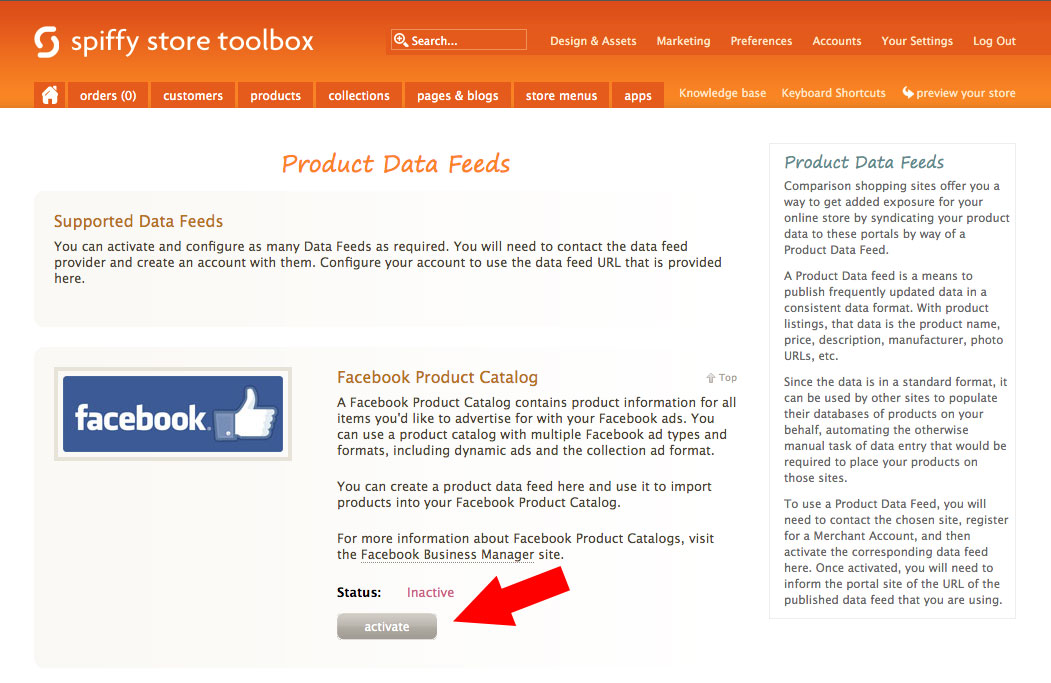
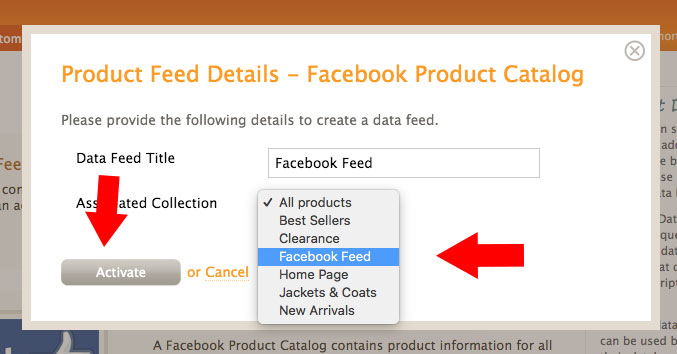
| + | # Create your data feed<br><br>[[File:Sell-on-facebook-003.jpg]]<br><br><br>[[File:Sell-on-facebook-004.jpg]]<br><br><br>[[File:Sell-on-facebook-005.jpg]]<br><br> | ||
| + | |||
| + | Your Spiffy store must be launched and accessible (not password protected) to be able to submit your products to Facebook. Every product must also have a unique SKU to show up in your feed. | ||
| + | |||
| + | ==Part 2 - Setting Up Your Facebook Store== | ||
Before you begin... | Before you begin... | ||
# Log in to Facebook. | # Log in to Facebook. | ||
# Create a Facebook business page for your store (if you haven't already). | # Create a Facebook business page for your store (if you haven't already). | ||
# Your account must have an admin page role for the Facebook business page. | # Your account must have an admin page role for the Facebook business page. | ||
| − | # | + | # Your Facebook page must have a phone number, Privacy Policy link, and a street address. You're able to hide your street address and it won't affect your store. |
| − | + | # Your Spiffy store must be launched and accessible (not password protected) to be able to submit your products to Facebook.<br><br> | |
| − | + | Once you have done the above, follow the step by step below. | |
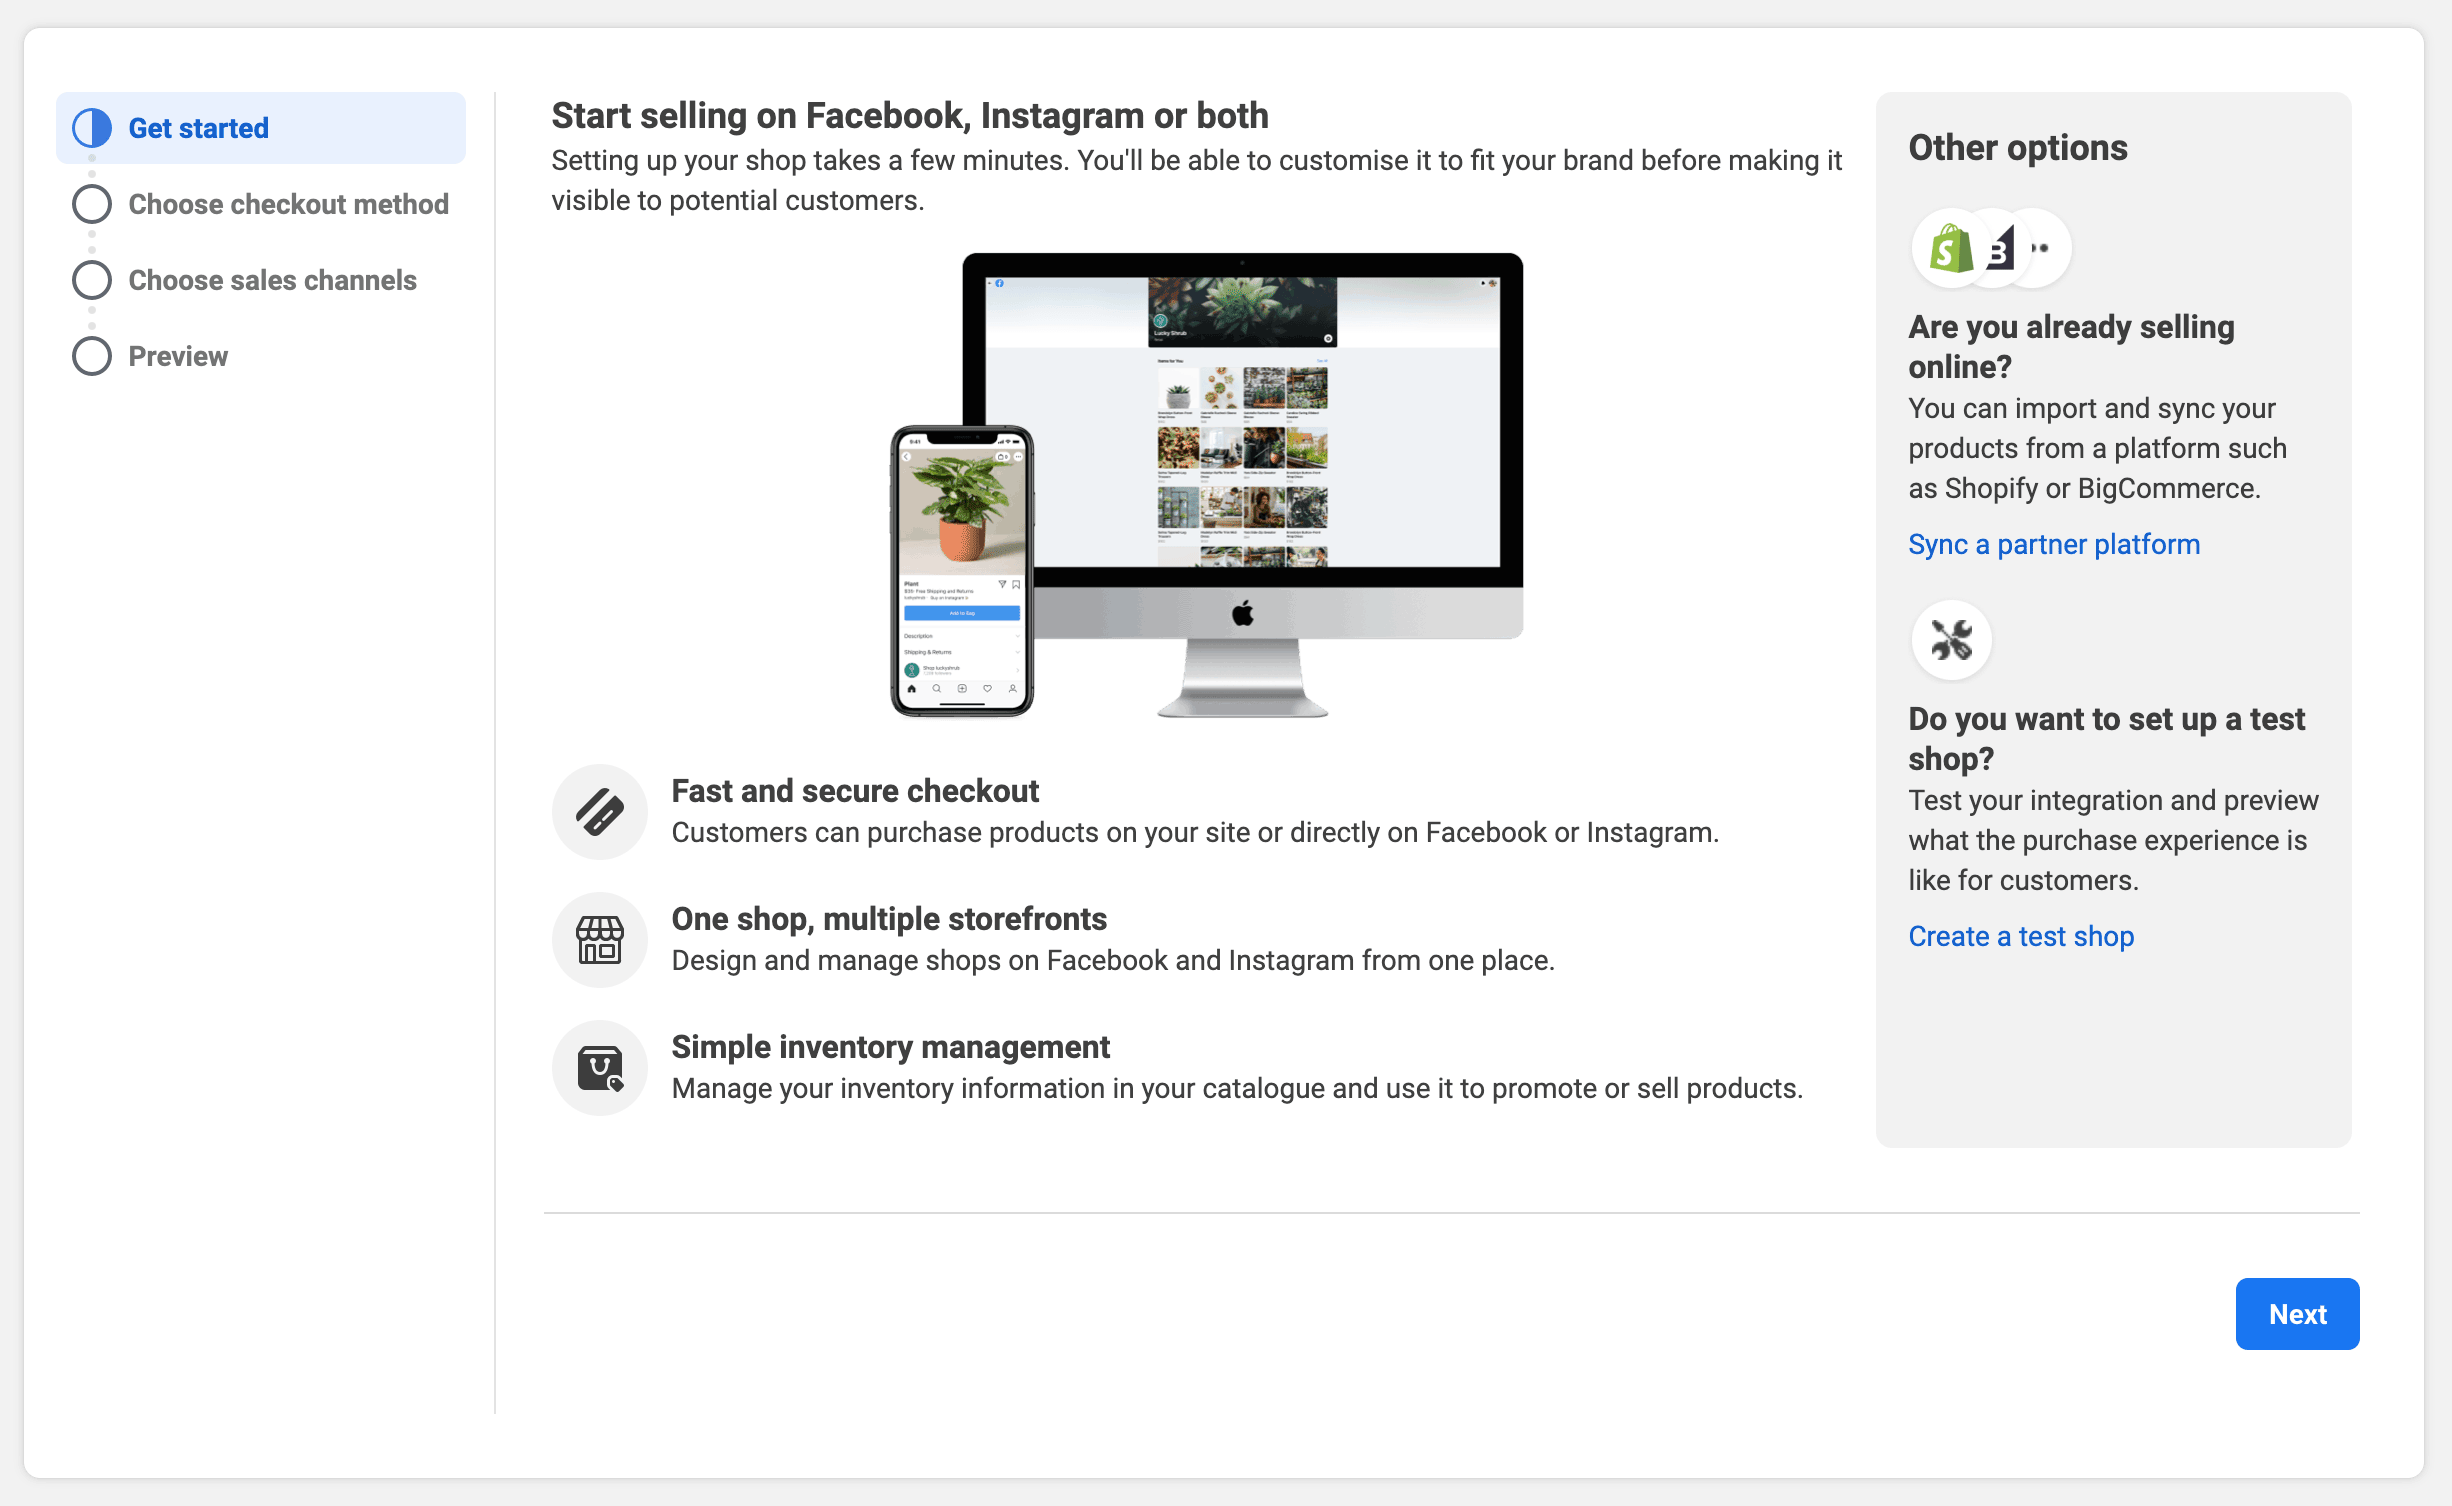
| − | # Go to your Facebook | + | # Go to your [https://www.facebook.com/commerce_manager/onboarding_landing Facebook Commerce Manager], review the information, and click the "Next" button.<br><br>[[File: Commerce-manager-001.png]]<br><br> |
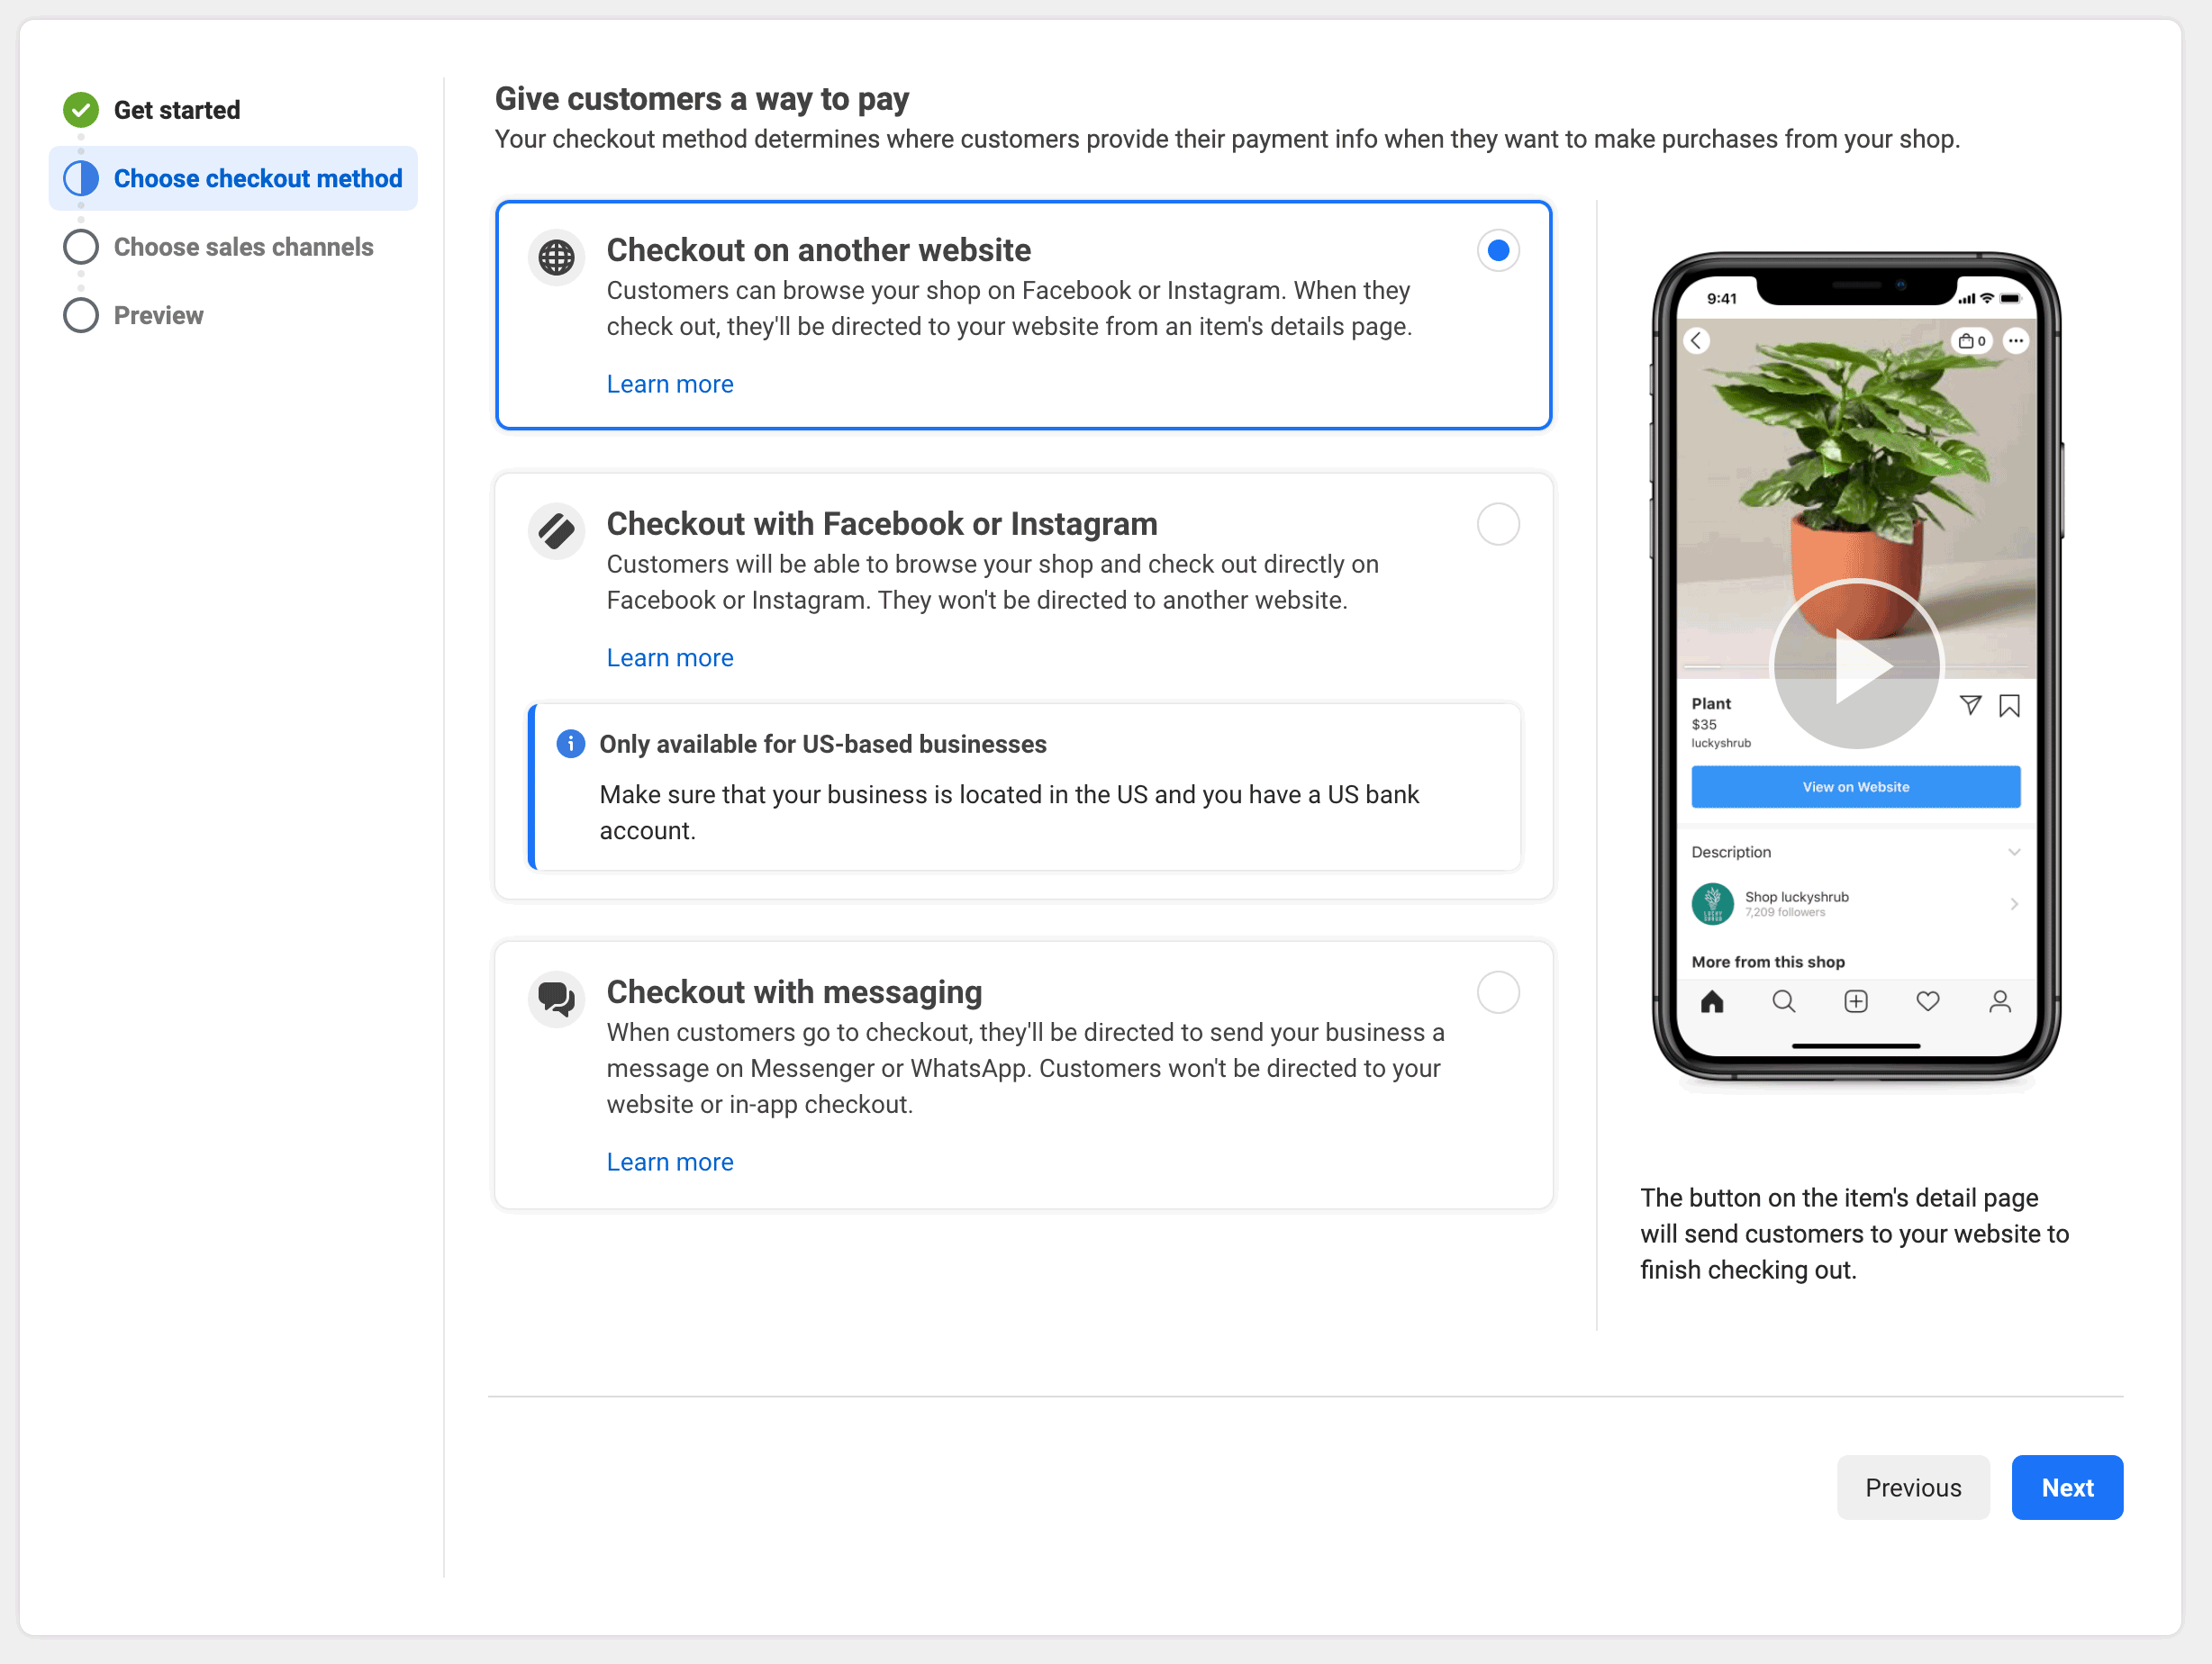
| − | + | # Choose "Checkout on another website" and click "Next".<br><br>[[File: Commerce-manager-002.png]]<br><br> | |
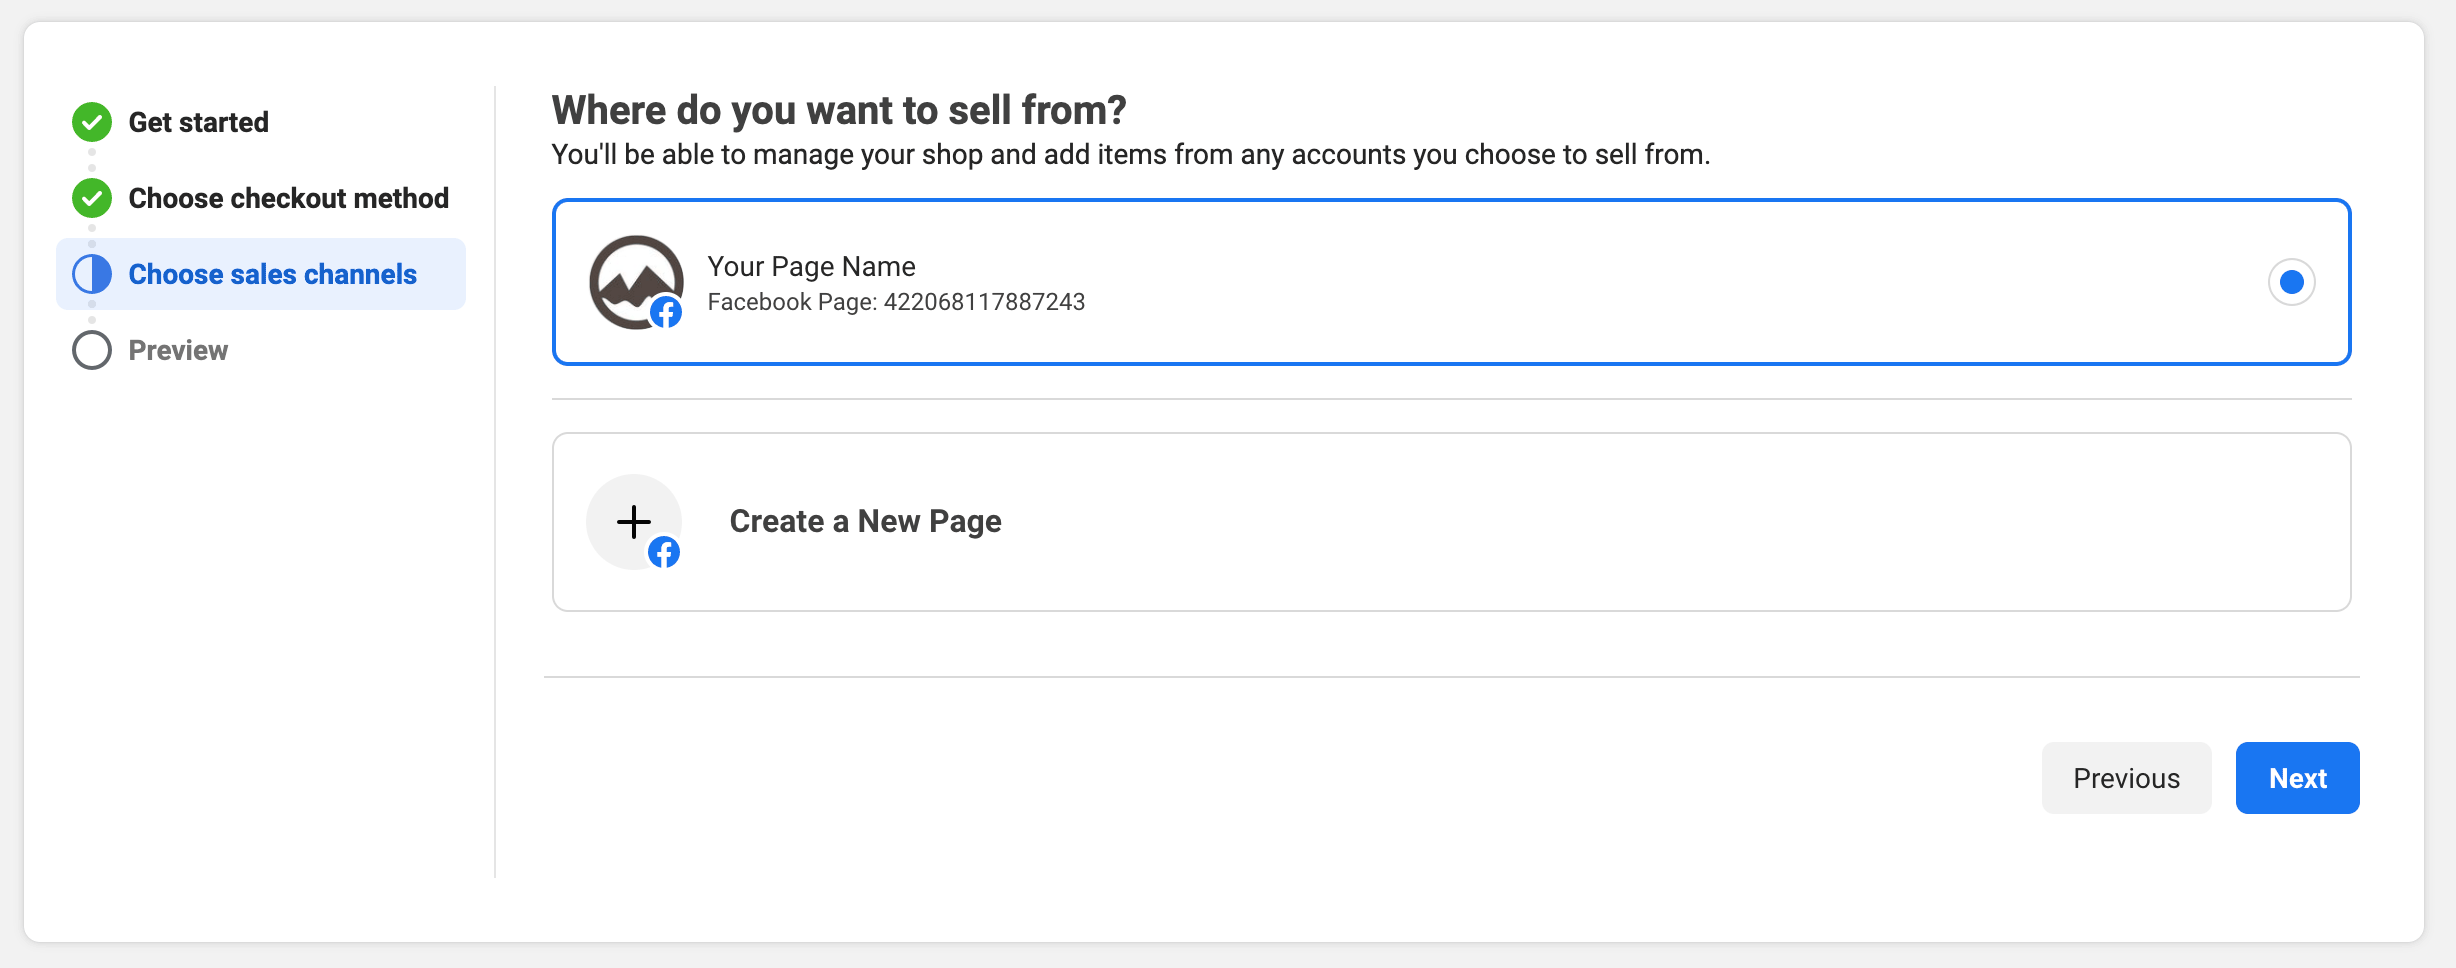
| − | + | # For your sales channel, choose your Facebook page.<br><br>[[File: Commerce-manager-003.png]]<br><br> | |
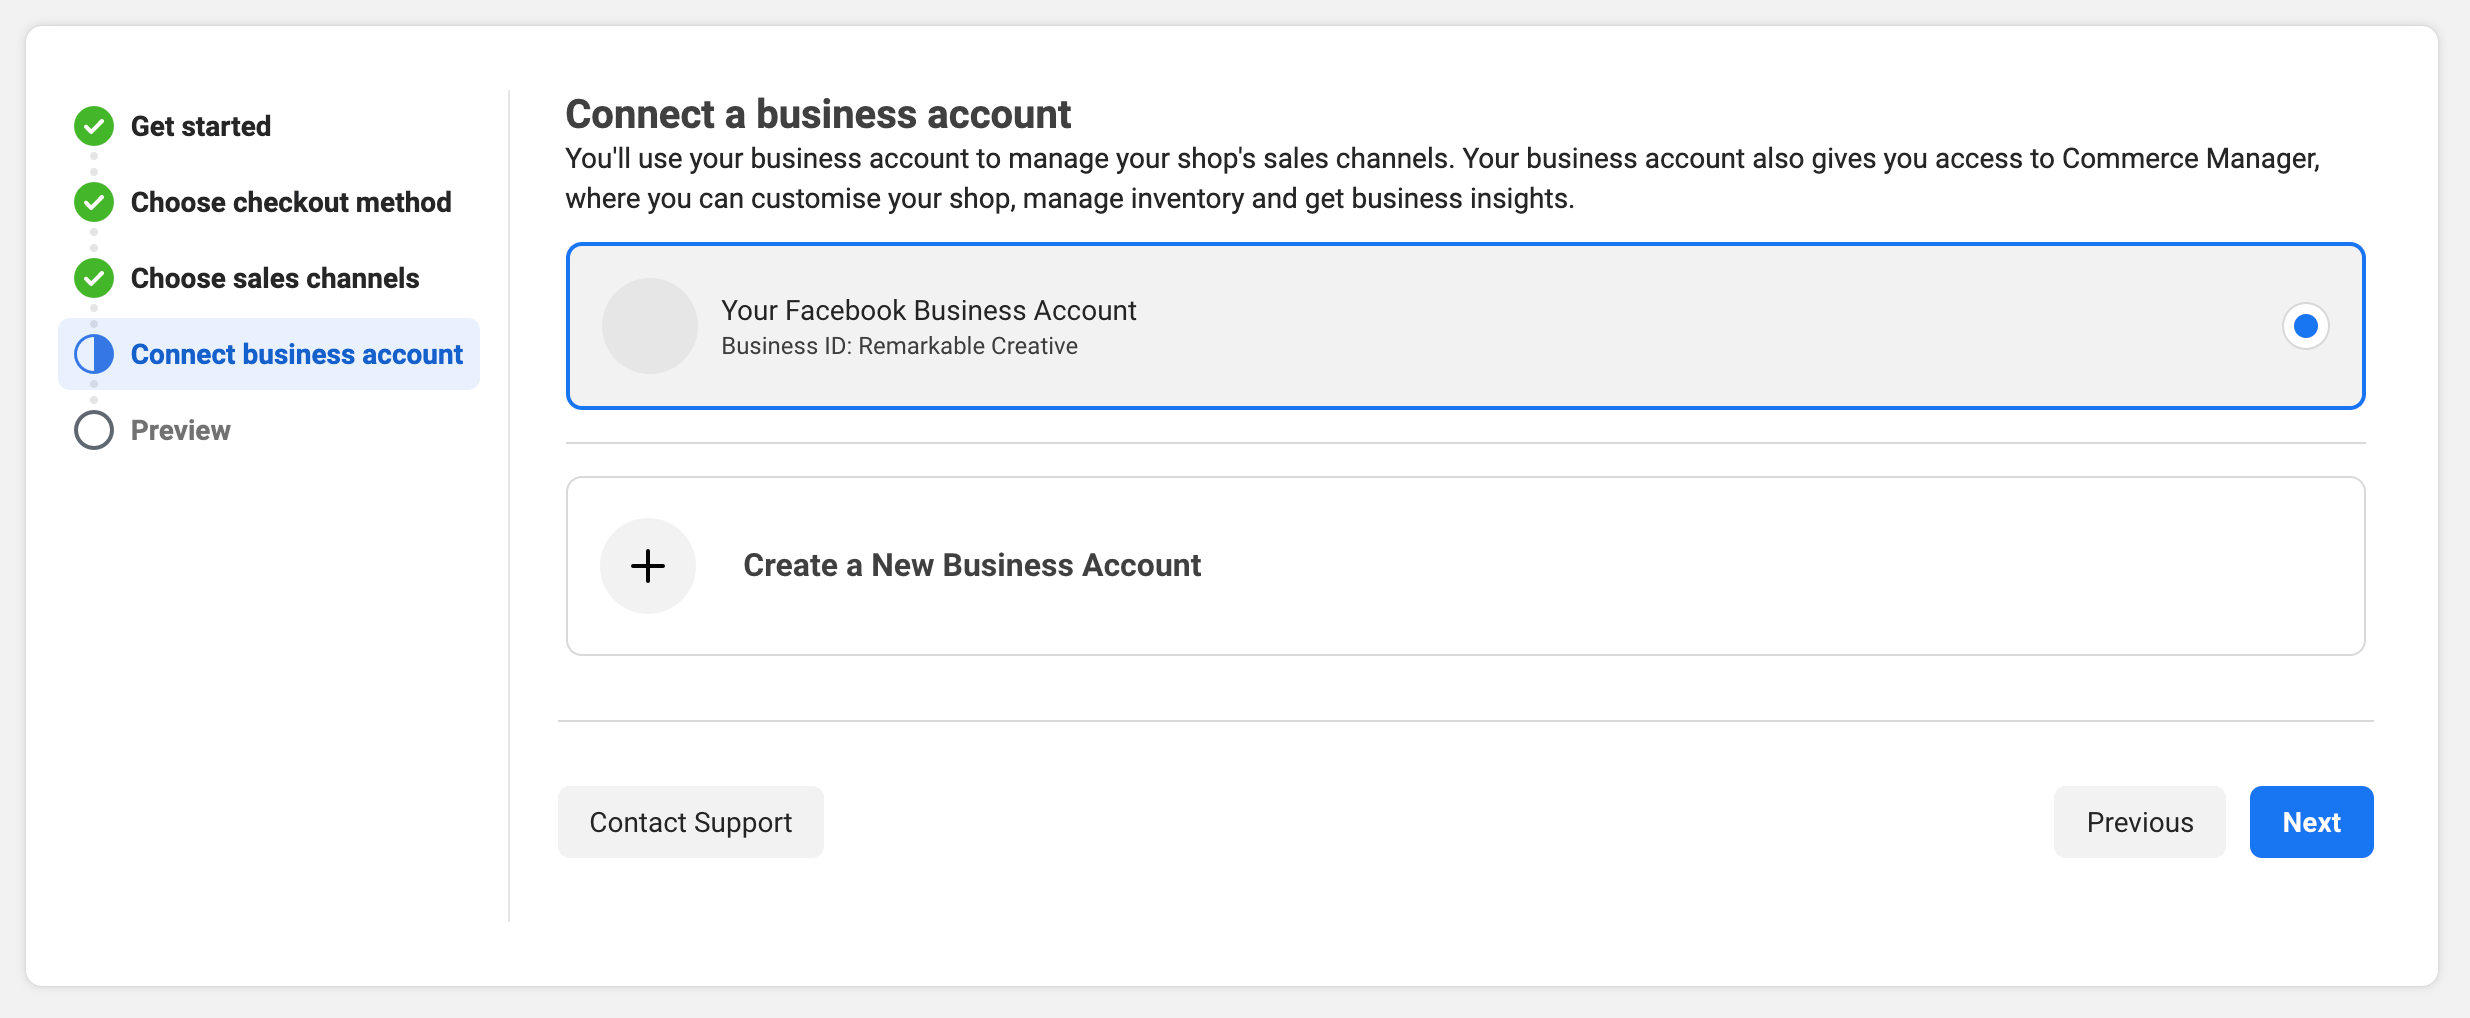
| − | # | + | # If you already have a business suite login, choose that, or create a new Business Account.<br><br>[[File: Commerce-manager-004.png]]<br><br> |
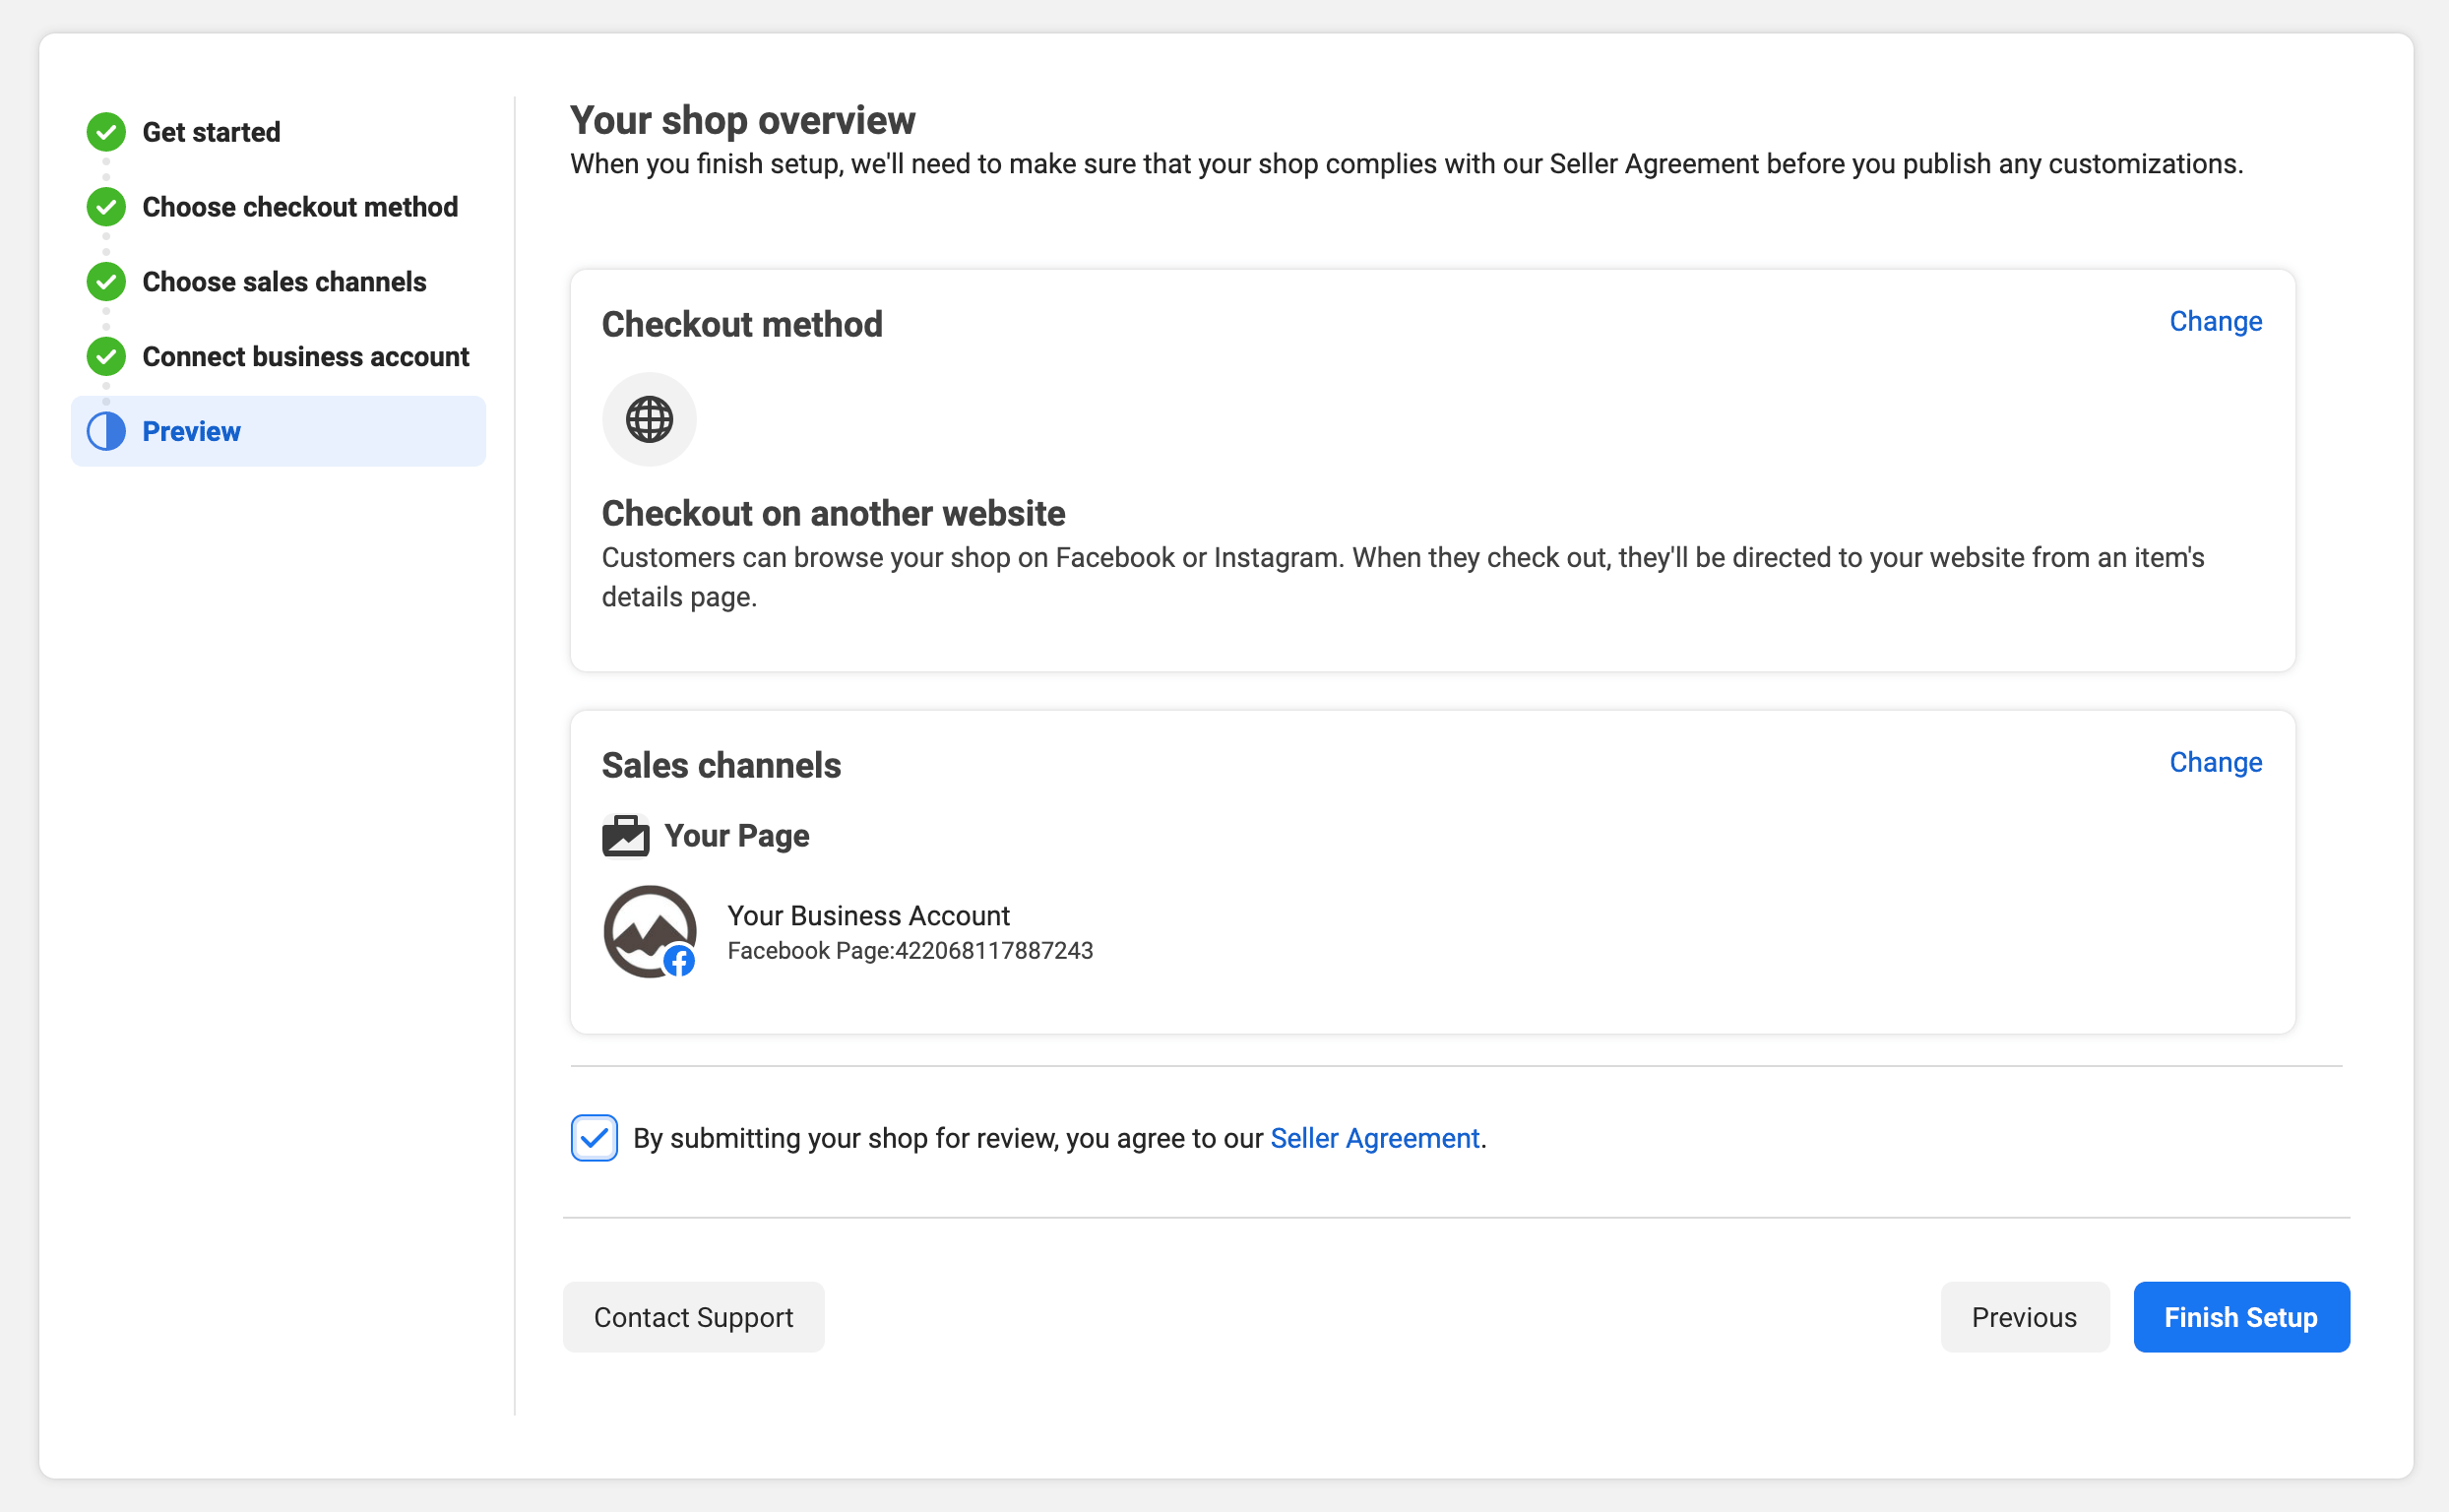
| − | + | # Review and agree to the seller agreement and click "Finish Setup".<br><br>[[File: Commerce-manager-005.png]]<br><br> | |
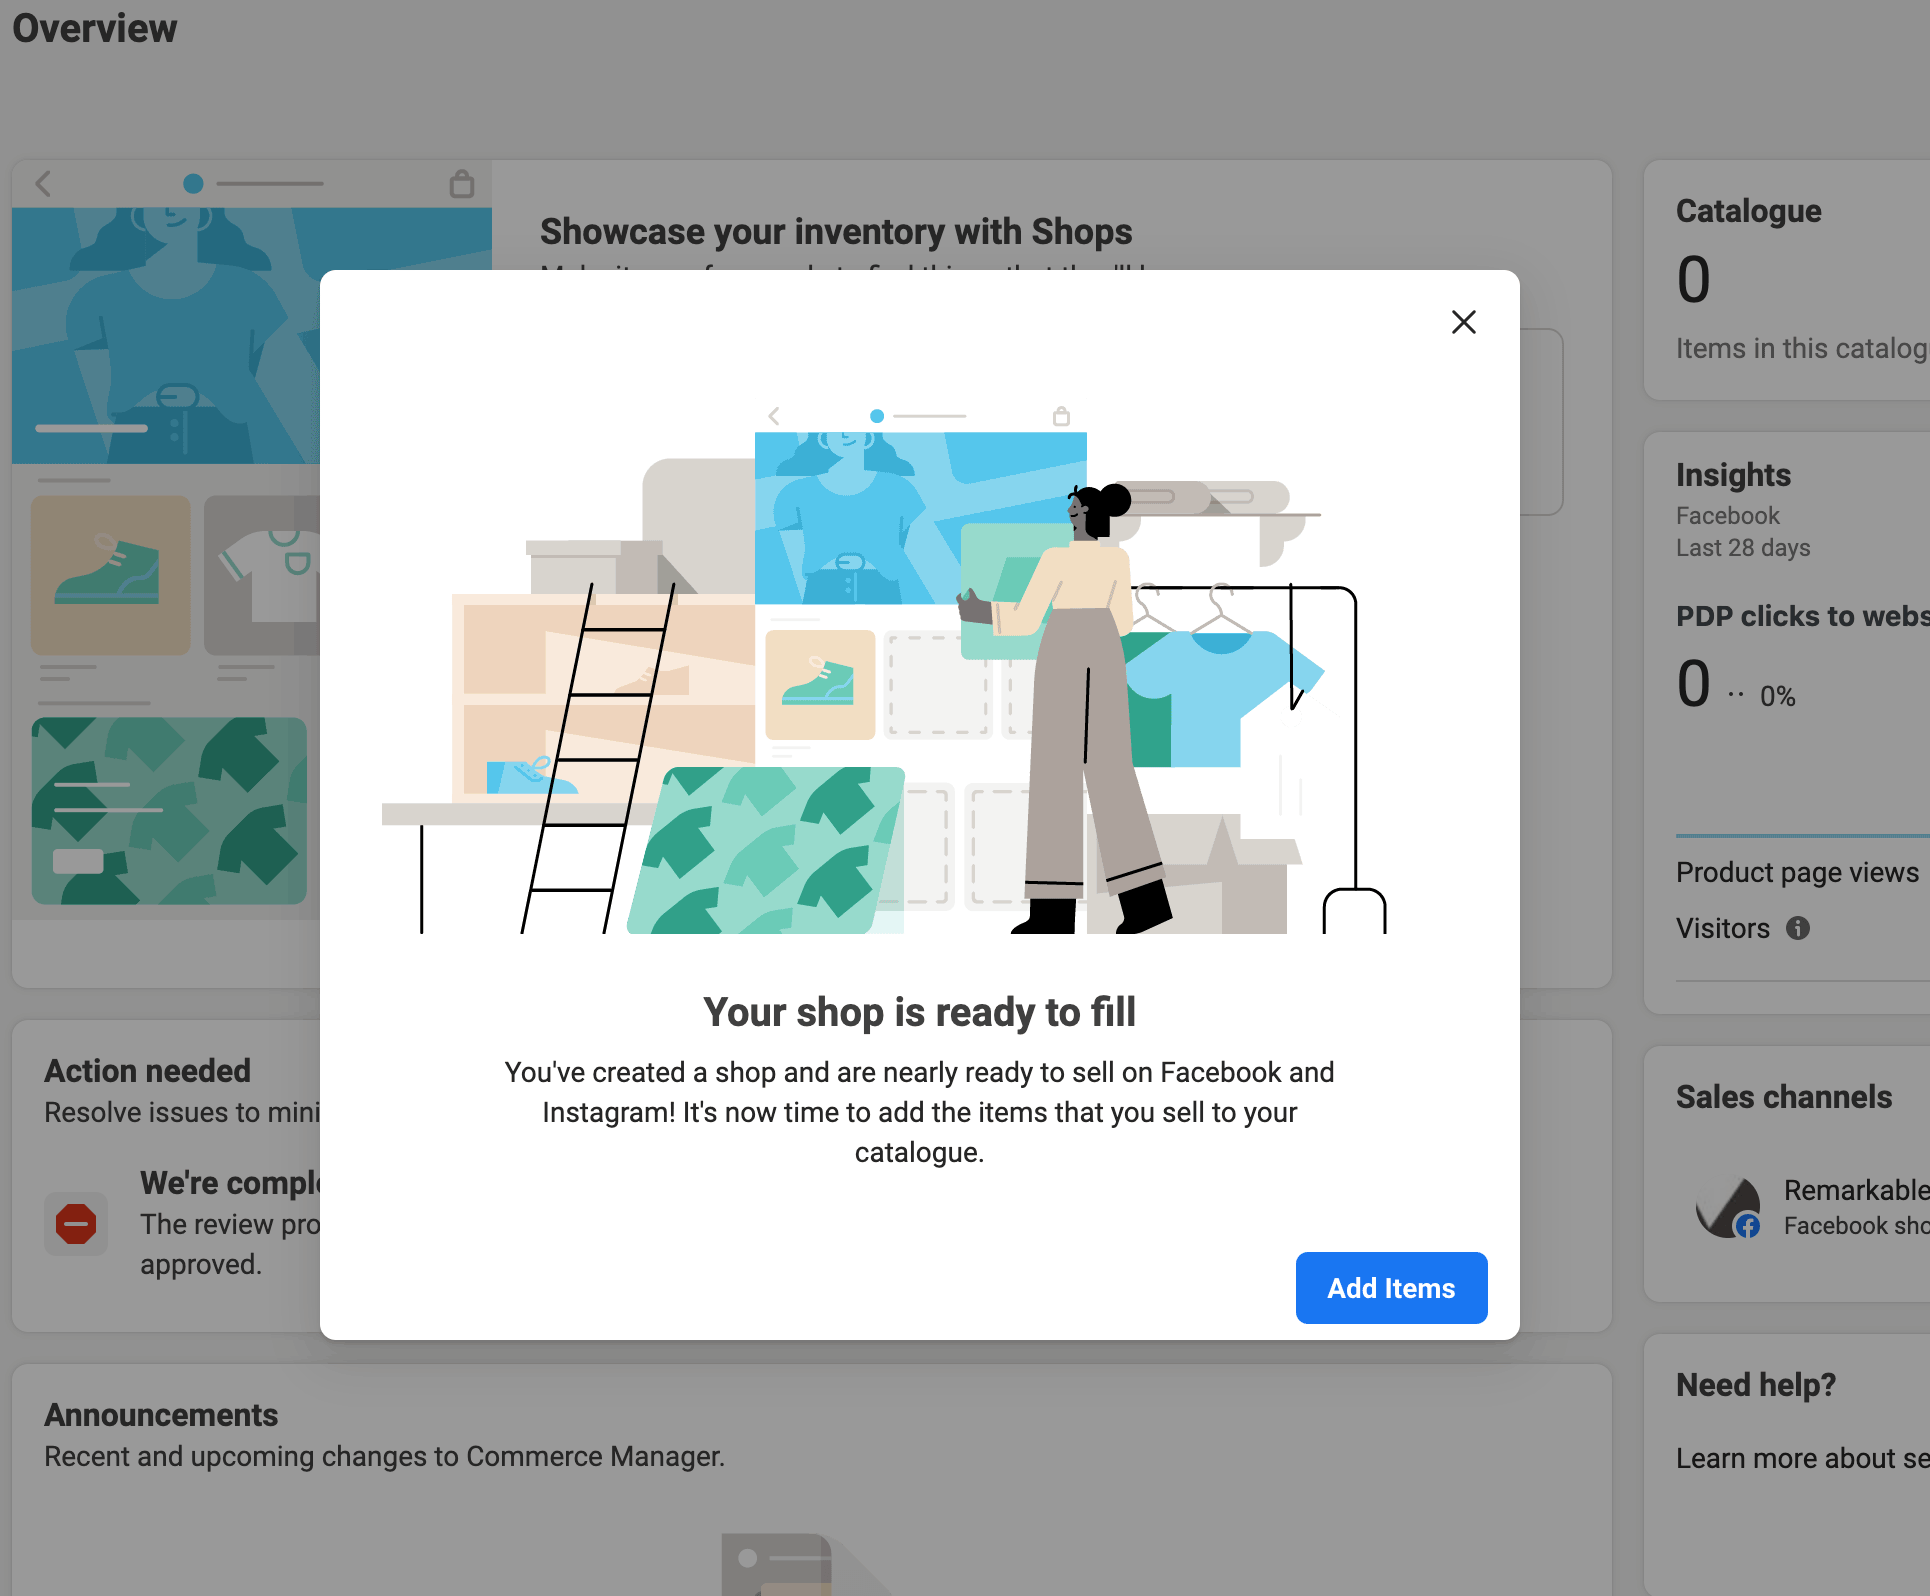
| − | # | + | # Your shop has now been created. Click the "Add Items" button.<br><br>[[File: Commerce-manager-006.png]]<br><br> |
| − | # | ||
| − | # | ||
| − | # | ||
| − | |||
| + | ==Part 3 - Connecting Your Data Feed == | ||
| + | <span style="color: red; font-size: 1.1em; font-weight: bold;">Note: Every product must have a unique SKU to show up in your feed.</span> | ||
| + | <br> | ||
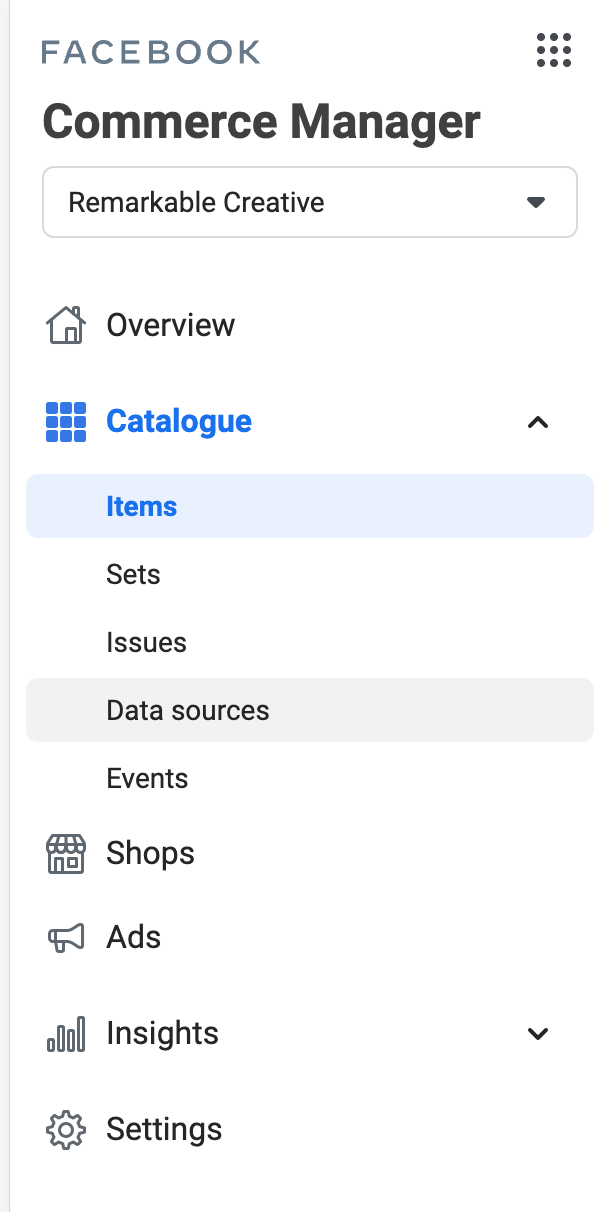
| + | # Under "Catalogue" on the left, click "Data Sources", and then click the "Add items" button on the next page.<br><br>[[File: Commerce-manager-007.png]]<br><br> | ||
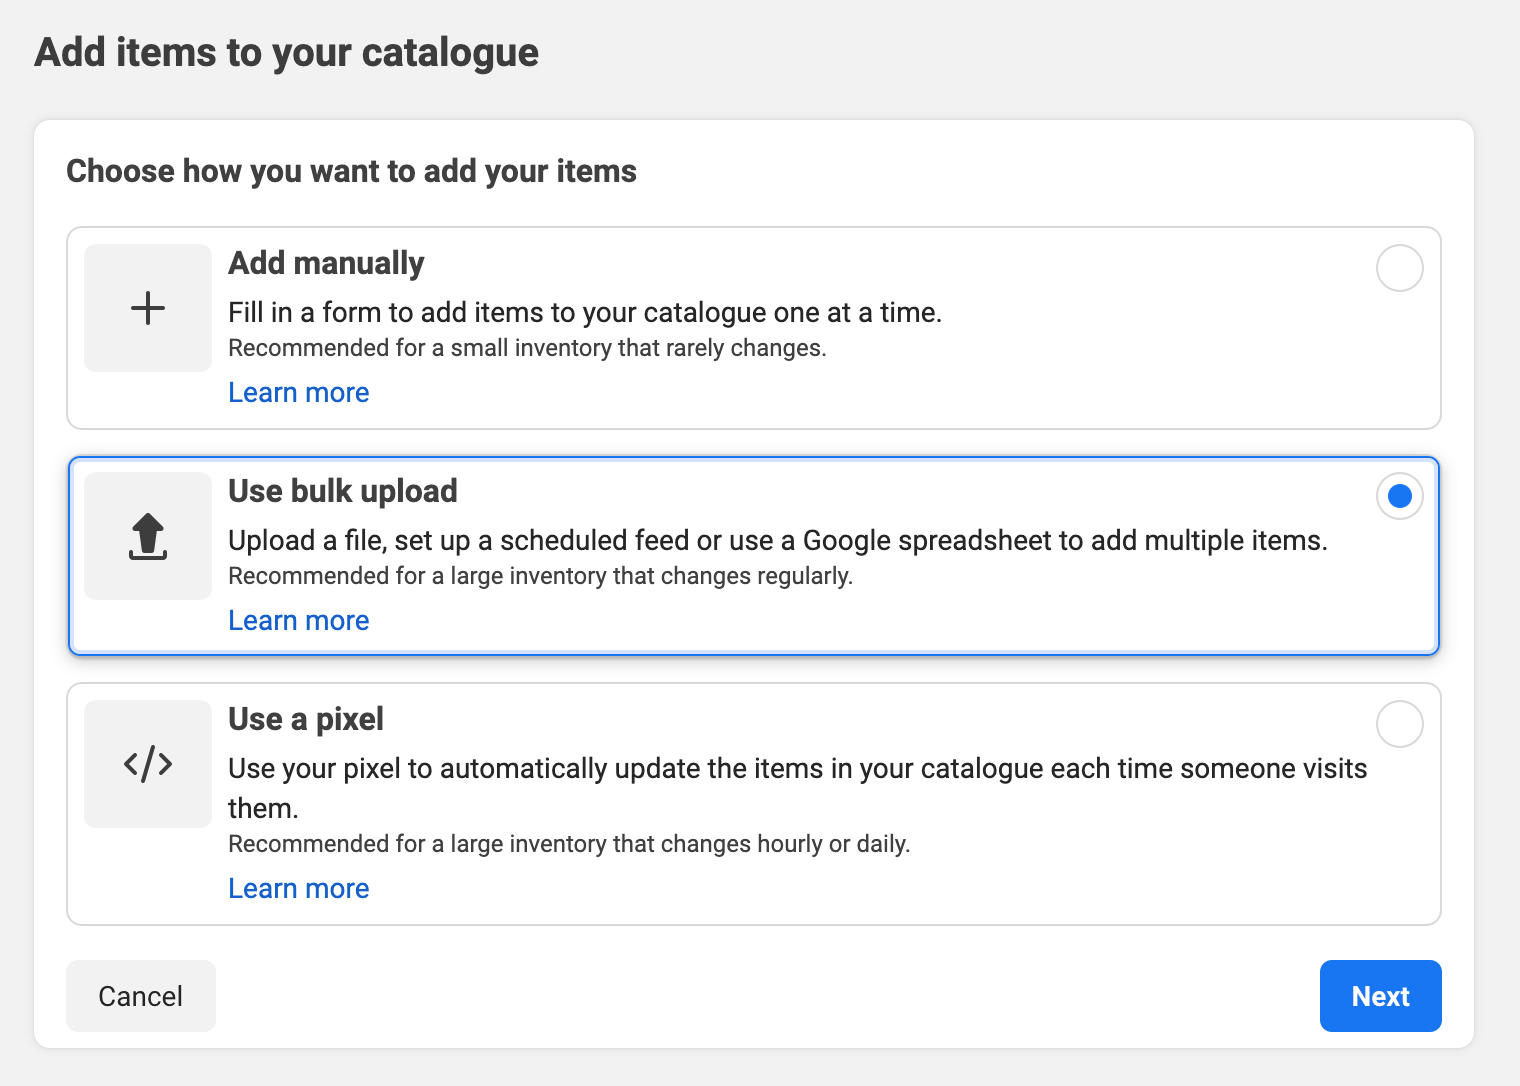
| + | # On the next screen, select "Use Bulk Upload" and click the "Next" button.<br><br>[[File: Commerce-manager-009.png]]<br><br> | ||
| + | # Choose "Scheduled Feed", and click "Next".<br><br>[[File: Commerce-manager-010.png]]<br><br> | ||
| + | ## Go back to the "Product Data Feeds" page in your Spiffy Store, copy the URL of your feed from your store, and paste it into the "Data feed URL" field<br><br>[[File:Sell-on-facebook-12.jpg]]<br><br> | ||
| + | ## Clear out any "Data feed URL login" details. They are not required.<br><br>[[File: Commerce-manager-011.png]]<br><br> | ||
| + | ## Choose the schedule that your feed should update your catalogue. We recommend this is set to "Daily".<br><br>[[File: Commerce-manager-012.png]]<br><br> | ||
| + | ## Name your data feed | ||
| + | ## Make sure the currency matches the currency of your Spiffy Store | ||
| + | ## When you're sure you have all of the details correct, click the "Upload" button.<br><br>[[File: Commerce-manager-013.png]]<br><br> | ||
| + | # Facebook should start importing your products. | ||
| + | # Importing your products may take a while, but you can safely click the "View Products" button to see the products that have been imported.<br><br> | ||
| − | + | ==Part 4 - Final Setup Steps== | |
| + | Once your products are all imported, refer to Facebook's Instructions on [https://www.facebook.com/business/help/610592986219839?id=1077620002609475 Customising your Facebook store] and [https://www.facebook.com/business/help/2658959294372394?id=1077620002609475 Setting up product collections in Facebook]. | ||
| + | <br><br> | ||
| + | |||
| + | =Guidelines for Listing Products in your Facebook Shop= | ||
Facebook needs the following to set up your Shop: | Facebook needs the following to set up your Shop: | ||
| + | * your business email address | ||
| + | * your business phone number | ||
| + | * the Facebook business page you want to connect to your Facebook Shop | ||
| + | * the URL of your storefront Terms of Service (usually your shipping and returns policy)<br><br> | ||
| + | |||
| + | Every product will need the following to be accepted by Facebook | ||
| + | * A unique SKU | ||
| + | * The product needs to be in stock | ||
| + | |||
| + | <br><br> | ||
| − | + | =Next Steps= | |
| − | + | * [[Set up Shoppable Posts on Instagram]] | |
| − | + | * [https://www.facebook.com/business/help/1665120490435542 Share your products on Facebook] | |
| − | |||
| − | + | <br><br> | |
| − | + | =HELP - There are no products in my feed!= | |
| − | + | Every product must have a unique SKU to show up in your feed. | |
Latest revision as of 11:37, 23 April 2021
Creating a feed of your products for Facebook allows you to show your product catalogue in your own store on your Facebook business page. This allows users to easily discover your products, share them with friends, and click through to your store to order.
Facebook has over 1 billion active users every month and is the largest social network in the world. Users spend an average of 50 minutes a day using its services. The sheer size of the network — coupled with the level of engagement by its users — makes it an ideal marketplace to promote your products and raise brand awareness.
There is no additional cost to use Facebook Shop and it is available on all Spiffy Stores Plans.
If you already have a Facebook shop setup with a different ecommerce provider, you will need to remove that catalogue altogether and create a new one.
Contents
Part 1 - Setting Up a Product Feed in Your Store
- Log in to your store
- Create a collection that will contain all of the products you want to show on Facebook. It can be either a Standard Collection or a Super Collection. A Super Collection makes it easier to set up. Note: Every product must have a unique SKU to show up in your feed.
- Create your data feed


Your Spiffy store must be launched and accessible (not password protected) to be able to submit your products to Facebook. Every product must also have a unique SKU to show up in your feed.
Part 2 - Setting Up Your Facebook Store
Before you begin...
- Log in to Facebook.
- Create a Facebook business page for your store (if you haven't already).
- Your account must have an admin page role for the Facebook business page.
- Your Facebook page must have a phone number, Privacy Policy link, and a street address. You're able to hide your street address and it won't affect your store.
- Your Spiffy store must be launched and accessible (not password protected) to be able to submit your products to Facebook.
Once you have done the above, follow the step by step below.
- Go to your Facebook Commerce Manager, review the information, and click the "Next" button.
- Choose "Checkout on another website" and click "Next".
- For your sales channel, choose your Facebook page.
- If you already have a business suite login, choose that, or create a new Business Account.
- Review and agree to the seller agreement and click "Finish Setup".
- Your shop has now been created. Click the "Add Items" button.


Part 3 - Connecting Your Data Feed
Note: Every product must have a unique SKU to show up in your feed.
- Under "Catalogue" on the left, click "Data Sources", and then click the "Add items" button on the next page.
- On the next screen, select "Use Bulk Upload" and click the "Next" button.
- Choose "Scheduled Feed", and click "Next".

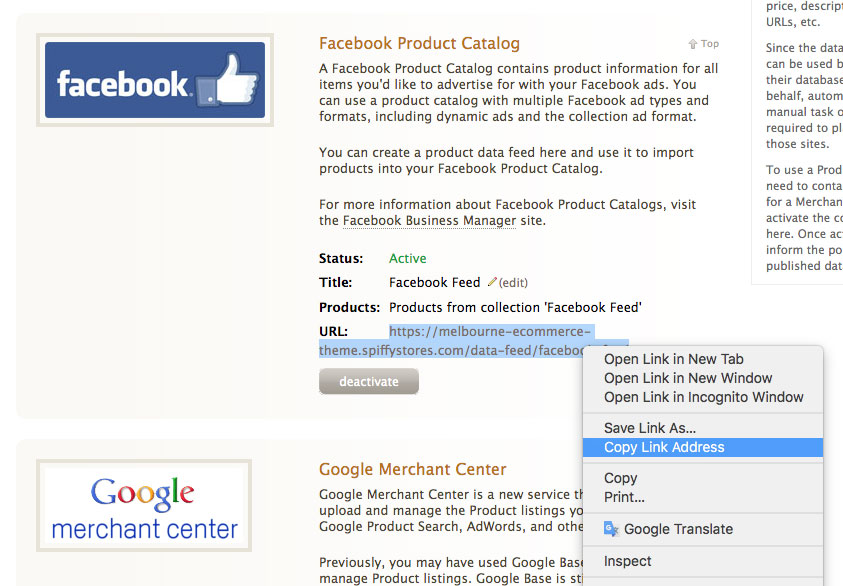
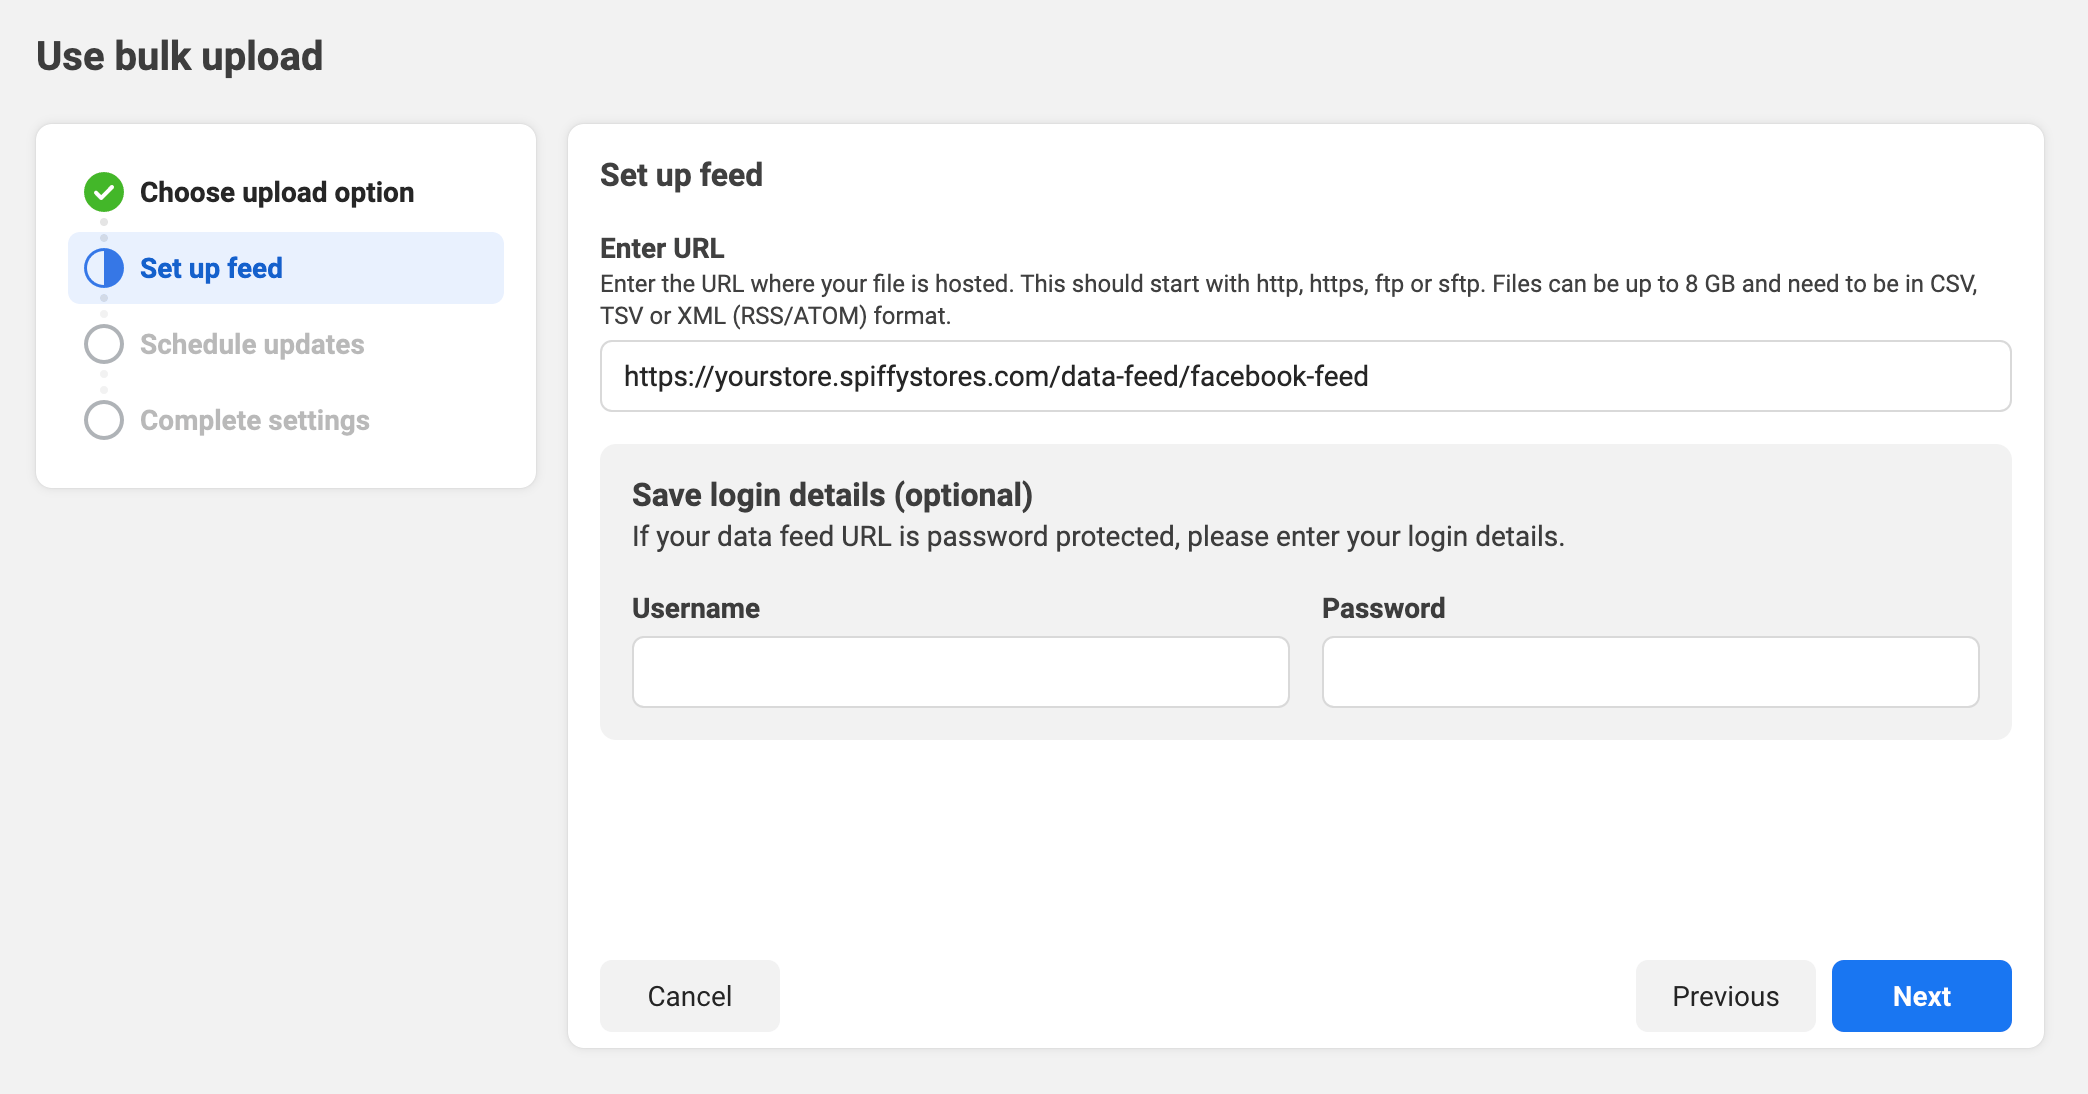
- Go back to the "Product Data Feeds" page in your Spiffy Store, copy the URL of your feed from your store, and paste it into the "Data feed URL" field
- Clear out any "Data feed URL login" details. They are not required.
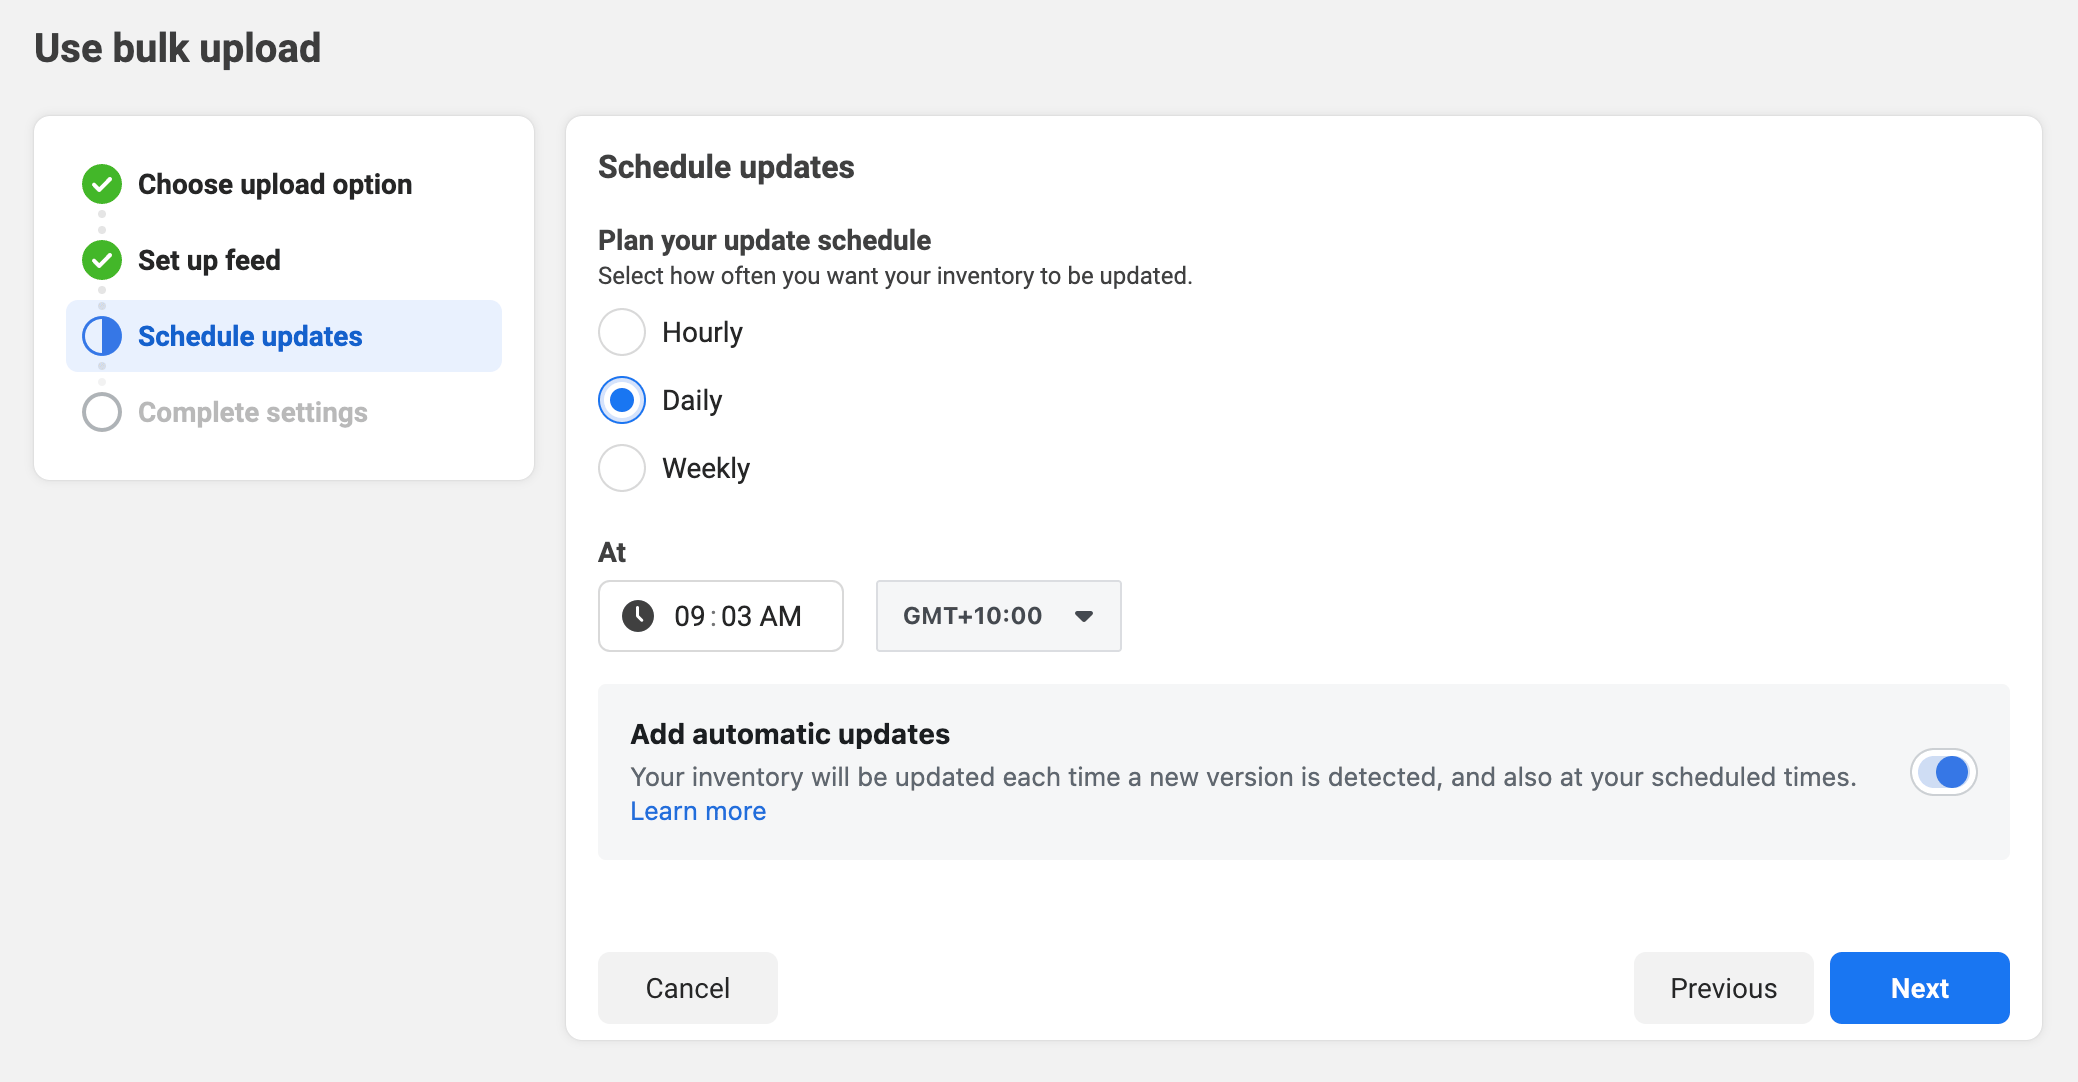
- Choose the schedule that your feed should update your catalogue. We recommend this is set to "Daily".
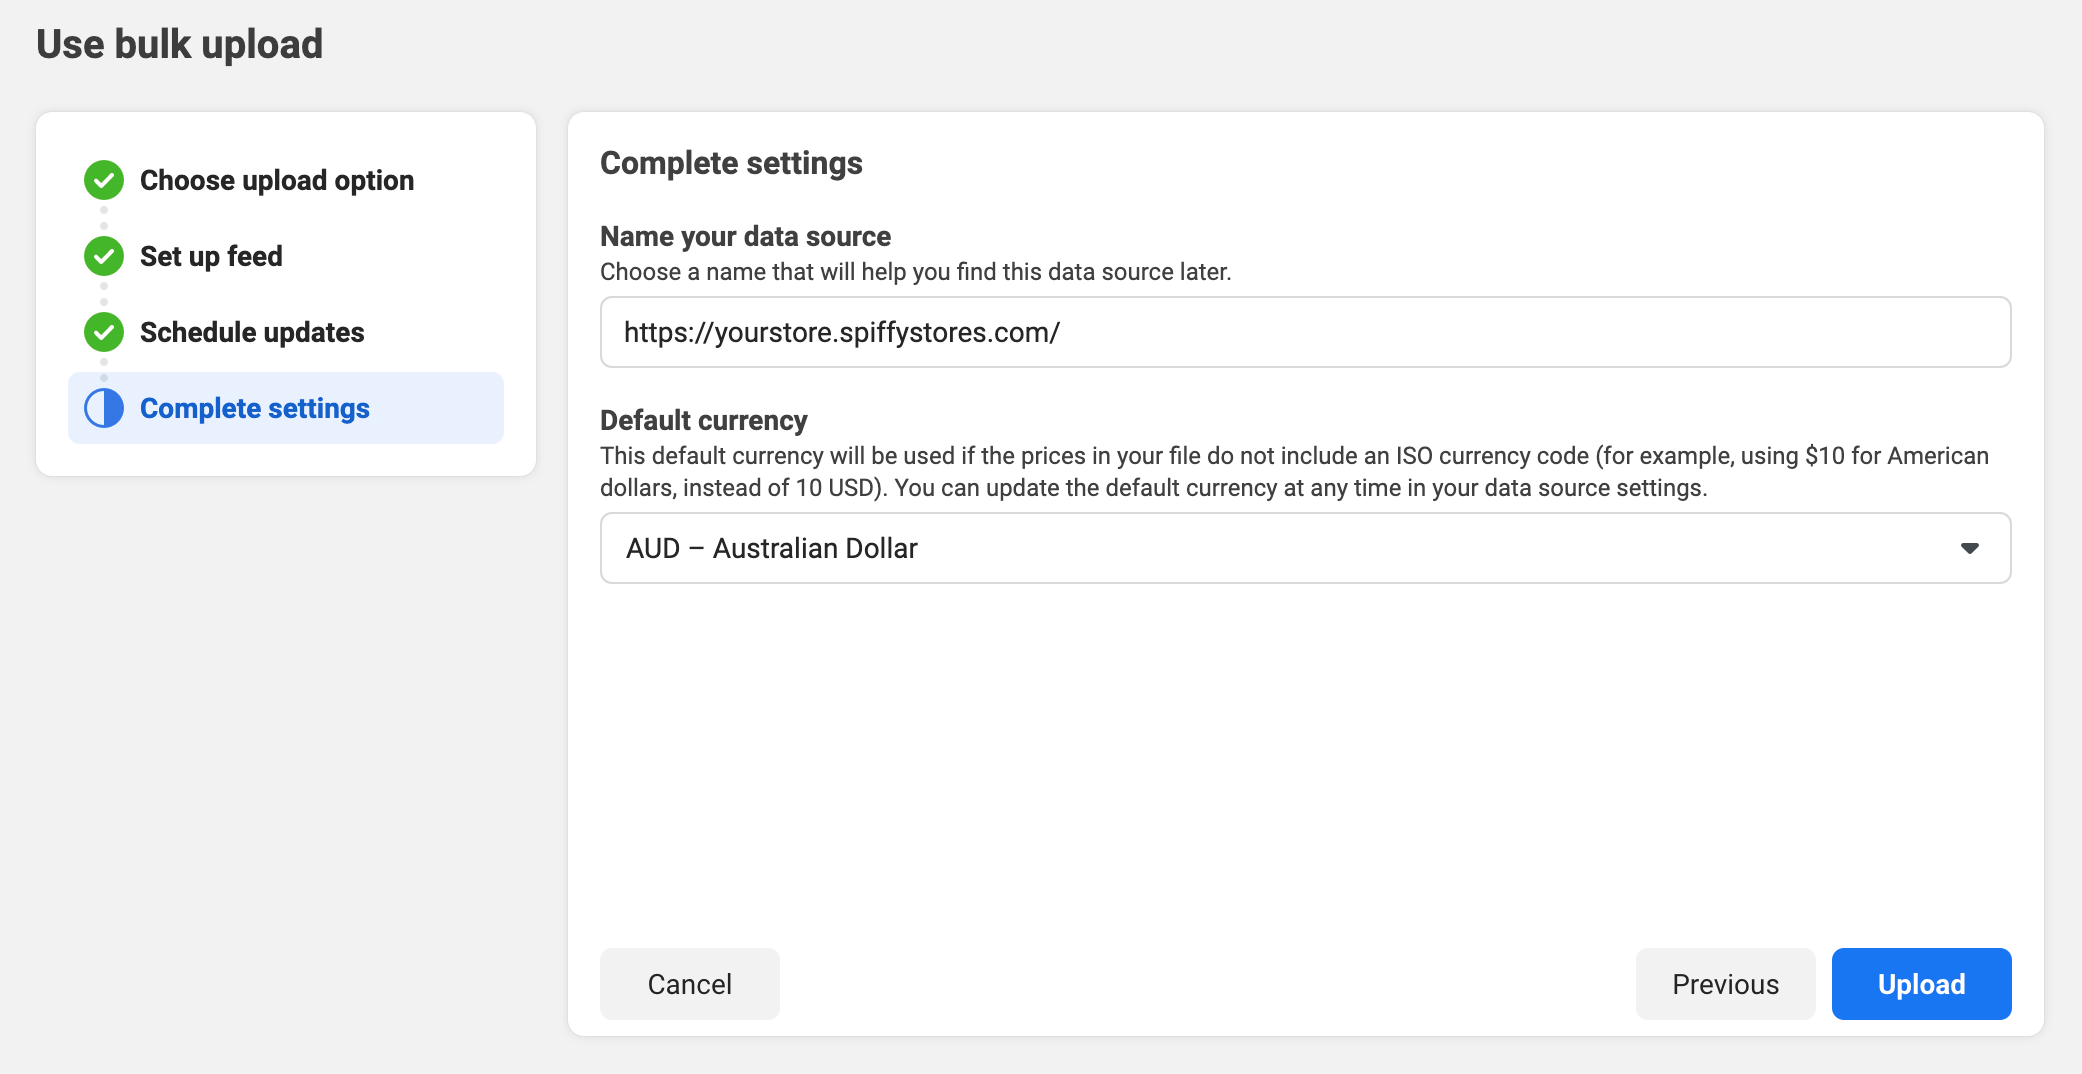
- Name your data feed
- Make sure the currency matches the currency of your Spiffy Store
- When you're sure you have all of the details correct, click the "Upload" button.
- Go back to the "Product Data Feeds" page in your Spiffy Store, copy the URL of your feed from your store, and paste it into the "Data feed URL" field
- Facebook should start importing your products.
- Importing your products may take a while, but you can safely click the "View Products" button to see the products that have been imported.


Part 4 - Final Setup Steps
Once your products are all imported, refer to Facebook's Instructions on Customising your Facebook store and Setting up product collections in Facebook.
Guidelines for Listing Products in your Facebook Shop
Facebook needs the following to set up your Shop:
- your business email address
- your business phone number
- the Facebook business page you want to connect to your Facebook Shop
- the URL of your storefront Terms of Service (usually your shipping and returns policy)
Every product will need the following to be accepted by Facebook
- A unique SKU
- The product needs to be in stock
Next Steps
HELP - There are no products in my feed!
Every product must have a unique SKU to show up in your feed.