Conversion Tracking
From Spiffy Stores Knowledge Base
Revision as of 12:24, 24 June 2025 by Admin (talk | contribs) (→Example — AdWords Conversion Tracking)
Conversion Tracking describes the practice of integrating "web bugs" into the checkout process which report back to a centralised third-party server when products are sold. This is commonly also described as a tracking pixel.
Contents
- 1 Tracking orders
- 1.1 Example
- 1.2 Example — Google Tag Manager Conversion Tracking
- 1.3 Example — AdWords Conversion Tracking
- 1.4 Example — ClixGalore Conversion Tracking
- 1.5 Example — Myshopping.com.au Conversion Tracking
- 1.6 Example — GetPrice.com.au Conversion Tracking
- 1.7 Example — Facebook Conversion Tracking
- 1.8 Example — Microsoft Ads / Bing Ads Conversion Tracking
Tracking orders
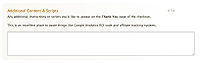
Additional Content and Scripts

Tracking pixels can be integrated in the Preferences -> Checkout & payment -> Additional Content & Scripts section of your store's Toolbox.
You are able to access the shop variable and you will find all the order variables which are customarily available to order notification emails.
Example
Your tracking system asks you to integrate a tracking pixel like this:
<img src="https://www.tracking.com/pixel.gif?amount=<AMOUNT>&order-id=<ORDER ID>¤cy=<CURRENCY>" height="1" width="1"/>
Looking at the above example we know that we need:
- full money amount of order. Probably in dollars :
{{ total_price | money }} - A unique order id. order_name will print out the name of the order such as #02322 which will suit our purposes:
{{order_name | url_encode}} - A unique order number. order_number will print out the order number without formatting such as 02322:
{{order_number}} - Our shop's currency. We can either hard code this or use
{{shop.currency}}
Let's replace the examples with actual liquid code:
<img src="https://www.tracking.com/pixel.gif?amount={{total_price | money}}&order-id={{order_name | url_encode}}¤cy={{shop.currency}}" height="1" width="1"/>
When a customer reaches the last page of the checkout the code that will actually be delivered to his browser will then look something like this:
<img src="https://www.tracking.com/pixel.gif?amount=55.34&order-id=#02322¤cy=AUD" height="1" width="1"/>
Example — Google Tag Manager Conversion Tracking
If you have enabled Google Tag Manager through the Analytics Preferences, then you don't need to include any snippet code as this has already been done for you.
You can add conversion tracking with the following code.
<script>
window.dataLayer = window.dataLayer || [];
window.dataLayer.push({
  event: "purchase",
  transaction_id: "{{ order_number }}",
  value: {{ total_price | money_without_currency }},
  "currency": "{{ currency }}",
  "tax": "{{tax_price}}",
  "shipping": "{{shipping_price}}",
  items: [
  {% for line_item in line_items %}{
      "id": "{{line_item.product_id}}",
      "name": "{{line_item.title}}",
      "quantity": {{line_item.quantity}},
      "price": {{line_item.line_price}}
    },{% endfor %}
  ]
});
</script>
Example — AdWords Conversion Tracking
When adding the tracking code for AdWords, you just need to change one small part of the tracking code that AdWords provides you with, by adding in your order amount with the "total_price" tag as displayed below.
Add in the tag
{{ total_price | money_without_currency }}in two places as displayed below in our example.
<!-- Google Code for SALES Conversion Page -->
<script type="text/javascript">
/* <![CDATA[ */
var google_conversion_id = 123456;
var google_conversion_language = "en";
var google_conversion_format = "3";
var google_conversion_color = "ffffff";
var google_conversion_label = "ttX7COr-gFFFtkPGsgL";
var google_conversion_value = {{ total_price | money_without_currency }};
/* ]]> */
</script>
<script type="text/javascript" src="https://www.googleadservices.com/pagead/conversion.js">
</script>
<noscript>
<div style="display:inline;">
<img height="1" width="1" style="border-style:none;" alt="" src="https://www.googleadservices.com/pagead/conversion/123456/?value={{ total_price | money_without_currency }}&label=ttX7COr-gFFFtkPGsgL&guid=ON&script=0"/>
</div>
</noscript>
You will need to ensure that you ONLY use the code that Google provides you with. DO NOT copy and paste our example.
When you have your tracking code ready, go to the "Preferences _> Checkout & Payment" section of your store's Toolbox, and paste your code in the "Additional Content & Scripts" box at the bottom of the page. Verify that it's all correct and click the "Apply these settings" button.
Example — ClixGalore Conversion Tracking
When adding the tracking code for ClixGalore, you just need to change a small part of the tracking code that Clix Galore provides you with, by adding in your order amount with the "total_price" tag, and adding in your order number with the "order_name" tag as displayed below.
Add in the tags
{{ total_price | money_without_currency }}and
{{order_name | url_encode}}in two places as displayed below in our example. You will also need to add in your Ad ID if it's not included in the code you have received from ClixGalore.
<!--begin clixGalore code -->

<IMG SRC="https://www.clixGalore.com/AdvTransaction.aspx?AdID=YOURCODEHERE&SV={{ total_price | money_without_currency }}&OID={{order_name | url_encode}}" height="1" width="1" border="0">

<!--end clixGalore code -->
You will need to ensure that you ONLY use the code that ClixGalore provides you with. DO NOT copy and paste our example.
When you have your tracking pixel ready, go to the "Preferences _> Checkout & Payment" section of your store's Toolbox, and paste your code in the "Additional Content & Scripts" box at the bottom of the page. Verify that it's all correct and click the "Apply these settings" button.
Example — Myshopping.com.au Conversion Tracking
As with the other examples above, to add the tracking code for Myshopping.com.au, you just need to change a small part of the tracking code that Myshopping.com.au provides you with, by adding in your order amount with the "total_price" tag, and adding in your order number with the "order_name" tag as displayed below.
Add in the tags
{{ total_price | money_without_currency }}and
{{order_name | url_encode}}in two places as displayed below in our example.
<!--begin Myshopping.com.au code -->

<img height="0" width="0"  src="https://www.myshopping.com.au/sale.asp?mid=123456&amount={{ total_price | money_without_currency }}&order={{order_name | url_encode}}">

<!--end Myshopping.com.au code -->
You will need to ensure that you ONLY use the code that Myshopping.com.au provides you with. DO NOT copy and paste our example.
When you have your tracking pixel ready, go to the "Preferences _> Checkout & Payment" section of your store's Toolbox, and paste your code in the "Additional Content & Scripts" box at the bottom of the page. Verify that it's all correct and click the "Apply these settings" button.
Example — GetPrice.com.au Conversion Tracking
As with the other examples above, to add the tracking code for GetPrice.com.au, you just need to change a small part of the tracking code that GetPrice.com.au provides you with, by adding in your order amount with the "total_price" tag, and adding in your order number with the "order_name" tag as displayed below.
Add in the tags
{{ total_price | money_without_currency }}and
{{order_name | url_encode}}in two places as displayed below in our example.
<!-- Getprice.com.au sales tracking system -->
<img height="1" width="1" border="0" src="https://secure.getprice.com.au/affsale.asp?shopid=12345&price={{ total_price | money_without_currency }}&sid={{order_name | url_encode}}">
<!-- End Getprice.com.au -->
You will need to ensure that you ONLY use the code that GetPrice.com.au provides you with. DO NOT copy and paste our example.
When you have your tracking pixel ready, go to the "Preferences _> Checkout & Payment" section of your store's Toolbox, and paste your code in the "Additional Content & Scripts" box at the bottom of the page. Verify that it's all correct and click the "Apply these settings" button.
Example — Facebook Conversion Tracking
As with the other examples above, to add the tracking code for Facebook, you use Your standard Facebook Pixel code, but add a tracking event to it..
Add in the tags
{{ total_price | money_without_currency }}and
{{order_name | url_encode}}in two places as displayed below in our example. If you are going to copy and paste our example, please ensure your replace
[YOUR PIXEL ID]
with your actual Pixel ID from Facebook.
<!-- Facebook Pixel Code -->
<script>
  !function(f,b,e,v,n,t,s)
  {if(f.fbq)return;n=f.fbq=function(){n.callMethod?
  n.callMethod.apply(n,arguments):n.queue.push(arguments)};
  if(!f._fbq)f._fbq=n;n.push=n;n.loaded=!0;n.version='2.0';
  n.queue=[];t=b.createElement(e);t.async=!0;
  t.src=v;s=b.getElementsByTagName(e)[0];
  s.parentNode.insertBefore(t,s)}(window, document,'script',
  'https://connect.facebook.net/en_US/fbevents.js');
  fbq('init', '[YOUR PIXEL ID]');
  fbq('track', 'PageView');
  fbq('track', 'Purchase',{value: {{ total_price | money_without_currency }},currency: '{{shop.currency}}'});
</script>
<noscript><img height="1" width="1" style="display:none"
  src="https://www.facebook.com/tr?id=[YOUR PIXEL ID]&ev=PageView&noscript=1"
/></noscript>
<!-- End Facebook Pixel Code -->
When you have your tracking pixel ready, go to the "Preferences _> Checkout & Payment" section of your store's Toolbox, and paste your code in the "Additional Content & Scripts" box at the bottom of the page. Verify that it's all correct and click the "Apply these settings" button.
Example — Microsoft Ads / Bing Ads Conversion Tracking
As with the other examples above, to add the tracking code for Microsoft / Bing Ads, you use your standard Microsoft/Bing Ads code, but add a tracking event to it.
Add in the tags
{{ total_price | money_without_currency }}and
{{shop.currency}}in two places as displayed below in our example. If you are going to copy and paste our example, please ensure your replace
[TAG_ID_HERE]
with your actual Tag ID from Microsoft.
<!-- Microsoft Ads Code -->
<script>
(function(w,d,t,r,u){var f,n,i;w[u]=w[u]||[],f=function(){var o={ti:"[TAG_ID_HERE]"};o.q=w[u],w[u]=new UET(o),w[u].push("pageLoad")},n=d.createElement(t),n.src=r,n.async=1,n.onload=n.onreadystatechange=function(){var s=this.readyState;s&&s!=="loaded"&&s!=="complete"||(f(),n.onload=n.onreadystatechange=null)},i=d.getElementsByTagName(t)[0],i.parentNode.insertBefore(n,i)})(window,document,"script","//bat.bing.com/bat.js","uetq");
</script>

<script>
  function GetRevenueValue()
    {
      return {{ total_price | money_without_currency }};
    }
</script>
<script>
  window.uetq = window.uetq || [];
  window.uetq.push('event', '', {'revenue_value': GetRevenueValue(), 'currency': '{{shop.currency}}'});
</script>
<!-- End Microsoft Ads Code -->
When you have your code ready, go to the "Preferences -> Checkout & Payment" section of your store's Toolbox, and paste your code in the "Additional Content & Scripts" box at the bottom of the page. Verify that it's all correct and click the "Apply these settings" button.