Difference between revisions of "Infinite Options"
From Spiffy Stores Knowledge Base
| (2 intermediate revisions by the same user not shown) | |||
| Line 30: | Line 30: | ||
Remember too, that complex build-to-order items can be constructed using [[Product Bundles]] which can provide inventory management for the individual components. | Remember too, that complex build-to-order items can be constructed using [[Product Bundles]] which can provide inventory management for the individual components. | ||
| + | <html> | ||
| + | <div style="padding:60% 0 0 0;position:relative;"><iframe src="https://player.vimeo.com/video/573811470?badge=0&autopause=0&player_id=0&app_id=58479" frameborder="0" allow="autoplay; fullscreen; picture-in-picture" allowfullscreen style="position:absolute;top:0;left:0;width:100%;height:100%;" title="Introduction to infinite options 001.mp4"></iframe></div><script src="https://player.vimeo.com/api/player.js"></script> | ||
| + | </html> | ||
=== Infinite Option Sets === | === Infinite Option Sets === | ||
Latest revision as of 11:22, 19 October 2021
Infinite Options allows you to sell products that are infinitely customisable. You can create drop down, number, radio, checkbox, text, and long text fields with ease, and apply them to a single product or collection of products.
Every Infinite Option is purely descriptive. If you offer a customer a choice of options using an Infinite Option selection, the option choice becomes part of the order and is added to the product description in the cart, but it does not affect the price of the product, nor does it affect inventory management. If you want to create fields that do affect the product price then you'll want to create Product Variations or Custom Options in addition or instead of using Infinite Options.
If you need stock tracking on the option, then you'll need to create those options using Product Variations.
When you create a product, you'll most likely need to define a number of variations for that product that represent all of the physical versions of that product that you stock. For example, if the product comes in Red, Blue and White colours, then you'll create 3 variations, one for each colour. Each can have a unique Stock Keeping Unit number (SKU), and each variation has its own inventory tracking levels.
Of course, products may have more than one distinguishing attribute, and the standard product variation allows up to three unique options to be defined for each product variation. For example, you can define a product with variations having up to three attributes, such as Colour, Size and Fabric, for example. Of course, you can choose whatever attributes are appropriate for your product.
Now, there may be additional attributes that apply to a product, and this can be handled by Custom Options.
Custom Options allow you to add price-based attributes to a product in addition to the standard three options available for product variations. However, Custom Options do not provide any support for inventory management as they are applied to a product independently of which product variation is selected.
Think of Custom Options as additional customizations that can be added to any product variation, regardless of which variation has been chosen. A good example would be an option to request gift wrapping for a product, which may attract an additional service charge, but clearly applies to any product variation, and therefor has no affect on inventory management.
Contents
- 1 Limitations with Custom Options
- 2 Customizing Products with Infinite Options
- 2.1 Infinite Option Sets
- 2.2 Getting Started
- 2.3 Managing Infinite Option Sets
- 2.4 Creating New Option Sets
- 2.5 Add Option Set Fields
- 2.6 Edit an Option Set
- 2.7 Edit an Option Set Field
- 2.8 Edit an Option Set Field with Selection Labels
- 2.9 Edit a Drop-Down Menu Option Set Field with Selection Labels
- 2.10 Option Set Field Positioning
- 3 Further Reference
Limitations with Custom Options
Custom Options are great for adding a small number extra options to a product that may involve an additional charge.
However, as the number of options is increased, the number of possible combinations of options becomes unmanageable, and this can lead to product pages being slow to load.
For this reason, we've introduced Infinite Options which remove all the previous limitations of Custom Options... especially for options which do not affect the price of the product.
Customizing Products with Infinite Options
Infinite Options are designed to allow your customers to customize a product by choosing from a number of additional options using a variety of selection types.
Every Infinite Option is purely descriptive. If you offer a customer a choice of options using an Infinite Option selection, the option choice becomes part of the order and is added to the product description in the cart, but it does not affect the price of the product, nor does it affect inventory management.
Infinite Options excel at providing a simple choice for customers where there are a large number of options available for a particular product, particularly for hand-made or build-to-order items.
Remember too, that complex build-to-order items can be constructed using Product Bundles which can provide inventory management for the individual components.
Infinite Option Sets
Unlike Custom Options, Infinite Options are not added individually to products.
Instead, you define an Infinite Option Set which contains a number of field definitions. This Infinite Option Set can then be applied to either all products, all products in a collection or to an individual product. Additionally, the Infinite Option Set can be restricted to being applied to only specific customers or only for a specified date range.
Multiple Infinite Option Sets can apply to a particular product, and the exact rules for determining whether the Infinite Option Set applies to a product can be built using Super Collections.
For example, you might create a Super Collection consisting of all the products of a particular brand, where the price is greater than $100 and you have less than 5 in stock. Even if the actual Super Collection is hidden, it can still be used to select the products for a particular Infinite Option Set.
The combination of Infinite Option Sets, Super Collections and Customer tags is a powerful tool that allows you to create very customized targeting for your additional product customization.
Finally, each Infinite Option Set provides some optional text that can be added to the end of the product description. Again, this allows for specific instructions or promotional information for the products selected by the Infinite Options Set.
Getting Started
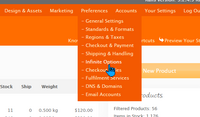
The Infinite Options settings can be found under the Preferences menu at the top of your store's control panel.
Selecting this menu item will allow you to view and create your Infinite Option Sets.
Managing Infinite Option Sets
You will find a list of currently defined Infinite Option Sets listed on this page.
Each option set can be paused by selecting the "Pause" option under the Actions, and a paused option set can be resumed by selecting "Resume".
An option set can be updated by selecting the "Edit" option icon (pencil) under Actions where the option set can be updated. If you need to update the option set fields or update any other settings for the option set, you need to use this action.
If an option set is no longer required, click on the "Delete" icon at the end of the line, under Actions.
The order in which the option sets are applied to products is determined by the order of the sets in this list. Click and drag on the "Drag" icon at the start of each line to move the option set to a different position in the list.
New option sets can be created by clicking on the "Add an Option Set" button.
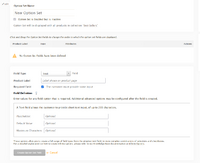
Creating New Option Sets
Each option set requires a name to help you identify the purpose of the option set.
There are three basic options that need to be chosen for the new option set before it can be created.
- Choose a Date Range
- The date range for the option set which determines when it may be applied. By default, a new option set is always active, but you may choose to defer its start date and in addition, you may choose a date when the option set is to be no longer active. Even when an option set is active, it may be manually paused at any time. The start and end dates can be chosen by clicking on the "today" and "deactivated" links to choose a new date from the calendar.
- Choose Associated Products
- A choice needs to be made as to the products for which this option set applies. Repeatedly clicking on the selection link cycles the options through "all products in a collection", "an individual product" and finally "all products". If you choose products in a collection, then select the associated collection from the drop-down menu list of collections. If you want to apply the option set to an individual product, then choose that product from the drop-down menu list of products.
- Choose Customers
- Finally, you can choose that the option set is applicable for everyone, or just for specific customers that have signed in and their customer record as the selected customer tag. For example, you might have wholesale customers, all tagged with the "wholesale" tag. You can choose to associate an option set with these customers by selecting the tag from the drop-down menu list of customer tags.
Lastly, an optional text description may be added which is appended to the product description for each option set. The text in this optional description may be simply formatted using Advanced textile editing markup tags. The toolbar will help you add simple formatting options, if required.
Once all the required options have been selected, click on the "Create Option Set" button.
Add Option Set Fields
Once the new option set has been created, it will be added to the list as shown.
By default, the option set will be disabled because the option set does not have any fields defined for it.
Click on the button "Define Option Set Fields" to add some fields to the option set.
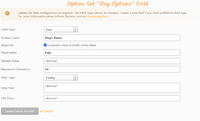
You'll now find yourself on the Option Set Edit page. From here you can update and edit some of the more advanced settings for the option set, and you can also manage the fields associated with the option set.
Click on the "Add an Option Set Field" button to add a field to the option set.
At this point you can see the available options that need to be specified to create a new option set field.
- Field Type
- Select the type of field that you want to create. You can choose from:
- Text - An field for small amounts of text input
- Large Text - A field for larger amounts of text presented as a block input field
- Number - A field for strictly numeric input only
- Radio Buttons - A list of options as a set of buttons, of which exactly one must be selected
- Checkboxes - A list of options as a set of check boxes, of which one or more may be optionally selected
- Drop-Down Menu - A set of options presented as a drop-down selection list, from which one may be chosen
- Product Label
- A description of the field that appears on the product page and in the cart description for the product.
- Required Field
- Select this if a field value is required. This applies to text and numeric fields, as well as drop-down menus.
- Optional Attributes
- The set of available optional attributes varies depending upon the field type.
- Placeholder - For text and number fields, this value provides a prompt as to the type of input that is required.
- Default Value - Initialize a field with a default value. If you are using Radio Buttons, Checkboxes or a Drop-Down Menu, then if the default value exactly matches one of the option labels, then that label is pre-selected.
- Maximum Characters - For text fields, this value limits the number of characters that can be entered for the field.
- Minimum Value - For number fields, this value specifies the minimum accepted value for the field.
- Maximum Value - For number fields, this value specifies the maximum accepted value for the field.
- Additional advanced options are available once the field has been created.
Once the settings have been entered, click on "Create Option Set Field" to create the field.
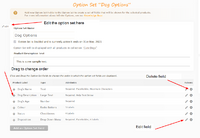
Once you have added a number of fields, the overview of the option set will look something like the image to the right.
You can edit the option set to update or set more advanced options.
You can also change the order in which the fields are displayed, by dragging the field to the desired position in the list.
Finally, individual fields can be edited or deleted as required. You will need to edit a field to update the settings, or to add more advanced settings.
Edit an Option Set
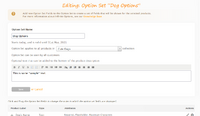
Editing an existing option set is quite straight forward. Simply update any of the settings to change the set name, update the valid date range for the set or alter the product and/or customer selection for the option set.
The optional product description text can also be changed.
Click on the "Save" button once your changes have been completed.
Edit an Option Set Field
Editing an option set field is also pretty straight forward.
You cannot change the field type of an existing field, but you can update all the other attributes for that field type.
When editing an option set field, you have access to some advanced options.
- Help Text
- You may choose to display some help text to assist the customer in completing the field input. The help text can be displayed in one of two ways.
- Tooltip - The help text appears in a bubble above the field when the customer hovers over the tooltip icon next to the label
- Below - The help text appears immediately below the input area for the field.
- CSS Class
- If you need to provide some custom styling for the field, you may specify a CSS Style class that is applied to the field. You will also need to define this class in your theme style sheet.
Once completed, your updates should be saved by clicking on the "Update Option Set Field" button.
Edit an Option Set Field with Selection Labels
If you edit Radio Button, Checkbox and Drop-Down Menu fields there will be an extra option to allow you to provide a set of label values for the field.
For example, in the image to the right, you'll find that there are three label values defined for this Radio Button field, "Red", "Blue" and "Green". If you want to add additional labels for this field, simple click on the "Add New Value" link and provide the value when prompted. If you want to change the order of the values, simply click and hold the value and drag it to a new position. Finally any label value can be deleted by clicking on the "Delete" link for the value.
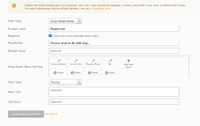
Edit a Drop-Down Menu Option Set Field with Selection Labels
Drop-Down Menu fields have a small additional option which can be used when the "Required" option is chosen.
If you configure a drop-down menu as "Required", then you may also use the "Placeholder" setting to provide a customized prompt for the drop-down menu. In the example shown to the right, the drop-down menu field will be generated with the prompt "Choose what do do with dog..." and the customer will be required to choose one of the options listed in the drop-down list.
Option Set Field Positioning
By default, the option set fields will be inserted just above the "Add to Cart" button in your theme.
If you want to specifically control where the fields appear on the product page, insert the following code at the point on the page where you want the fields to be inserted.
<div id="ifo-fields"></div>
