How to create a custom XML feed for Google Merchant Center
From Spiffy Stores Knowledge Base
This is a tutorial for creating a custom data feed for Google Merchant Center. In most cases, you will not need to create a custom feed, as the standard feed built into your store should provide you with everything you need.
This page has been created for stores that need additional information in their feed, or stores that sell adult products. It also has a limit of 50 products. If you don't need a custom feed, please refer to Product data feeds for the current information on creating and managing product data feeds.
IMPORTANT! BEFORE YOU BUILD YOUR FEED
You need to ensure that all products in your feed have a Barcode (UPC/EAN, ISBN) and SKU (Stock Keeping Unit) before submitting your data file Google Merchant Center. If you don't do this, they will not appear in your feed, and they will not accept your submission!
Contents
Setting up your store to create the feed
To create a feed, you'll need to do two things.
- Create a new collection that contains all of the products you want to include in your product feed.
- Edit your Theme.liquid file in your store toolbox.
STEP 1
Create a collection in your Spiffy Toolbox called "Google Merchant Center Feed". Make sure it called exactly that. The collection you create can be either a standard collection, or a super collection… it doesn't matter which.
You then add the products to this collection that you want to supply to Google Merchant Center Feed in your XML feed.
STEP 2
Paste the code below into your Theme.liquid file so it's ABOVE THE FIRST LINE that appears in the editor.
{% if collection.handle == 'google-merchant-center-feed' %}<?xml version="1.0" encoding="UTF-8"?>
<rss xmlns:g="http://base.google.com/ns/1.0" version="2.0">
  <channel>
    <title>Google Feed</title>
    <description>Google Product Data Feed for {{ shop.name }}</description>
    <link>{{ shop.url }}</link>{% for product in collection.products %}
    <item>
      <g:id>{{product.variants.first.sku}}</g:id>
      <title>{{product.title | escape}}</title>
      <link>{{shop.url}}{{product.url}}</link>
      <description>{{product.description | strip_html | escape | truncate: 4000}}</description>
      <g:price>{{product.price | money_without_currency}} {{ shop.currency }}</g:price>
      <g:condition>new</g:condition>
      <g:brand>{{product.vendor | escape}}</g:brand>
      <g:gtin>{{product.variants.first.barcode}}</g:gtin>
      <g:image_link>{{product.featured_image | product_img_url: 'medium'}}</g:image_link>
      <g:product_type>{{product.type | escape}}</g:product_type>
      <g:availability>{% if product.variants.first.available == true %}in stock{% else %}out of stock{% endif %}</g:availability>
      <g:shipping_weight>{{ product.variants.first.weight | weight_with_unit }}</g:shipping_weight>
    </item>{% endfor %}
  </channel>
</rss>{% else %}
Paste this so it's BELOW THE LAST line in your Theme.liquid file.
{% endif %}
Including all products automatically
If you wish to automatically generate a data feed for all products in your store, change the code in the second line from
{% for product in collection.products %}
to
{% for product in collections.all.products %}
If you do this, then you do not need to add any products to the collection. All products from your store will be automatically added to the data feed.
STEP 3
Save your Theme.liquid file, and go back to the collections page of your Store Toolbox. Select your new collection called "Google Merchant Center Feed", and then preview the collection to make sure that it's working. If you view the source of this page, you will see something that looks like this.
<?xml version="1.0" encoding="UTF-8" ?>
<products>
  <product>
    <merchant_sku>ART002</merchant_sku>
    <product_name>Blue Shirt</product_name>
    <product_description>Lorem ipsum dolor sit amet, consectetur adipisicing elit, sed do eiusmod tempor incididunt ut labore et dolore magna aliqua.Ut enim ad minim veniam, quis nostrud exercitation ullamco laboris nisi ut aliquip ex ea commodo consequat.Duis aute irure dolor in reprehenderit in voluptate velit esse cillum dolore eu fugiat nulla pariatur. Excepteur sint occaecat cupidatat non proident, sunt in culpa qui officia deserunt mollit anim id est laborum.</product_description>
    <manufacturer>Diesel</manufacturer>
    <Current_Price>45.00</Current_Price>
    <Original_Price>0.00</Original_Price>
    <price>45.00</price>
    <stock>Y</stock>
    <Product_URL>http://showtime.spiffystores.com/products/blue-shirt</Product_URL>
    <Image_URL>http://asset2.spiffyserver.com/sites/104/products/16174_z05_medium.jpg</Image_URL>
    <Product_Type>Mens Jeans</Product_Type>
    <Condition>New</Condition>
  </product>
  <product>
    <merchant_sku>ART002</merchant_sku>
    <product_name>MENS JEANS</product_name>
    <product_description>Lorem ipsum dolor sit amet, consectetur adipisicing elit, sed do eiusmod tempor incididunt ut labore et dolore magna aliqua.Ut enim ad minim veniam, quis nostrud exercitation ullamco laboris nisi ut aliquip ex ea commodo consequat.Duis aute irure dolor in reprehenderit in voluptate velit esse cillum dolore eu fugiat nulla pariatur. Excepteur sint occaecat cupidatat non proident, sunt in culpa qui officia deserunt mollit anim id est laborum.</product_description>
    <manufacturer>Diesel</manufacturer>
    <Current_Price>85.99</Current_Price>
    <Original_Price>0.00</Original_Price>
    <price>85.99</price>
    <stock>Y</stock>
    <Product_URL>http://showtime.spiffystores.com/products/mens-jeans</Product_URL>
    <Image_URL>http://asset3.spiffyserver.com/sites/104/products/8543_z16_medium.jpg</Image_URL>
    <Product_Type>Mens Jeans</Product_Type>
    <Condition>New</Condition>
  </product>
</products>
If it all looks correct, your store is now set up to provide your XML product feed at
http://<YOUR STORE ADDRESS>/collections/google-merchant-center-feed
STEP 4 - Adding your data feed on the Google Merchant Center website
Adding your data feed on the Google Merchant Center website

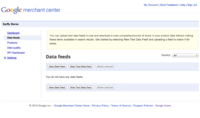
Once you have signed up for a Google Merchant Center account, you can then add your data feed. In the "Data feeds" section of the Merchant Centre, click the "New Data Feed" button.
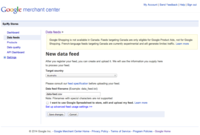
Data feed options

On the next screen, choose the country you are based in, enter "data-feed.xml" for your filename, and click "Save changes".

Click "Create schedule"

Click the "Create schedule" link next to your data-feed.xml file.

Scheduled upload

In the Popup window, choose "Weekly", select your timezone, and then paste in the URL of your data feed that you have copied from the "Marketing -> Product data feeds" section of your store's Toolbox. In most browsers, you can right-click on the URL and copy it.
Username and password should be left blank.
When you have done this, click the "Schedule and fetch now" button. Google will fetch your XML file. If there are any issues, it's likely because there are issues with product data. You will need to check any products in your store's Toolbox that you receive warnings about to make sure that they all have a Barcode (UPC/EAN, ISBN) and SKU (Stock Keeping Unit).
Common Errors
Insufficient product identifiers: Missing two out of three attributes [GTIN, brand, mpn]
The brand field is already populated, so this means that you have not entered a Barcode for this product. You will need to edit the product in your store's Toolbox and ensure it has a Barcode number entered in the "Barcode" field. You can also use the Import/Export feature to update your products if your store is on the Business Plan or above. You can enter a GTIN, UPC, EAN or ISBN here. More information about a GTIN can be found at http://en.wikipedia.org/wiki/Global_Trade_Item_Number
Missing required attribute: id
This means that you have not entered a SKU for this product. You will need to edit the product in your store's Toolbox and ensure it has a SKU entered in the SKU field. You can also use the Import/Export feature to update your products if your store is on the Business Plan or above.
Missing recommended attribute: google product category
We cannot include the Google product category in the feed. You can safely ignore this warning.
Website URL not claimed
You will need to claim your website in the General Settings section of Google Merchant Center.