Enabling PayPal Express Checkout
From Spiffy Stores Knowledge Base
Note: These instructions refer to a legacy PayPal service, and we recommend using the latest PayPal Checkout service instead.
PayPal Website Payments Standard adds PayPal as a payment method in your checkout. The customer submits their order, and is redirected to the PayPal site to make a payment.
PayPal Express Checkout works slightly differently, by adding a checkout button to your Shopping Cart page. Users can checkout through the PayPal interface first, before returning to the Spiffy Stores Checkout to select their shipping. This process is slightly more complex for customers and can result in confusion on your customers' part. They think they have paid for an order, but it's not actually paid until they complete the checkout.
This is why we don't recommend that you enable PayPal Express Checkout, and use PayPal Website Payments Standard instead. If you only accept payment by PayPal, this is especially important, because the standard checkout button is displayed regardless of whether you choose to use PayPal Express or not. If you don't have any other payment methods, and you customer click the Checkout button, they won't be able to complete their order.
Contents
Before Starting: You will need a PayPal Business account
To enable PayPal Express Checkout, you will need to have a PayPal Business account. If you don't have a PayPal business account, click here to sign up for a PayPal Business account, and then return to this page.
Part 1 - Configure your PayPal Account
When you've set up your PayPal account, follow the steps below to configure access to your PayPal account.
Include Shipping charges from your store

Configure PayPal Shipping

Configure PayPal Shipping


Allow Shipping Override

You need to configure PayPal to include the shipping charges that are calculated by your store.
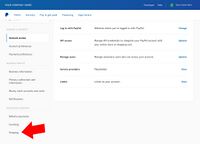
- Log in to manage your PayPal account
- Click on "Account settings" under Settings icon in the top menu.
- Click on "Shipping" under "Solutions & Services".
- Click on "Update" next to "Shipping calculations".
- Tick the box that says "Click here to allow transaction-based postage values to override the profile postage settings listed above (if profile settings are enabled)"
- Click the "Save" button
Accept payments from customers without a PayPal account
Configure PayPal Website Preferences

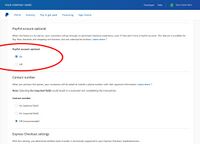
Enable PayPal Account Optional

You can allow your customer to make payments using PayPal even if they don't have their own PayPal account. Unfortunately all Paypal transactions processed in this method are not protected by PayPal's seller protection... so there is a risk of fraudulent transactions.
- Log in to manage your PayPal account
- Click on "Account settings" under Settings icon in the top menu.
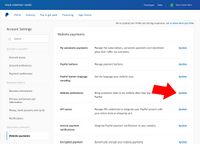
- Click on "Website payments" under "Solutions & Services".
- Click on "Website preferences" on the right.
- Scroll down, and select the option that enables "PayPal Account Optional"
- Click the "Save" button
Automatic Return at the end of the transaction
Configure PayPal Website Preferences
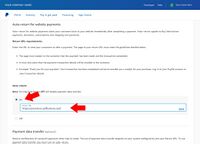
Enable Auto Return

Once a customer has made their payment using PayPal, a confirmation message is displayed and the customer is prompted to click a link to return to your store. If the customer does not click on this link, then any tracking code that you have installed will not be triggered and your site statistics may not correctly reflect the actual number of orders that have been processed.
You should enable the "Auto Return" feature in PayPal so that the customer is automatically redirected back to your store once the transaction has been completed.
- Log in to manage your PayPal account
- Click on "Account settings" under Settings icon in the top menu.
- Click on "Website payments" under "Solutions & Services".
- Click "Update" on "Website preferences".
- Select the option that enables "Auto Return"
- Enter your store's web address as the "Return URL". For example, http://mystore.spiffystores.com.
Encrypted website payments
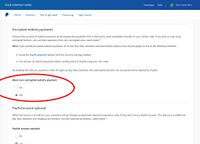
Turn off encrypted payments

The encrypted website payments option is only applicable when you use PayPal Payment Buttons. This payment method is not applicable to your Spiffy Store, as we use a direct, fully-encrypted method of connecting to PayPal which is not related to PayPal Payment Buttons. This means that you should set the Block non-encrypted website payment option to Off.
- Log in to manage your PayPal account
- Click on "Account settings" under Settings icon in the top menu.
- Click on "Website payments" under "Solutions & Services".
- Click "Update" on "Website preferences".
- Scroll down to "Encrypted website payments".
- Select "Off" for the "Block non-encrypted website payment" option.
Part 2 - Enable PayPal Express Checkout in your Spiffy Store
Follow the steps below to enable PayPal Express in your store.
To use PayPal Express alongside PayPal Website Payments Standard (Recommended)
- Log into your Spiffy Store Toolbox
- Go to the "Checkout & payment" page in the Preferences section
- In the PayPal section at the top, choose "PayPal Website Payments Standard"
- Type your PayPal account email into the "Account Email" field
- Tick the box next to "Enable PayPal Express", and click the "Activate" button
- Go to Part 3 below
Part 3 - Approve permissions for your store to access your PayPal Account
- Once you've clicked the "Activate" button in your Spiffy Store, you will be redirected to the PayPal site
- Log in to PayPal (if you haven't already done so) and you will be asked to grant permissions to Spiffy Stores so that we can use PayPal's API to configure your account to use PayPal Express Checkout.
- Click the Grant Permission button.
After you've followed the steps above, your Spiffy Store should now be set up to accept payments through PayPal Express Checkout. To verify that it's all working, go to your store, and add a product to your cart. The PayPal Express button should appear under the "Update cart" and "Checkout" buttons.
Help! PayPal Express is showing errors!
You may get an error when enabling PayPal Express or you may get an error when trying to make a test purchase using PayPal Express. The error could look something like this...
Unable to connect to PayPal Express
You do not have permissions to make this API call
Please contact store for assistance or continue using another payment method
If you encounter this error, please go to the "Preferences -> Checkout & payment" section of your Toolbox and DISABLE PAYPAL EXPRESS, save the changes, then edit it and try enabling it again. You should be redirected to the PayPal site again, where you will need to log in and approve the API requests that appear on the PayPal site after you've logged in.
If this continues to occur after disabling and re-enabling PayPal Express, please log in to your PayPal account, and go to the "Profile -> My Selling Tools -> API Access Update -> Add or edit API permissions" page, and remove any permissions you've added for "Spiffy Internet Services", then log out of PayPal completely, and try enabling PayPal Express again in your Toolbox.
If you continue to have problems, please ensure that the email address that you have used for your PayPal account has been verified.
Help! The PayPal Express button isn't showing up!
If the button isn't there, you may need to add a little code to your theme to make it show up. Instructions on how to do this are below.
Adding the PayPal Express button to your cart page
- Log into your Spiffy Store Toolbox, and navigate to the "Theme editor" page
- Scroll down to the "Theme templates" section, and click on your "Cart.liquid" file to edit it
- Towards the bottom of the code, you should see a line that looks something like this
<input name="checkout" type="submit" class="button" id="checkout-button" value="Checkout">
- Add the following code immediately after the checkout button tag, then click "Save"
{% if additional_checkout_buttons %}
  <div class="additional-checkout-buttons">
    <p>- or -</p>
    {{ content_for_additional_checkout_buttons }}
  </div>
{% endif %}
The PayPal Express button should now appear under the "Update cart" and "Checkout" buttons. If you need to adjust the position of the button, you should do this using CSS.
Help! Checkout fails with the message "Payment has already been made for this InvoiceID"
You might see this message if you have multiple Spiffy Stores using the same PayPal account. By default, each Spiffy Store generates sequential invoice numbers as a simple number, usually starting at 1000. If you have multiple stores, then each store will generate a sequence of order numbers that will overlap with other stores using the same PayPal account. This means that PayPal may reject a new order if it has the same order number as a previous order that was placed via a different store using the same PayPal account.
In order to avoid this problem, simple go to "Preferences -> Standards & formats" and look at the "Adjust your standards and formats" section. You need to create a unique Order ID format for each store sharing the same PayPal account, and you can do this by clicking on the "(formatting)" link next to the "Order ID'.
Update the order id format by including a simple character prefix to distinguish each store. For example add a couple of letters in front of the invoice number,
#TS{{number}}
Help! The shipping price doesn't show up in PayPal Express
That is the way that PayPal Express works unfortunately. The shipping rate is shown to the customer when they return to your store to confirm their payment. If you don't like the way that PayPal Express works, you should just use PayPal Website Payments Standard instead.