Enabling PayPal Checkout
From Spiffy Stores Knowledge Base
Contents
Using PayPal Checkout in Your Store
PayPal Checkout makes it easy for your customers to pay securely with PayPal, credit or debit card or PayPal's Pay in 4 "buy now, pay later" option — without ever leaving your checkout.
When a customer selects PayPal as their payment method, a secure PayPal window opens directly in the checkout. From there, they can:
- Log in and pay with their PayPal account
- Pay by card as a guest, without creating a PayPal account
- Choose Pay in 4 (where available) to split their purchase into four interest-free payments
Once PayPal confirms the payment, the window closes and the order is created and marked as paid. The customer then receives their order confirmation email.
This process is a major improvement over older PayPal integrations like Website Payments Standard, which could leave unpaid or abandoned orders in your system. With PayPal Checkout, orders are created only after the payment is successfully completed, keeping your order records accurate.
As an official PayPal partner, Spiffy Stores supports one-click onboarding. Connecting your PayPal account takes just a moment and requires no technical setup — unlike the older manual process that involved creating and entering credentials yourself.
To use PayPal Checkout, you’ll need a PayPal Business account. If you don’t already have one, you can sign up for a PayPal Business account here. If you’re currently using a Personal account, PayPal will prompt you to upgrade by providing the required business details.
Please note: PayPal Checkout replaces legacy integrations such as PayPal Website Payments Standard and PayPal Express.
| Benefits at a Glance – PayPal Checkout |
|---|
|
Migrating to PayPal Checkout
If you're currently using PayPal Website Payments Standard and/or PayPal Express, or even a manually configured PayPal Checkout integration, we'd strongly recommend that you migrate to the new automatic onboarding version of PayPal Checkout. You'll be creating a better checkout experience for your customers, with additional benefits for both you and your customers.
The migration process is as simple of taking a note of any settings you currently have configured for your PayPal integration, then deactivating the current integration.
Once you have removed the old integration, just follow the steps below to add a new PayPal Checkout integration, remembering to add back the same settings that you had for your old integration.
Part 1 - Enable PayPal Checkout in your Spiffy Store
Your PayPal account is now ready to connect to your Spiffy Store. You now need to follow the steps below to enable PayPal in your store.
- Log in to your Spiffy Store Toolbox
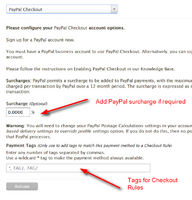
- Go to the "Checkout & Payment" page in the Preferences section
- In the PayPal section at the top, choose "PayPal Checkout"
- Review the settings and add a surcharge value and/or tags for and checkout rules you have created
- Click the "Activate" button
- If your browser is blocking popups, then you'll need to click on the Create/Connect a PayPal account button
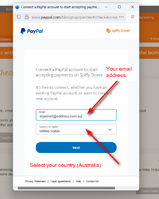
- Otherwise, you'll be taken to the PayPal login dialog box
- Enter the email address and password of your current PayPal account, or if you don't have one, you'll be asked to create a new account
- Your account will be connected and you'll be returned to the "Checkout & Payment" page
- If you created a new account, it will show up as pending until your email address is verified
Your Spiffy Store should now be set up to accept payments through PayPal Checkout. To verify that it's all working, go to your store and add a product to your cart. Proceed to the Checkout and enter your details. On the payment page of the Checkout, select PayPal as the desired payment method. A PayPal button should appear at the bottom of the page. Click this to proceed with the checkout, and you should see a modal dialog appear that allows you to login to your PayPal account. If you can see this prompt, then you have successfully connected PayPal Checkout to your store. Just cancel the dialog, and you'll end up back on the checkout page.
Part 2 - Configure your PayPal Account
You may need to configure your PayPal account to ensure that it is configured correcty to work with your Spiffy Store.
Once your PayPal account has been setup, please follow the steps below to confirm the settings on your PayPal account.
Include Shipping charges from your store
You need to configure PayPal to include the shipping charges that are calculated by your store.
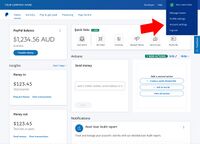
- Log in to manage your PayPal account
- Click on "Account settings" under Settings icon in the top menu.
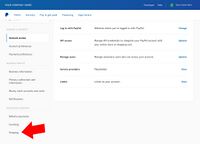
- Click on "Shipping" under "Solutions & Services".
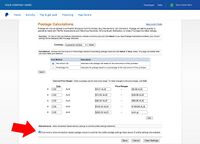
- In the "Shipping calculations" area, click "Update".
- Tick the box that says "Click here to allow transaction-based postage values to override the profile postage settings listed above (if profile settings are enabled)"
- Click the "Save" button
Accept payments from customers without a PayPal account
You can allow your customer to make payments using PayPal even if they don't have their own PayPal account. Unfortunately all Paypal transactions processed in this method are not protected by PayPal's seller protection&ellip; so there is a risk of fraudulent transactions.
- Log in to manage your PayPal account
- Click on "Account settings" under Settings icon in the top menu.
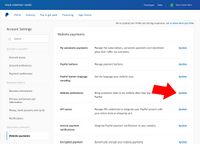
- Click on "Website payments" under "Solutions and Services".
- Click on "Update" under "Website preferences".
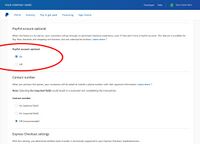
- Select the option that enables "PayPal Account Optional"
- Click the "Save" button
Automatic Return at the end of the transaction
Once a customer has made their payment using PayPal, a confirmation message is displayed and the customer is prompted to click a link to return to your store. If the customer does not click on this link, then any tracking code that you have installed will not be triggered and your site statistics may not correctly reflect the actual number of orders that have been processed.
You should enable the "Auto Return" feature in PayPal so that the customer is automatically redirected back to your store once the transaction has been completed.
- Log in to manage your PayPal account
- Click on "Account settings" under Settings icon in the top menu.
- Click on "Website payments" under "Solutions & Services".
- Click "Update" on "Website preferences".
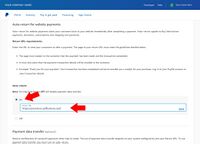
- Select the option that enables "Auto Return"
- Enter your store's web address as the "Return URL". For example, https://mystore.spiffystores.com.
Encrypted website payments
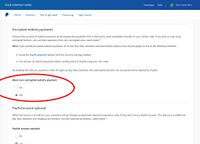
The encrypted website payments option is only applicable when you use PayPal Payment Buttons. This payment method is not applicable to your Spiffy Store, as we use a direct, fully-encrypted method of connecting to PayPal which is not related to PayPal Payment Buttons. This means that you should set the Block non-encrypted website payment option to Off.
- Log in to manage your PayPal account
- Click on "Account settings" under Settings icon in the top menu.
- Click on "Website payments" under "Solutions & Services".
- Click "Update" on "Website preferences".
- Scroll down to "Encrypted website payments".
- Select "Off" for the "Block non-encrypted website payment" option.


