Adelaide ecommerce theme - your store's header
From Spiffy Stores Knowledge Base
Adelaide theme header

Contents
Editable areas in your store's header
Editing areas in your store's header

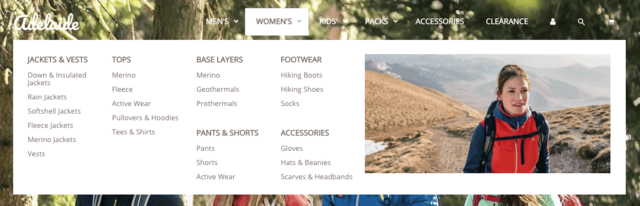
The header of the Adelaide theme contains your logo, menus, and links to your cart, search and login pages. The options can be edited in your theme editor in the Store Header section of your Theme Editor.
We'll go into detail with some of these sections below.
Uploading your logo
Editing areas in your store's header
You can upload your own logo in the Store Header section of your Theme editor. You simply tick the Use a logo? option, select your logo file, and click the Save Settings button.
The theme editor will resize the logo for you when you upload it. You can also set your theme to resize the logo to a maximum width. This is handy for getting the position and sizing of your logo perfect.
A tall, square, or round logo will not look good in this theme, and you would do better getting a designer to come up with an alternative solution for you. The best result you'll get is with a landscape oriented logo. If you need assistance with this, please contact us.
Using Pixlr to create create a logo image
Pixlr is a free online image editing program, where you can edit your images in your web browser.
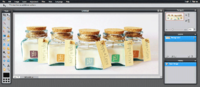
Pixlr editor

- Go to the Pixlr editor
- Click "Create a new image"
- Set your width and height, tick the "Transparent" box, and click OK.
- You now have your canvas to work within. You will need to explore the various tools and options.
- Open your own logo image in Pixlr using "File -> Open image" in the Pixlr menu. Select the "Wand" tool, and select only the type and any icons in your logo. There are also various other tools available so that you can select your logo without the background.
- Once you have your logo selected, you can then copy and paste it into your canvas.
- When you have pasted your logo image into the canvas, you can resize it by using the <CTRL> and <T> keys on your keyboard. Make sure you're viewing it at 100%, and see if you can get it as close as possible to the left with a small amount of space around it. You should then crop closer to the edges of your logo image using the crop tool.
- When your logo is looking gorgeous, save it by choosing "File -> Save" from the Pixlr top menu.
- Choose "PNG (Transparent full quality) for your format, and save it to your computer
- When you've saved the file to your computer, upload it in your Theme Editor, tick the Use a logo? option, and click the Save Settings button.
By default, the Adelaide theme uses the menu called "Top menu" in your store's header.
If you're switching to the Adelaide theme from another theme, and have all of your menu items in a different menu, you can select the menu that you want to use in your store's header in the Store Header section of your Theme editor. You simply select the menu you want to use and click the Save Settings button.
Built-in drop down menus

The Adelaide theme supports up to 4 levels of drop-down menus. This should be plenty. If you have more complex menu requirements, then you'll likely want to set up your drop-down as a mega menu.
There's no mucking about with code to get your drop-down menus working. You can create them simply by following the simple steps below. One important note though... you can't create links to nothing! If you haven't created the page or collection you want to link to, you need to create them first.
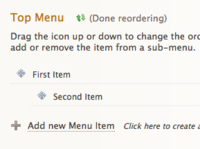
First item
- Log in to your store's Toolbox and go to the "Store menus" tab
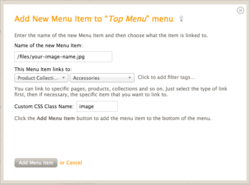
- Scroll down to the "Top Menu" section, and click "Add new Menu Item"
- Type in the name of your menu item
- Select whether you want your menu item to link to a page, product, or collection
- A new list of options will appear. Select the name of your page that you want to link to.
- Click the "Add menu item" button to save.
Creating a drop-down menu

Sub item
- Create another menu item the same way you created one above
- Click the "Reorder" link
- Click and drag the item you want to drop down to the right (so it sits directly underneath and to the right of the one above - see example)
- Click "Done reordering"
Previewing your store should show your second item as a drop-down. You can do this with multiple levels, and re-arrange your menus by dragging items up, down, left, or right whilst you're in "re-order" mode.
Adding a link to the "Collections" page in your store
The Adelaide theme also has a "Collections" page that shows all of the collections in your store.
To add the “Collections” page to your store, you just need to create a link to a page that has the address "/collections" to do this, follow the instructions below:
- Go to the "Store menus" section of your toolbox
- Scroll down to the menu that you want to add the link to
- Click the "Add Menu Item" link
- Enter the name of your link (e.g. Collections)
- Choose "Web address" next to "This item links to:"
- Enter "/collections" (without the quotes)
- Click the "Add item" button
You're also able to edit the text that appears on this page. To do this, follow the instructions below:
- Go to the “Pages & blogs” section of your Toolbox, and click the “add a new page” button. Give your page a title, and add some text, then save it.
- Click on the edit link, and then click on the “handle” link, which is next to the “Title” field. This should then display the field for your handle.
- Change the handle of your page to “collections”.
The Adelaide theme versions 2.0 and above include mega menus. Please note that the video tutorial below will only work versions on 2.0 and above of the Adelaide Theme. This video tutorial walks you through the process of setting up a mega menu to show a large amount of collections in one menu.
Overview
A mega menu consists of a grid. This grid is as flexible as you need it to be, and can be from 2 to 10 columns wide.

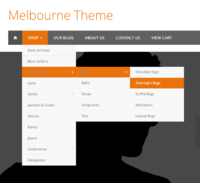
Here's what a simple 7 column mega menu can look like...

Here's what another mega menu can look like...

And here's my beautiful drawing to plan out the menu...

Supported Mega Menu Styles
A mega menu can be up to 10 columns wide. We do recommend you use a maximum of 7 though, as things can get a little squished on smaller devices. Columns are automatically calculated based on the number of first level items you have in your mega menu drop-down. We suggest you watch the video above to see what a "first level item" is, as that clarifies things for you.
| mega-menu | Used on a top level drop-down menu to specify that it is a mega menu. |
|---|---|
| title | Specifies a menu item as a title, so it displays slightly larger and bolder. |
| image | Specifies a menu item as an image. Without this style, results can be unusual. |
| image-two-columns | An image that spans 2 columns in relation to the number of columns used. |
| image-three-columns | An image that spans 3 columns in relation to the number of columns used. |
| image-four-columns | An image that spans 4 columns in relation to the number of columns used. |
| image-five-columns | An image that spans 5 columns in relation to the number of columns used. |
| image-six-columns | An image that spans 6 columns in relation to the number of columns used. |
The first thing you need to do is to enable a hidden option in your account.
- Log in to your store's Toolbox and go to the "Your Settings" section
- Tick Enable all advanced options and click the save button
You're now ready to start setting up a mega menu!
First item
- Go to the "Store menus" tab
- Scroll down to the "Top Menu" section, and click "Add new Menu Item"
- Type in the name of your menu item
- Select whether you want your menu item to link to a page, product, or collection
- A new list of options will appear. Select the name of your page that you want to link to.
- Enter mega-menu in the Custom CSS Class Name field
- Click the "Add menu item" button to save. This means that this top level item is now a mega menu
Column Each second level item in a menu creates a column. The contents in the column should be third level items.
- Create another menu item
- Name of the new Menu Item
- This Menu Item links to: Select whether you want your menu item to link to a page, product, or collection
- A new list of options will appear. Select the name of your page that you want to link to.
- Custom CSS Class Name: title if you want this item to be a title, otherwise leave blank.
- Click the "Add menu item" button to save
- Click the "Reorder" link
- Click and drag the item to the right (so it sits directly underneath and to the right of the one above).
- Click "Done reordering"
Column items
- Create another menu item
- Type in the name of your menu item
- Select whether you want your menu item to link to a page, product, or collection
- A new list of options will appear. Select the name of your page that you want to link to.
- Click the "Add menu item" button to save
- Click the "Reorder" link
- Click and drag the item you want to drop down to the right (so it sits directly underneath and to the right of the column)
- Click "Done reordering"
Image
Adding an image

Before you can add an image to your menu, you need to upload it to your store.
- Upload an image in the Design & Assets → Uploaded Files section
- Rename it to something intelligent so you know what it is
- Go to the "Store menus" tab
- Create another menu item
- In the name file, enter the relative url of your image e.g. /files/your-image.jpg
- Select whether you want your image to link to a page, product, or collection
- A new list of options will appear. Select the name of your page that you want to link to.
- Custom CSS Class Name: image or image-two-columns, image-three-columns, image-four-columns etc.
- Click the "Add menu item" button to save
- Click the "Reorder" link
- Click and drag the item you want to drop down to the right (so it sits directly underneath and to the right of the column)
- Click "Done reordering"