Accepting payments using Afterpay
From Spiffy Stores Knowledge Base
Afterpay’s proprietary technology platform enables shoppers to pay for items in four simple instalments, without the need for additional information at checkout.
For more information about Afterpay, Visit the Afterpay Website.
Afterpay's Integration Instructions -> https://developers.afterpay.com/afterpay-online/docs/spiffy-stores
Contents
- 1 Benefits For Afterpay Merchants
- 2 Applying for Afterpay
- 3 Enabling Afterpay payments in your store.
- 4 Displaying Afterpay information/widgets in your store
- 5 Refunding an order
- 6 Afterpay Minimum and Maximum Order Limits
- 7 Afterpay Cross Border Trade
- 8 What can’t be sold on Afterpay
- 9 Orders marked as Payment Pending or Error?
Benefits For Afterpay Merchants
- Incremental sales, new customers
Afterpay converts customers that would have otherwise abandoned, generating more sales from the existing customer base and creating new customers. - Guaranteed up-front payment
Afterpay pays merchants the full transaction amount within 48 hours of purchase, guaranteed. - Increase basket size and repeat purchase rates
Afterpay customers spend more per transaction and over their lifetime, and they come back more often. - Zero fraud or credit risk
Afterpay assumes all end-customer non-payment risk for every single transaction.
Applying for Afterpay
When applying for Afterpay, you may get someone at AfterPay who is not aware that Spiffy Stores is a supported solution. Should this happen, please direct them to this page -> https://developers.afterpay.com/afterpay-online/docs/spiffy-stores
Enabling Afterpay payments in your store.
To accept Afterpay, you will first need a merchant account with Afterpay. Contact Afterpay to apply for an account. You may get someone at AfterPay who is not aware that Spiffy Stores is a supported solution. Should this happen, please forward their email to support@spiffystores.com.au, and we'll communicate with their staff directly to get you set up painlessly.
After you have created an Afterpay account, activating Afterpay payments in your store is simple, and can be done in the Preferences -> Checkout & Payment section of your Spiffy Store Toolbox.
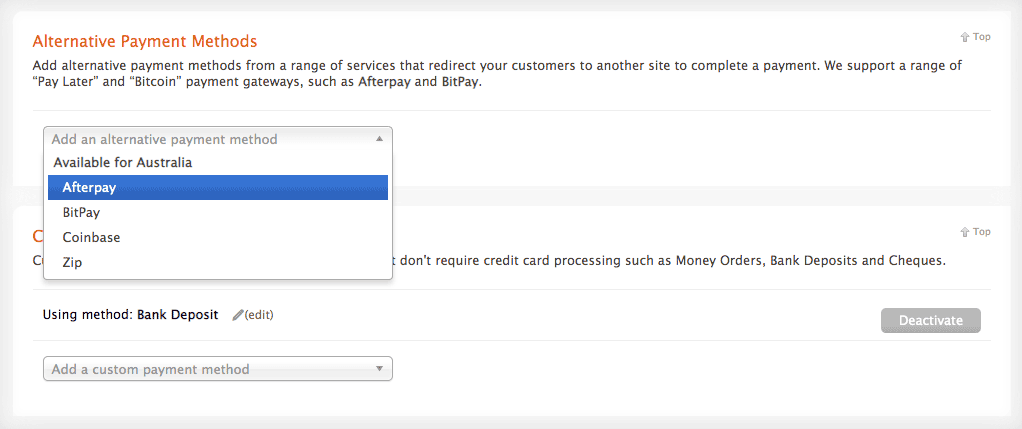
To activate Afterpay, scroll down to the Alternative Payment Methods section, and select Afterpay.
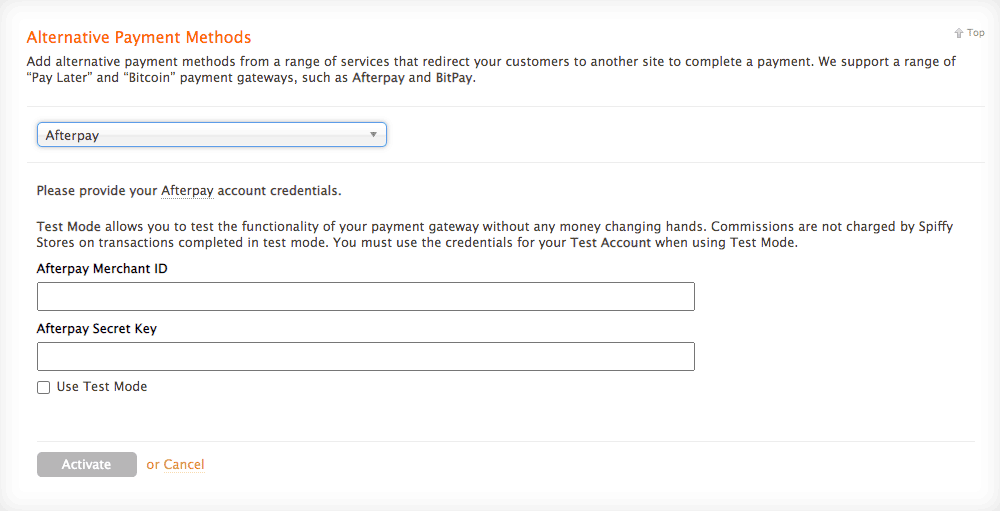
It's then just a simple matter of entering the Afterpay Merchant ID and Afterpay Secret Key provided by Afterpay. The Maximum Order Value and Minimum Order Value are updated automatically as per your agreement with Afterpay. You may also want to add a note that is displayed in your checkout in the Extra Instructions to Buyer section.
Once you have completed all of the information, simply click the Activate button, and head over to your storefront to preview Afterpay in your checkout.
Displaying Afterpay information/widgets in your store
Our newer themes already include Afterpay support, but if your theme isn't showing Afterpay assets when you activate Afterpay in your store, please contact us, and we'll add them in for you free of charge.
Refunding an order
When you're viewing an order in your store's admin, you'll find there's an option to refund the order under the "Edit order status" options. This marks the order as refunded, but it doesn't send the refund through to Afterpay. You will need to log in to your Afterpay Merchant Portal to process the refund.
Afterpay Minimum and Maximum Order Limits
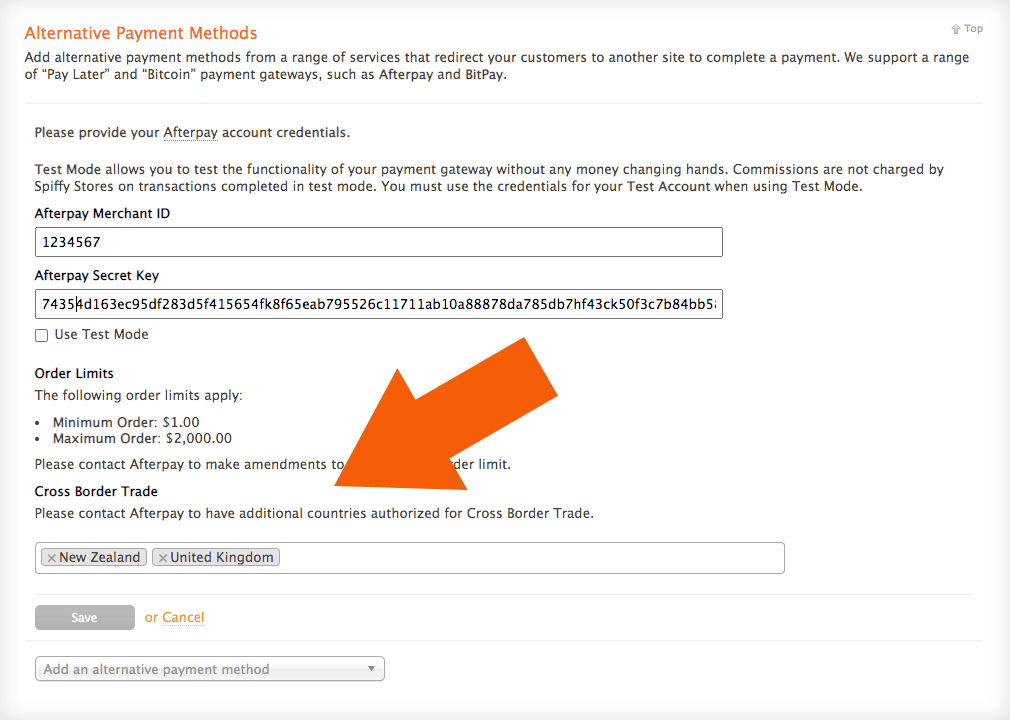
If you contact Afterpay, you can adjust the minimum and maximum spend for your Afterpay account. If the order amount is under the minimum they set, Afterpay doesn't show as an option in the checkout, and if it's over the maximum Afterpay doesn't show as an option in the checkout.
Afterpay Cross Border Trade
Afterpay have released a cross-border trade option. To enable cross border trade, you first need to contact Afterpay. They will let you know when cross border trade has been enabled in your Afterpay account.
Once it is enabled, you can enable the countries Afterpay have approved in the "Cross Border Trade" section when editing or enabling the gateway.
You should only enable the countries Afterpay have set up for you. If you add countries there that Afterpay have not enabled, the transaction will fail.
What can’t be sold on Afterpay
Some goods and services cannot be paid for using Afterpay. This list is not exhaustive and subject to change.
- Gift cards
- Perishable goods
- Alcohol in bulk or hard liquor
- Tobacco
- Recreational drugs or equipment to facilitate drug use
- Weapons
- Ammunition
- Explosive materials or instructions for making explosives
- Pornographic material, experiences, and digital content
- Gambling related content
- Medicines
- Products that enable dishonest behaviour
- Consumer electronics
- Grocery
- Forward delivery of goods/services over 90 days from purchase date
- Ongoing services (eg subscriptions)
- B2B
- Goods or Services that infringe third party intellectual property (without limitation) counterfeit goods and pirated content
If your store sells any of these goods or services, then you will need to take extra steps to set up your store with Afterpay. You will also require our "Checkout Rules" add-on to ensure that these goods/services cannot be paid for in the checkout.
Step 1 - Create a collection of Afterpay restricted products
- Log in to your store's admin area, and go to the Collections tab
- Create a collection called "Afterpay Restricted"
- Set the Collection Visibility to Hidden
- Add your restricted products to this collection
Step 2 - Enable the Checkout Rules Add-on and create a Checkout Rule
- If you're on our Starter or Plus plans, you'll need to enable the Add-on. When logged in to your store's admin area, go to the Accounts -> Add-Ons section, and add the Checkout Rules Add-on to your store. If you're on our or Pro plan, it is already included in your plan.
- Go to the Preferences -> Checkout Rules section of your store's admin
- Click the Add a Checkout Rule link
- In the name, type "Afterpay Restricted"
- For the rule action, choose Set a Payment Tag
- Set your tag to "noafterpay"
- Starts today, and is valid until deactivated
- Rule applies only with at least 1 products from collection Afterpay Restricted
- Inventory, price, time, and customer options should be all left on their default setting
- Click Create Rule to add the rule
Step 3 - Edit all of your payment options
- Go to the Preferences -> Checkout & Payment section
- Click Edit next to your first payment option on this page.
- You will find that a new field appears called Payment Tags
- Enter "*,noafterpay" and save the payment option
- Repeat the process for all payment options other than Afterpay
Orders marked as Payment Pending or Error?
Afterpay can sometimes take a little while to verify a payment and decide to offer your customer credit, which is why the order is marked as Payment Pending. If you go into the paytment details, you may see a status of Status received from gateway-failed order has not been approved.
An order that uses Afterpay that is marked as Error means that Afterpay has rejected the payment. The customer is well aware that this has happened, as they are notified by Afterpay. In this instance, we recommend you follow-up with your customer by sending them an email asking if they would like to continue with the order. You would generally do this about 24 hours after the order has been placed.
If they do want to continue with the order, log in to your store admin, and view the order details. You will find that there should be an option to Send order retry link under Email customer, which will send them an email with a link so they can complete their payment. When you receive payment, the order should then be automatically marked as paid on the View order screen in your Spiffy Store.
For more information about Afterpay, Visit the Afterpay Website.


