Difference between revisions of "Simple Theme - updating your home page"
From Spiffy Stores Knowledge Base
| Line 1: | Line 1: | ||
| − | Your home page consists of 8 major sections... your slideshow, welcome text, featured products, featured collections, latest articles from your blog, and finally an Instagram feed. Each section can be enabled/disabled or edited the ''Theme Editor'' section of your store's | + | Your home page consists of 8 major sections... your slideshow, welcome text, featured products, featured collections, latest articles from your blog, and finally an Instagram feed. Each section can be enabled/disabled or edited the ''Theme Editor'' section of your store's admin area. |
Below you will find detailed information on each of the sections. | Below you will find detailed information on each of the sections. | ||
| Line 25: | Line 25: | ||
Image:Simple-ecommerce-theme-slideshow-settings-all.png|Home page slideshow | Image:Simple-ecommerce-theme-slideshow-settings-all.png|Home page slideshow | ||
</gallery> | </gallery> | ||
| − | Edit your slideshow in the ''Design & assets -> Theme editor'' section of your store's | + | Edit your slideshow in the ''Design & assets -> Theme editor'' section of your store's admin area. Scroll down on this page until you find the section called ''Home page - Slideshow''. Make sure you delete the captions and links that are currently there before you start to upload your own images. |
* '''Display a slideshow''' - Enables or disables the slideshow. | * '''Display a slideshow''' - Enables or disables the slideshow. | ||
| Line 94: | Line 94: | ||
==Displaying featured collections on your home page== | ==Displaying featured collections on your home page== | ||
| − | Select your featured collections in the ''Design & assets -> Theme editor'' section of your store's | + | Select your featured collections in the ''Design & assets -> Theme editor'' section of your store's admin area. Scroll down on this page until you find the section called ''Home Page - Sections''. |
You will find the following options in the '''Featured collections''' section... | You will find the following options in the '''Featured collections''' section... | ||
| Line 110: | Line 110: | ||
Image:Simple-ecommerce-theme-featured-products-1.jpg|Featured Products | Image:Simple-ecommerce-theme-featured-products-1.jpg|Featured Products | ||
</gallery> | </gallery> | ||
| − | Select your featured products | + | Select your featured products in the ''Design & assets -> Theme editor'' section of your store's admin area. Scroll down on this page until you find the section called ''Home Page - Sections''. |
| − | |||
| − | |||
You will find the following options... | You will find the following options... | ||
| − | * '''Collection to display''' - Your options are either "None", or you can select a collection that you have added in the '''Collections''' section of your store's admin | + | * '''Collection to display''' - Your options are either "None", or you can select a collection that you have added in the '''Collections''' section of your store's admin. |
* '''Collection title''' - The title that appears above your featured products. If you don't want a title there, leave this field blank. | * '''Collection title''' - The title that appears above your featured products. If you don't want a title there, leave this field blank. | ||
* '''Number of items to display per row''' - How many products per row you want to show. We have set the options to be between 3 per row and 6. When set to 3, the images are quite large. When set to 6, they are quite small. | * '''Number of items to display per row''' - How many products per row you want to show. We have set the options to be between 3 per row and 6. When set to 3, the images are quite large. When set to 6, they are quite small. | ||
Revision as of 14:22, 29 July 2020
Your home page consists of 8 major sections... your slideshow, welcome text, featured products, featured collections, latest articles from your blog, and finally an Instagram feed. Each section can be enabled/disabled or edited the Theme Editor section of your store's admin area.
Below you will find detailed information on each of the sections.
- Editing your slideshow
- Selecting featured collections
- Selecting featured products
- Displaying blog articles on your home page
- Displaying an Instagram feed on your home page
There's a lot to each section, which is why some are disabled when you first apply the theme. These sections can all be enabled in the Theme Editor section of your store's admin area.
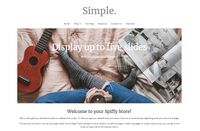
Home page slideshow

The Simple Theme includes a responsive slideshow on the home page that resizes based on the size of the device your customer is using.
Your home page slideshow can have up to 5 images, with the option to modify the speed. You can also add a title, caption, and a button that links to other pages. The slideshow resizes for different devices, and looks gorgeous on tablets and phones.
Edit your slideshow in the Design & assets -> Theme editor section of your store's admin area. There you can upload new slideshow images, and enter captions and links, and select the position of your captions. This can be found in the Home Page - Slideshow section'.
Contents
Editing your slideshow
Home page slideshow

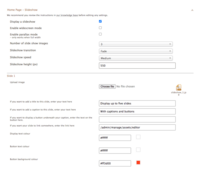
Edit your slideshow in the Design & assets -> Theme editor section of your store's admin area. Scroll down on this page until you find the section called Home page - Slideshow. Make sure you delete the captions and links that are currently there before you start to upload your own images.
- Display a slideshow - Enables or disables the slideshow.
- Enable widescreen mode - The slideshow can be either the fill width of the browser window, or can be restricted to the width of the site. In all cases, it should scale to fit nicely on whichever device your store is being viewed on.
- Enable parallax mode - The slideshow can be displayed with a rather cool Parallax effect. If in doubt, enable this option and preview your store. The parallax effect is only displayed when widescreen mode is enabled..
- Number of slideshow images - Set this to the number of images you have ready to upload.
- Slideshow transition - Options are fade or slide. This is pretty self explanatory.
- Slideshow speed - Options are slow, medium or fast. We suggest just keeping this on medium.
- Slideshow height - You can set the height of your slideshow to whatever you like... but bear in mind that you will need to upload images that are all the same size!
Underneath this section, there is a section for each individual slide;
- Upload image - To upload an image to your slideshow, click the "Choose file" button, and select the image on your computer. Make sure your images are high enough quality, and meet the size requirements listed below, or they will not look great. There's a tutorial on this page with step by step instructions on getting your slideshow images the correct size.
- Title - If you want title text to appear as an overlay on your slide, enter the text here. You should preview it to make sure you haven't written too much text. This field accepts text only. Entering HTML here may have unpredictable results. If you don't want a caption, or have included the text you want in your slide image, you should leave this field blank.
- Caption - If you want text to appear as an overlay on your slide, enter the text here. You should preview it to make sure you haven't written too much text. This field accepts text only. Entering HTML here may have unpredictable results. If you don't want a caption, or have included the text you want in your slide image, you should leave this field blank.
- Button text - If you want a button to appear as an overlay on your slide underneath the title and caption, enter the text you want to appear on the button here. Generally you want this to be a short call to action like "See More" or "Buy Now". If you don't want a button, you should leave this field blank. If you want your entire slide to be a link, leave this field blank, and add a link in the Button Link field below.
- Slide Link - If you want your slide to link somewhere, enter the page address that you want to link to. You should ALWAYS enter your links as relative URL's. To get the relative URL of a page on your store, view the page in your web browser, and copy the address of the page that's directly after your domain. e.g. if your page is at "joes-widgets.spiffystores.com/pages/blue-widgets", the relative url of this page is "/pages/blue-widgets".
- Display text colour - If your image is dark, you should set this to light colour. If your image is light, you should set this to a dark colour. You may need to adjust your image before uploading to get it to work nicely with the overlay text and button.
- Button text colour - The background of your button will be the same as the Display text colour above. Choose a colour for the text inside the button that will show up nicely.
- Button background colour - The text in your button will be the Button text colour above. Choose a colour for the text inside the button that will show up nicely.
When you are done editing your slideshow, or want to save it to view it in your store, scroll down an click the Save Settings button.
Slideshow image sizes
If you enable Widescreen mode, your slideshow will display at the full width of the device it is viewed on. You will need to upload your slideshow images at a good resolution... at least 2048px wide, as the images are stretched out on very large screens.
If you enable Parallax, the optimal size for your slideshow images is 2048px x 2048px.
If Widescreen mode is disabled, you should upload images that are 1200px wide x 550px high (or the height of the slideshow you have set).
You can upload images that are any size, but they won't look as good as if you follow our size guidelines. You can create slideshow images using most image editing programs, but many people find Pixlr useful. If they are blurry, they aren't high enough quality.
You should ensure you source good quality photos for your slideshow, as this is the first thing your customers will see when they visit your site and set the tone of their shopping experience. Spend time to get your slideshow images looking gorgeous, as cheap looking, unprofessional or ugly images will definitely have a negative effect on your sales.
You can also email us if you need help getting your slideshow images looking gorgeous! You will need to send your images to us attached to your email if you want any help with this.
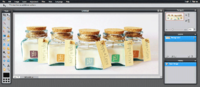
Using Pixlr to create a slideshow image
Pixlr is a free online image editing program, where you can edit your images in your web browser.
Pixlr editor

- Go to the Pixlr editor
- Click "Create a new image"
- Set the size recommended above, and click OK
- You now have your canvas to work within. You will need to explore the various tools and options. You can add your own images in Pixlr in the bottom right by clicking the + symbol. This adds the image as a layer that can be moved around. You need to make sure when you're doing this, that you don't stretch your images. You can do this by holding down the shift key when re-sizing.
- When your slide is looking gorgeous, save it by choosing "Save" at the bottom of the page.
- Choose JPEG for your format, and set your quality to high
- When you've saved the file to your computer, upload it by following the instructions above.
Displaying featured collections on your home page
Select your featured collections in the Design & assets -> Theme editor section of your store's admin area. Scroll down on this page until you find the section called Home Page - Sections.
You will find the following options in the Featured collections section...
- Display featured Collections- The first ten collections will be displayed in the order that they were created
- Menu Called "Featured Collections" - Control exactly which collections are displayed by creating a menu called "Featured Collections", and adding links to the collections you want to display.
- Hide this section - Hides the section altogether
Select your option, scroll down and click the Save Settings button.
Displaying featured products on your home page
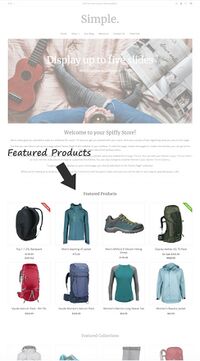
Featured Products

Select your featured products in the Design & assets -> Theme editor section of your store's admin area. Scroll down on this page until you find the section called Home Page - Sections.
You will find the following options...
- Collection to display - Your options are either "None", or you can select a collection that you have added in the Collections section of your store's admin.
- Collection title - The title that appears above your featured products. If you don't want a title there, leave this field blank.
- Number of items to display per row - How many products per row you want to show. We have set the options to be between 3 per row and 6. When set to 3, the images are quite large. When set to 6, they are quite small.
- Maximum number of products to display - You can limit the number of products shown. By default, this is set to 8 products, but you can alter it to show less or more.
Select your options, scroll down and click the Save Settings button.