Difference between revisions of "Minimal theme: Creating images for your slideshow"
From Spiffy Stores Knowledge Base
(Created page with "<gallery heights="200px" widths="200px" class="right"> Image:Vintage-theme-slideshow.jpg|Home page slideshow </gallery> The Minimal theme includes a responsive slideshow on th...") |
|||
| Line 2: | Line 2: | ||
Image:Vintage-theme-slideshow.jpg|Home page slideshow | Image:Vintage-theme-slideshow.jpg|Home page slideshow | ||
</gallery> | </gallery> | ||
| − | The Minimal theme includes a | + | The Minimal theme includes a simple slideshow on the home page that can have up to 5 images, with a choice of 3 different transitions. |
| − | |||
| − | |||
Edit your slideshow in the "Design & assets -> theme editor" section of your store's Toolbox. There you can upload new slideshow images, delete images, enter captions and links in the "Home page slideshow" section. | Edit your slideshow in the "Design & assets -> theme editor" section of your store's Toolbox. There you can upload new slideshow images, delete images, enter captions and links in the "Home page slideshow" section. | ||
| − | You will need to upload your slideshow images at the correct size of '''960px x | + | You will need to upload your slideshow images at the correct size of '''960px x 300px''' so that they're not stretched or squashed. You can do this using most image editing programs, but many people find [http://pixlr.com/editor/ Pixlr] useful. |
== Using [http://pixlr.com/editor/ Pixlr] to create a slideshow image == | == Using [http://pixlr.com/editor/ Pixlr] to create a slideshow image == | ||
| Line 17: | Line 15: | ||
#Go to the [http://pixlr.com/editor/ Pixlr] editor | #Go to the [http://pixlr.com/editor/ Pixlr] editor | ||
#Click "Create a new image" | #Click "Create a new image" | ||
| − | #Set the width to 960 and the height to | + | #Set the width to 960 and the height to 300, and click OK |
#You now have your canvas to work within. You will need to explore the various tools and options. You can open your own images in Pixlr using "File -> Open image" in the Pixlr menu. You can then copy and paste your images into your slide. | #You now have your canvas to work within. You will need to explore the various tools and options. You can open your own images in Pixlr using "File -> Open image" in the Pixlr menu. You can then copy and paste your images into your slide. | ||
#When your slide is looking gorgeous, save it by choosing "File -> Save" from the Pixlr top menu. | #When your slide is looking gorgeous, save it by choosing "File -> Save" from the Pixlr top menu. | ||
| Line 25: | Line 23: | ||
== Updating your slideshow == | == Updating your slideshow == | ||
| − | |||
| − | |||
| − | |||
Edit your slideshow in the "Design & assets -> Theme editor" section of your store's Toolbox. Scroll down on this page until you find the section called "Home page slideshow". Make sure you delete the demo images, captions, and links that are currently there before you start to upload your own images. | Edit your slideshow in the "Design & assets -> Theme editor" section of your store's Toolbox. Scroll down on this page until you find the section called "Home page slideshow". Make sure you delete the demo images, captions, and links that are currently there before you start to upload your own images. | ||
* '''Number of slideshow images''' - Your first option is to select the number of images to use in your slideshow. Set this to the number of images you have ready to upload. | * '''Number of slideshow images''' - Your first option is to select the number of images to use in your slideshow. Set this to the number of images you have ready to upload. | ||
| − | * '''Slideshow transition''' - by default we've chosen the fade transition, as it's not too distracting. If you're after | + | * '''Slideshow transition''' - by default we've chosen the fade transition, as it's not too distracting. If you're after something a little more dynamic, choose one of the slide transitions. |
* '''Slideshow speed''' - If you have only 2 images, set this to slow. If you have 3 or 4 images, set this to medium. If you have 5 images, set this to fast. If you're using captions on your images, you should view your store and make sure the slideshow isn't too fast for your customers to read the captions! | * '''Slideshow speed''' - If you have only 2 images, set this to slow. If you have 3 or 4 images, set this to medium. If you have 5 images, set this to fast. If you're using captions on your images, you should view your store and make sure the slideshow isn't too fast for your customers to read the captions! | ||
| Line 40: | Line 35: | ||
Underneath this section, there is a section for each individual slide; | Underneath this section, there is a section for each individual slide; | ||
| − | * '''Upload image''' - To upload an image to your slideshow, click the "Choose file" button, and select the image on your computer. Make sure your images are 960px wide x | + | * '''Upload image''' - To upload an image to your slideshow, click the "Choose file" button, and select the image on your computer. Make sure your images are 960px wide x 300px high or they will be stretched. There's a tutorial on this page with step by step instructions on getting your slideshow images the correct size. |
| − | |||
| − | |||
| − | |||
| − | |||
== HELP! - My slideshow photos are stretched!!! == | == HELP! - My slideshow photos are stretched!!! == | ||
| Line 50: | Line 41: | ||
Image:Vintage-theme-slideshow-stretched.jpg|Ugly or stretched images don't look too great! Make sure you source good quality photos for your slideshow, and upload them at the correct size!</gallery>If your slideshow images look stretched, they were either uploaded stretched, or aren't the size that's required by the theme. | Image:Vintage-theme-slideshow-stretched.jpg|Ugly or stretched images don't look too great! Make sure you source good quality photos for your slideshow, and upload them at the correct size!</gallery>If your slideshow images look stretched, they were either uploaded stretched, or aren't the size that's required by the theme. | ||
| − | You will need to create your slideshow images at the correct size of '''960px x | + | You will need to create your slideshow images at the correct size of '''960px x 300px''' so that they're not stretched or squashed. You can do this using most image editing programs, but many people find [http://pixlr.com/editor/ Pixlr] useful. That's why we've included instructions above on this page on how to get your slideshow images the correct size :-) |
You should also ensure you source good quality photos for your slideshow, as this is the first thing your customers will see when they visit your site and set the tone of their shopping experience. Spend time to get your slideshow images looking gorgeous, as cheap looking, unprofessional or ugly images will will definitely have a negative effect on your sales. | You should also ensure you source good quality photos for your slideshow, as this is the first thing your customers will see when they visit your site and set the tone of their shopping experience. Spend time to get your slideshow images looking gorgeous, as cheap looking, unprofessional or ugly images will will definitely have a negative effect on your sales. | ||
You can also email us if you need help getting your slideshow images looking gorgeous! | You can also email us if you need help getting your slideshow images looking gorgeous! | ||
| − | |||
| − | |||
| − | |||
| − | |||
| − | |||
| − | |||
| − | |||
| − | |||
| − | |||
| − | |||
| − | |||
| − | |||
| − | |||
| − | |||
| − | |||
| − | |||
| − | |||
| − | |||
| − | |||
Revision as of 10:22, 29 November 2013
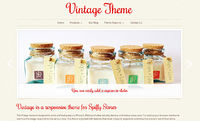
Home page slideshow

The Minimal theme includes a simple slideshow on the home page that can have up to 5 images, with a choice of 3 different transitions.
Edit your slideshow in the "Design & assets -> theme editor" section of your store's Toolbox. There you can upload new slideshow images, delete images, enter captions and links in the "Home page slideshow" section.
You will need to upload your slideshow images at the correct size of 960px x 300px so that they're not stretched or squashed. You can do this using most image editing programs, but many people find Pixlr useful.
Using Pixlr to create a slideshow image
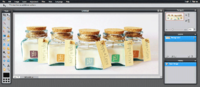
Pixlr editor

- Go to the Pixlr editor
- Click "Create a new image"
- Set the width to 960 and the height to 300, and click OK
- You now have your canvas to work within. You will need to explore the various tools and options. You can open your own images in Pixlr using "File -> Open image" in the Pixlr menu. You can then copy and paste your images into your slide.
- When your slide is looking gorgeous, save it by choosing "File -> Save" from the Pixlr top menu.
- Choose JPEG for your format, and set your quality to 80
- When you've saved the file to your computer, upload it by following the instructions below.
Updating your slideshow
Edit your slideshow in the "Design & assets -> Theme editor" section of your store's Toolbox. Scroll down on this page until you find the section called "Home page slideshow". Make sure you delete the demo images, captions, and links that are currently there before you start to upload your own images.
- Number of slideshow images - Your first option is to select the number of images to use in your slideshow. Set this to the number of images you have ready to upload.
- Slideshow transition - by default we've chosen the fade transition, as it's not too distracting. If you're after something a little more dynamic, choose one of the slide transitions.
- Slideshow speed - If you have only 2 images, set this to slow. If you have 3 or 4 images, set this to medium. If you have 5 images, set this to fast. If you're using captions on your images, you should view your store and make sure the slideshow isn't too fast for your customers to read the captions!
Underneath this section, there is a section for each individual slide;
- Upload image - To upload an image to your slideshow, click the "Choose file" button, and select the image on your computer. Make sure your images are 960px wide x 300px high or they will be stretched. There's a tutorial on this page with step by step instructions on getting your slideshow images the correct size.
HELP! - My slideshow photos are stretched!!!
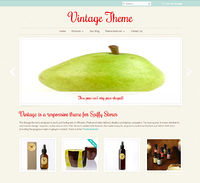
Ugly or stretched images don't look too great! Make sure you source good quality photos for your slideshow, and upload them at the correct size!

If your slideshow images look stretched, they were either uploaded stretched, or aren't the size that's required by the theme.
You will need to create your slideshow images at the correct size of 960px x 300px so that they're not stretched or squashed. You can do this using most image editing programs, but many people find Pixlr useful. That's why we've included instructions above on this page on how to get your slideshow images the correct size :-)
You should also ensure you source good quality photos for your slideshow, as this is the first thing your customers will see when they visit your site and set the tone of their shopping experience. Spend time to get your slideshow images looking gorgeous, as cheap looking, unprofessional or ugly images will will definitely have a negative effect on your sales.
You can also email us if you need help getting your slideshow images looking gorgeous!