How to edit your Store Menus
From Spiffy Stores Knowledge Base
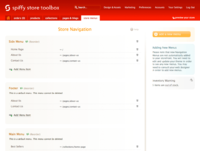
Store menus page

You can create and edit your menus by going to the "Store Menus" tab in the Toolbox.
Here you will find a list of your current menus.
You can add a new menu by clicking on the "add a new menu" button.
When you create a new menu, you can use any name you like to describe the new menu. However, it is best to choose a short descriptive name.
Standard Menus
There are three standard menus that you will find that are created for you by default when your store is created.
If a standard menu does not exist, you can create it at any time. However, a standard menu cannot be deleted.
All of the themes in the Theme Gallery use the standard menus, so once you set up a standard menu, you can swap themes without having to make changes to the menu definitions.
Unless you are designing a custom theme, you will probably not need to create any additional menus.
Top Menu
This menu would generally be used for some general navigation links at the top of your site. For example, you might find a "Shop Home" link as well as a "View Cart" link.
Main Menu
This menu is your main navigation menu and will contain links to your product collections, blogs and other pages.
A main menu may appear underneath your top banner or perhaps at the side.
The footer menu naturally will be placed at the bottom of the page. This usually contains the links to your "Terms and Conditions" and "Privacy" policy pages.
Menu Handles
Each menu has a name, such as "Top Menu", "Main Menu" or "Footer".
In order to refer to these menus in your theme code, you need to use the menu's "handle". This handle is derived from the menu name by removing all special characters, making all letters lowercase and replacing all spaces with a '-' character.
Therefore, the handle for "Main Menu" is "main-menu".
Similarly "Top Menu" becomes "top-menu" and "Footer" becomes "footer".
Adding Menu Items
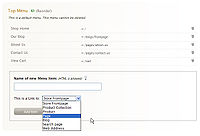
Add new Menu Item

You can start to populate your menu by clicking on the "Add Menu Item" link underneath the menu.
In the form that opens up, enter the name of the new menu item. This is the name that will appear on your menu link. You can enter additional HTML markup if you require some special formatting of the name.
Beneath the entry field for the name, there is a selection box from which you can select the type of menu link that you want to create.
The types of items that you can link to are:
- Store Frontpage
- Product Collection
- Product
- Page
- Blog
- Search page
- Web Address