How to edit your Store Menus
From Spiffy Stores Knowledge Base
Revision as of 14:43, 14 September 2010 by Shawn (talk | contribs) (→How to Reorder the Menu Items)
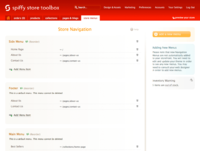
You can create and edit your menus by going to the "Store Menus" tab in the Toolbox.
Here you will find a list of your current menus.
You can add a new menu by clicking on the "add a new menu" button.
When you create a new menu, you can use any name you like to describe the new menu. However, it is best to choose a short descriptive name.
Contents
Standard Menus
There are three standard menus that you will find that are created for you by default when your store is created.
If a standard menu does not exist, you can create it at any time. However, a standard menu cannot be deleted.
All of the themes in the Theme Gallery use the standard menus, so once you set up a standard menu, you can swap themes without having to make changes to the menu definitions.
Unless you are designing a custom theme, you will probably not need to create any additional menus.
Top Menu
This menu would generally be used for some general navigation links at the top of your site. For example, you might find a "Shop Home" link as well as a "View Cart" link.
Main Menu
This menu is your main navigation menu and will contain links to your product collections, blogs and other pages.
A main menu may appear underneath your top banner or perhaps at the side.
The footer menu naturally will be placed at the bottom of the page. This usually contains the links to your "Terms and Conditions" and "Privacy" policy pages.
Menu Handles
Each menu has a name, such as "Top Menu", "Main Menu" or "Footer".
In order to refer to these menus in your theme code, you need to use the menu's "handle". This handle is derived from the menu name by removing all special characters, making all letters lowercase and replacing all spaces with a '-' character.
Therefore, the handle for "Main Menu" is "main-menu".
Similarly "Top Menu" becomes "top-menu" and "Footer" becomes "footer".
Adding Menu Items
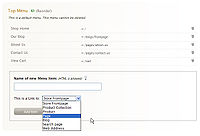
You can start to populate your menu by clicking on the "Add Menu Item" link underneath the menu.
In the form that opens up, enter the name of the new menu item. This is the name that will appear on your menu link. You can enter additional HTML markup if you require some special formatting of the name.
Beneath the entry field for the name, there is a selection box from which you can select the type of menu link that you want to create.
The types of items that you can link to are:
- Store Frontpage
- Product Collection
- Product
- Page
- Blog
- Search page
- Web Address
Store Frontpage
This creates a link to the home page for your store.
Product Collection
When you select a product collection, a second selection box will appear listing all the collections that have been created in your store. Just select the one that you want to create a link for.
Additionally, there is a link at the end that you can "Click to add filter tags...".
You can click on this link, to add filter tags to the collection. The tags are entered as words separated by spaces. The filter tags will enable you to display a collection containing only products in that collection that also have matching filter tags.
For example, if we have a "Cute Dogs" collection, then we can add a filter tag of "brown" to add a link to a collection of "brown" dogs in the "Cute Dogs" collection.
Remember, that for this to work, you will have to tag all the brown dogs with a "brown" tag when you create the products.
The product collection selections also include Super Collections, so you can link to a super collection if you want to create more advanced filtered collections.
Product
If you want to directly link to a product, then select this option and then select the desired product from the second selection box.
Page
You can also directly link to a page that you have previously created in the "Pages & Blogs" section.
Just choose the page you want from the second selection box.
Blog
Create a link to a blog by selecting this option, and then choosing the blog from the second selection box.
Search page
If you want to provide access to the search function from a menu, then select this option.
Web Address
Finally, you can create a link to any URL that you want. Just enter the URL address in the text field.
You can create links to internal or external addresses.
If you want to link to some other part of your store, just enter the path.
For example, if you want to create a link to the cart, enter
/cart
If you want to link to an external address, then enter the full URL of the web site. For example, you can link to Google by entering
http://www.google.com
Be aware that if you add external links to your menus, these links will cause the user to navigate away from your store. If you want to provide access to other sites, it may be preferable to include these on a "Links" page where you can create links that open up in a new browser window.
Deleting a Menu Item
If at any time you want to remove an item from the menu, just click on the "Rubbish Bin" icon on the right-hand side of the menu item line.
When you click on the delete icon, a prompt box will popup asking if you are sure you want to delete the item. Click "OK" if you want to continue, or "Cancel" if you want to keep the menu item.
If you make a mistake when you're creating menu items, then just delete the item and add a new one. Once you're happy that you have created the correct link, you can reorder the menu items to put them into the right order.
How to Reorder the Menu Items
Here is a video tutorial on how to use the Spiffy Stores drag and drop menu feature to build multi-level drop-down menus.
If you can't see the video above, you can also view it on Youtube

