Difference between revisions of "Creating a data feed for Shopping.com"
From Spiffy Stores Knowledge Base
| Line 8: | Line 8: | ||
Firstly we need to have a list of products to send to Shopping.com. To create this, you'll need to create a collection that contains all of the products you want in your data feed. You can create a [[Collections|Standard Collection]] or a [[Super Collections|Super Collection]]. This can be done in the "Collections" section of your store's Toolbox.<br><br>If you already have created a collection for another provider (for example Google Merchant Center) then you can skip this step.<br> | Firstly we need to have a list of products to send to Shopping.com. To create this, you'll need to create a collection that contains all of the products you want in your data feed. You can create a [[Collections|Standard Collection]] or a [[Super Collections|Super Collection]]. This can be done in the "Collections" section of your store's Toolbox.<br><br>If you already have created a collection for another provider (for example Google Merchant Center) then you can skip this step.<br> | ||
| − | === Step 2 === | + | === Step 2 - Creating your data feed === |
<br> | <br> | ||
<gallery heights="126px" widths="200px" class="right">Image:Shopping-com-data-feed-03.png|Creating your data feed</gallery> | <gallery heights="126px" widths="200px" class="right">Image:Shopping-com-data-feed-03.png|Creating your data feed</gallery> | ||
| Line 16: | Line 16: | ||
# Click the "Activate" button | # Click the "Activate" button | ||
| − | Once you have | + | === Step 3 - Adding your data feed on the shopping.com website === |
| + | <br> | ||
| + | <gallery heights="126px" widths="200px" class="right">Image:Shopping-com-data-feed-05.png|Adding your data feed on the shopping.com website</gallery> | ||
| + | |||
| + | Once you have signed up for a Shopping.com merchant account, you can then add your data feed. On the home page of the Merchant Centre, click the "Submit Datafeed" button. | ||
Revision as of 11:12, 29 April 2014
Setting up a product data feed for your products is a great way to get added exposure for your online store by syndicating them to a variety of these shopping portals.
Product data feeds are updated whenever you make a change to your products, so you can be sure that they're up to date. To create a data feed for Shopping.com follow the instructions below.
Step 1 - Create a collection of products
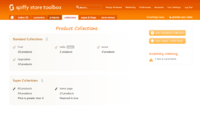
Collections Section

Firstly we need to have a list of products to send to Shopping.com. To create this, you'll need to create a collection that contains all of the products you want in your data feed. You can create a Standard Collection or a Super Collection. This can be done in the "Collections" section of your store's Toolbox.
If you already have created a collection for another provider (for example Google Merchant Center) then you can skip this step.
Step 2 - Creating your data feed
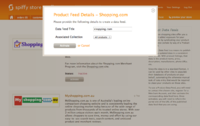
Creating your data feed

After you have created your collection, go to the
"Marketing -> Product data feeds" section of your store's Toolbox, and click the "Activate" button in the Shopping.com section.
- Enter a name for your feed. It's not used anywhere except for your reference.
- Select the collection you created in Step 1
- Click the "Activate" button
Step 3 - Adding your data feed on the shopping.com website
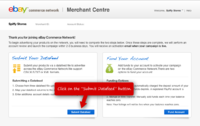
Adding your data feed on the shopping.com website

Once you have signed up for a Shopping.com merchant account, you can then add your data feed. On the home page of the Merchant Centre, click the "Submit Datafeed" button.