Difference between revisions of "Adding the Facebook Pixel to your store"
From Spiffy Stores Knowledge Base
| Line 60: | Line 60: | ||
To add products to your catalogue with the pixel: | To add products to your catalogue with the pixel: | ||
| − | # Go to | + | # Go to [https://www.facebook.com/products Catalogue Manager] |
# Select the e-commerce catalogue that you want to add products to. | # Select the e-commerce catalogue that you want to add products to. | ||
# Go to Product data sources. | # Go to Product data sources. | ||
Revision as of 14:52, 25 September 2019
The process for adding the Facebook pixel is described below. Facebook provides you with code, and you copy their code and paste it in your Theme.liquid file.
Contents
Step 1. Get the code from Facebook
- Go to your Pixels tab in Events Manager.
- Click Create a Pixel.
- Click Create in the box that appears to finish creating your pixel.
Step 2. Add the code to your store
- Copy the pixel code from Facebook
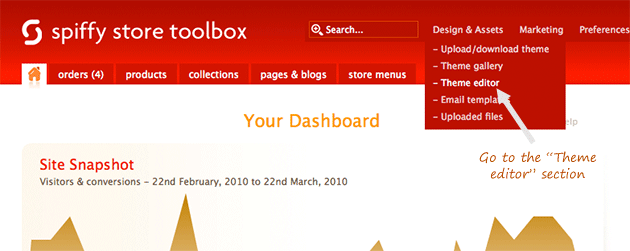
- Log in to your Spiffy Toolbox, and go to the "Theme editor" section.
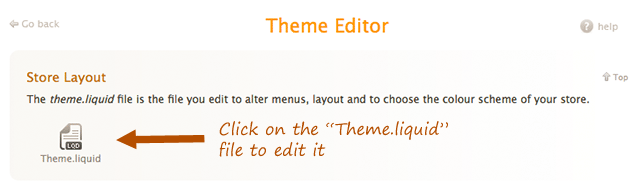
- In the theme editor, click on the "Theme.liquid" file to edit it.
- Paste the code immediately before the </head> tag, and then click the save button.


Step 3. Check that your code's working correctly
- Go back to Facebook
- Click Send Test Traffic after placing the code on your website to make sure your pixel's working properly. If your status says "Active", your base code has been installed correctly. This can take several minutes to update.
Please note that your store needs to be unlocked to be able to verify, as the "coming soon" page does not include your meta tag. You can unlock your store in the Preferences -> General Settings -> Password protect access to your store section of your store's Toolbox.
Tracking orders
Additional Content and Scripts

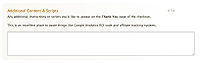
You can add the Facebook Pixel code to track orders in the Preferences -> Checkout & payment -> Additional Content & Scripts section of your store's Toolbox.
- Copy the pixel code from Facebook
- Paste the code in the Additional Content & Scripts section
- Add the code below right after the line fbq('track', 'PageView');
fbq('track', 'Purchase',{value:'{{ total_price | money_without_currency }}',currency: '{{shop.currency}}'});
Your final code should look like this...
<!-- Facebook Pixel Code -->
<script>
!function(f,b,e,v,n,t,s)
{if(f.fbq)return;n=f.fbq=function(){n.callMethod?
n.callMethod.apply(n,arguments):n.queue.push(arguments)};
if(!f._fbq)f._fbq=n;n.push=n;n.loaded=!0;n.version='2.0';
n.queue=[];t=b.createElement(e);t.async=!0;
t.src=v;s=b.getElementsByTagName(e)[0];
s.parentNode.insertBefore(t,s)}(window,document,'script',
'https://connect.facebook.net/en_US/fbevents.js');
 fbq('init', '12345678910111213');
fbq('track', 'PageView');
fbq('track', 'Purchase',{value:'{{ total_price | money_without_currency }}',currency: '{{shop.currency}}'});
</script>
<noscript>
 <img height="1" width="1"
src="https://www.facebook.com/tr?id=12345678910111213&ev=PageView
&noscript=1"/>
</noscript>
<!-- End Facebook Pixel Code -->
Using the Facebook Pixel to add Products to your Facebook Catalogue
To add products to your catalogue with the pixel:
- Go to Catalogue Manager
- Select the e-commerce catalogue that you want to add products to.
- Go to Product data sources.
- Go to Add data source and select Add new product from the drop-down menu.
- Select Connect Facebook pixels and click Next.
- Choose the pixel that you want to use and click Next.
- Click Done.
Your pixel is now connected and will update your catalogue inventory each time someone views one of your product pages. The pixel usually takes just a few minutes to update your catalogue, but allow up to 15 minutes. If you want to speed up the process of getting products into your catalog, go look at every product page in your store once you have set everything up.