Difference between revisions of "How to configure Microsoft Outlook"
From Spiffy Stores Knowledge Base
| Line 10: | Line 10: | ||
''Note:'' In these instructions, ''yourstore'' refers to the name given to your Spiffy Store, and this is the name that appears in your spiffystores.com domain name. For example, if your store is called '''sellmore''', then your Spiffy Stores domain name will be '''sellmore.spiffystores.com'''. | ''Note:'' In these instructions, ''yourstore'' refers to the name given to your Spiffy Store, and this is the name that appears in your spiffystores.com domain name. For example, if your store is called '''sellmore''', then your Spiffy Stores domain name will be '''sellmore.spiffystores.com'''. | ||
| − | |||
'''To set up Microsoft Outlook:''' | '''To set up Microsoft Outlook:''' | ||
| − | + | # Open Microsoft Outlook. | |
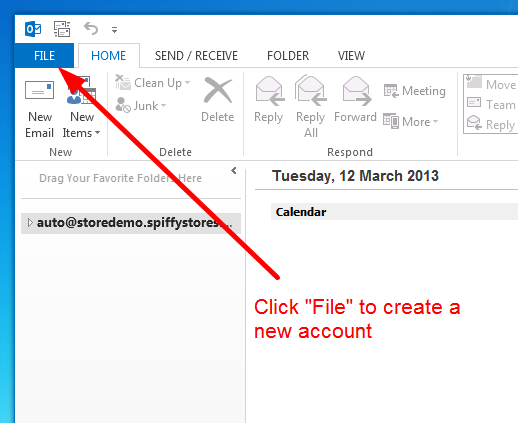
| − | # Open Microsoft Outlook | + | # Click the "File" tab from the menu.<br><br>[[Image:Email outlook1.png]]<br><br> |
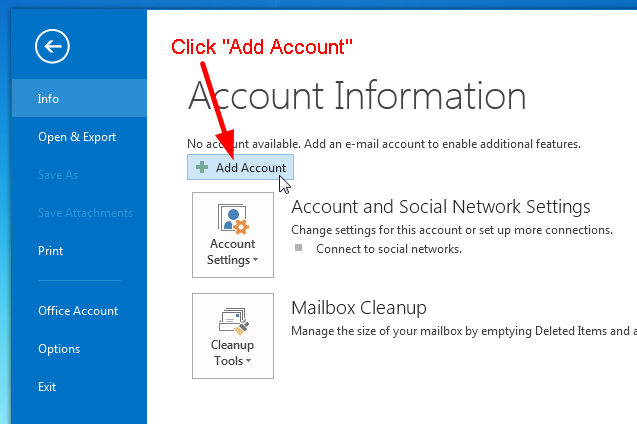
| − | # Click the "File" tab from the menu<br><br>[[Image:Email outlook1.png]]<br><br> | + | # Click the "Add Account" button.<br><br>[[Image:Email outlook2.png]]<br><br> |
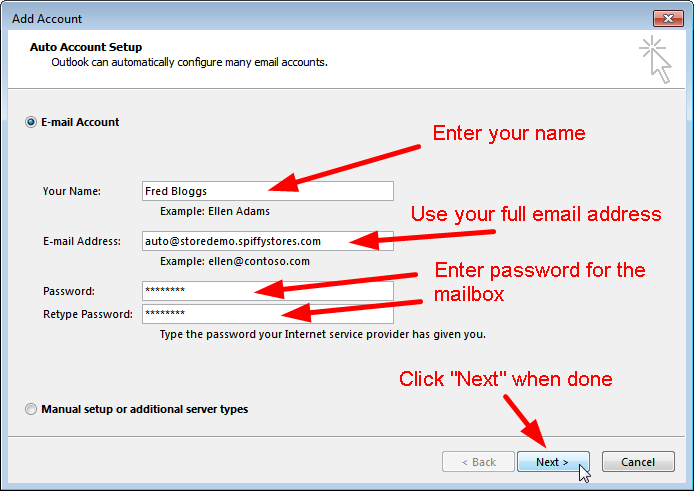
| − | # | + | # In the "Add Account" window, enter your name, full email address and password. Your email address should be something like "''name''@''yourstore''.spiffystores.com". Once you have entered all the information, click "Next".<br><br>[[Image:Email outlook3.png]]<br><br> |
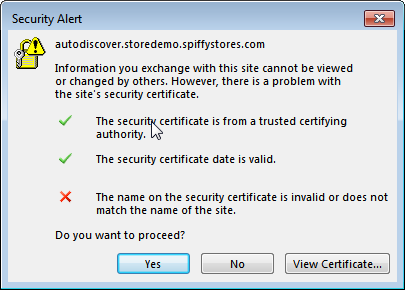
| − | # | + | # You may see a number of "Security Alert" windows pop up. On each of these, click "No" to ignore the requests.<br><br>[[Image:Email outlook4.png]]<br><br> |
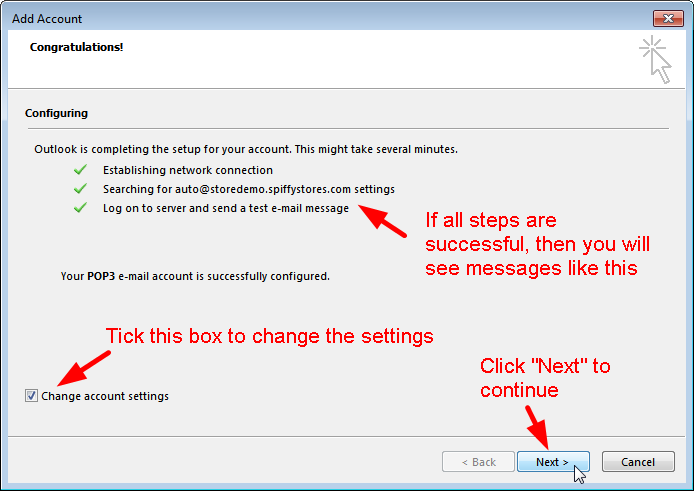
| − | + | # Once the configuration has completed successfully, you should see a "Congratulations!" message. Tick the "Change account settings" box if you want to change your email address to use your own domain name. Then click "Next". <br><br>[[Image:Email outlook5.png]]<br><br> | |
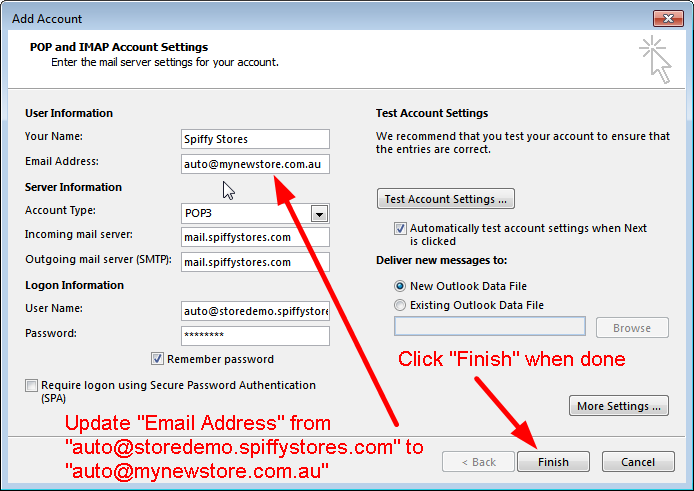
| − | + | # If you have your own domain name, you'll probably want to update your email address to use this instead of the ''yourstore''.'''spiffystores.com''' domain name. Update the "Email Address" field and enter your new address using your own domain name. Click "Finish" to save the update. Use your own domain names, rather than the values shown in the example.<br><br>[[Image:Email outlook6.png]]<br><br> | |
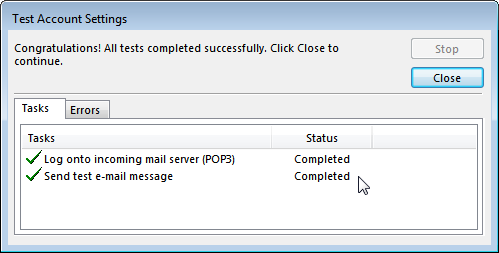
| − | + | # A test message is sent and if everything is correct, you will see a message box letting you know that everything has been successfully tested. Click "Close" to dismiss the message and return to Outlook.<br><br>[[Image:Email outlook7.png]]<br><br> | |
| − | |||
| − | |||
| − | |||
| − | |||
| − | |||
| − | |||
| − | |||
| − | |||
| − | |||
| − | |||
| − | |||
| − | |||
| − | |||
| − | |||
| − | |||
| − | |||
| − | |||
| − | |||
| − | |||
| − | |||
| − | |||
| − | |||
| − | |||
| − | |||
| − | |||
| − | <br><br>[[Image:Email | ||
| − | # | ||
| − | |||
| − | # | ||
| − | |||
| − | # | ||
| − | |||
| − | |||
| − | # Click | ||
| − | |||
| − | |||
| − | |||
== Further Reference == | == Further Reference == | ||
Revision as of 14:52, 12 March 2013
Setting Up Microsoft Outlook
To read your email messages using Microsoft Outlook, you will need to configure several Microsoft Outlook email service options. Please note that there are different versions of Outlook, so sometimes the names of menu items or fields are a little different from our instructions here.
These instructions apply to Outlook 2013.
For other email software, refer to How to set up your email program to access your Spiffy Stores mailboxes
Outlook is designed to use auto-configuration to help make the setup process simple and easy to use. In order for this to work properly, you must use the "yourstore.spiffystores.com" domain name in your email address.
Note: In these instructions, yourstore refers to the name given to your Spiffy Store, and this is the name that appears in your spiffystores.com domain name. For example, if your store is called sellmore, then your Spiffy Stores domain name will be sellmore.spiffystores.com.
To set up Microsoft Outlook:
- Open Microsoft Outlook.
- Click the "File" tab from the menu.
- Click the "Add Account" button.
- In the "Add Account" window, enter your name, full email address and password. Your email address should be something like "name@yourstore.spiffystores.com". Once you have entered all the information, click "Next".
- You may see a number of "Security Alert" windows pop up. On each of these, click "No" to ignore the requests.
- Once the configuration has completed successfully, you should see a "Congratulations!" message. Tick the "Change account settings" box if you want to change your email address to use your own domain name. Then click "Next".
- If you have your own domain name, you'll probably want to update your email address to use this instead of the yourstore.spiffystores.com domain name. Update the "Email Address" field and enter your new address using your own domain name. Click "Finish" to save the update. Use your own domain names, rather than the values shown in the example.
- A test message is sent and if everything is correct, you will see a message box letting you know that everything has been successfully tested. Click "Close" to dismiss the message and return to Outlook.