Difference between revisions of "Minimal theme: Customising your store's design"
From Spiffy Stores Knowledge Base
| Line 1: | Line 1: | ||
The minimal theme design can be edited in the "Design >> Theme editor" section of your toolbox. The Theme Editore allows you to edit just about every colour in your theme, as well as editing your slideshow and enabling or disabling social media functionality. Below is a guide detailing each of the sections in the theme editor; | The minimal theme design can be edited in the "Design >> Theme editor" section of your toolbox. The Theme Editore allows you to edit just about every colour in your theme, as well as editing your slideshow and enabling or disabling social media functionality. Below is a guide detailing each of the sections in the theme editor; | ||
| − | === Theme presets === | + | === Theme presets === |
The theme comes with 6 preset colour schemes. When you first load the theme, it is loaded using the "White & grey" colour scheme. You can choose a colour scheme in this section, or you could also modify each section of your theme by editing other sections below. | The theme comes with 6 preset colour schemes. When you first load the theme, it is loaded using the "White & grey" colour scheme. You can choose a colour scheme in this section, or you could also modify each section of your theme by editing other sections below. | ||
| Line 7: | Line 7: | ||
[[Image:Minimal theme editor 01.png]]<br> | [[Image:Minimal theme editor 01.png]]<br> | ||
| − | == The theme editor == | + | == The theme editor == |
| − | The theme editor is broken up into sections to make it a litle easier to find things. Each section of the theme editor is devoted to either a specific set of functions, or a specific area of the page. We'll go into more detail about each section below.[[Image: | + | The theme editor is broken up into sections to make it a litle easier to find things. Each section of the theme editor is devoted to either a specific set of functions, or a specific area of the page. Clicking on a section heading will expand the section out so you can see the options for that section. We'll go into more detail about each section below.<br><br>[[Image:Minimal theme editor 02.png]]<br> |
| + | |||
| + | === Store header & navigation === | ||
| + | |||
| + | This section allows you to upload your logo, so that it displays in the header of your theme, and also on your checkout page. To upload your logo, you tick the box that says "Use a logo?", and then click the "Choose file" button to select the file on your computer. When you've done that, you just click the "Save settings" button to upload your logo and have it display in your theme. aPlease note that the theme editor re-sizes your logo to a maximum size of 750 pixels wide x 150 pixels high so that it fits into the theme nicely. If you need that modified, please [[/support/|contact us]] to request a change to this.<br><br>You can also choose the menu that you want to appear in the header of your page. The menus that appear in this list are ones that have been created in the "Store menus" section of your toolbox.<br> | ||
| + | |||
| + | [[Image:Minimal_theme_editor_03.png]] | ||
Revision as of 09:06, 14 June 2011
The minimal theme design can be edited in the "Design >> Theme editor" section of your toolbox. The Theme Editore allows you to edit just about every colour in your theme, as well as editing your slideshow and enabling or disabling social media functionality. Below is a guide detailing each of the sections in the theme editor;
Theme presets
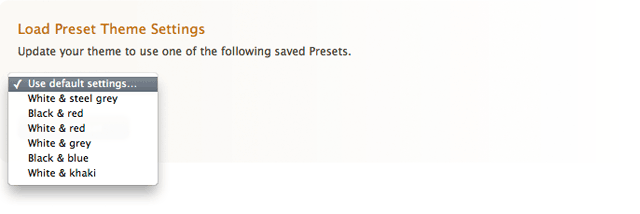
The theme comes with 6 preset colour schemes. When you first load the theme, it is loaded using the "White & grey" colour scheme. You can choose a colour scheme in this section, or you could also modify each section of your theme by editing other sections below.
The theme editor
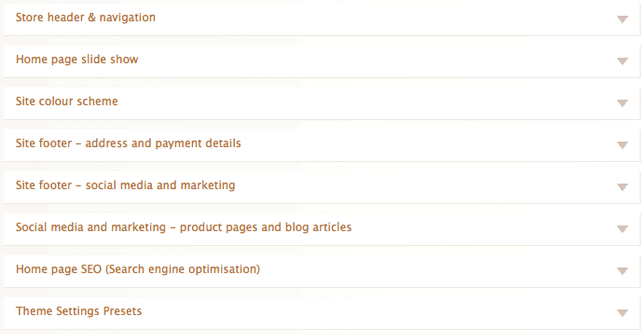
The theme editor is broken up into sections to make it a litle easier to find things. Each section of the theme editor is devoted to either a specific set of functions, or a specific area of the page. Clicking on a section heading will expand the section out so you can see the options for that section. We'll go into more detail about each section below.
This section allows you to upload your logo, so that it displays in the header of your theme, and also on your checkout page. To upload your logo, you tick the box that says "Use a logo?", and then click the "Choose file" button to select the file on your computer. When you've done that, you just click the "Save settings" button to upload your logo and have it display in your theme. aPlease note that the theme editor re-sizes your logo to a maximum size of 750 pixels wide x 150 pixels high so that it fits into the theme nicely. If you need that modified, please contact us to request a change to this.
You can also choose the menu that you want to appear in the header of your page. The menus that appear in this list are ones that have been created in the "Store menus" section of your toolbox.

