Difference between revisions of "Gift Cards"
From Spiffy Stores Knowledge Base
m (→FAQ) |
|||
| (43 intermediate revisions by the same user not shown) | |||
| Line 3: | Line 3: | ||
The Gift Card feature is currently available on all Spiffy Stores plans. | The Gift Card feature is currently available on all Spiffy Stores plans. | ||
| − | '''Note:''' By using | + | '''Note:''' By using Gift Cards, you are agreeing to the [https://www.spiffystores.com.au/terms-of-service-gift-cards Spiffy Stores Gift Cards Terms of Service]. |
You can use Gift Cards in any of the following ways: | You can use Gift Cards in any of the following ways: | ||
| Line 20: | Line 20: | ||
Image:GiftCardProduct1.png|Creating a Gift Card Product | Image:GiftCardProduct1.png|Creating a Gift Card Product | ||
</gallery> | </gallery> | ||
| − | Before you can sell gift cards, you need to | + | Before you can sell gift cards, you need to create a Gift Card product. |
| − | # From your Spiffy Stores admin, go to "Products" page. | + | # From your Spiffy Stores admin, go to the "Products" page. |
# Click on the "Add a Gift Card Product" button. | # Click on the "Add a Gift Card Product" button. | ||
# Enter information about the Gift Card product into the following fields: | # Enter information about the Gift Card product into the following fields: | ||
| Line 40: | Line 40: | ||
'''Note:''' Gift Card products need to be added to a collection or to the storefront navigation menu in order for them to be found and made available for purchase. | '''Note:''' Gift Card products need to be added to a collection or to the storefront navigation menu in order for them to be found and made available for purchase. | ||
| + | |||
| + | === Add a New Gift Card Product Denomination === | ||
| + | <gallery widths="200px" heights="200px" class="right"> | ||
| + | Image:GiftCardProduct3.png|Add a new Denomination | ||
| + | </gallery> | ||
| + | # From your Spiffy Stores admin, go to the "Products" page. | ||
| + | # Optionally filter the product view to show only Gift Card products. This is done by adding a filter where the Product Type is "Gift Card". | ||
| + | # Click the Gift Card product that you want to edit. | ||
| + | # In the Denominations section, click the "Add a New Denomination" button. | ||
| + | # Enter the required denomination, then click "Save Variation". | ||
| + | |||
| + | === Remove a Gift Card Product Denomination === | ||
| + | # From your Spiffy Stores admin, go to the "Products" page. | ||
| + | # Optionally filter the product view to show only Gift Card products. This is done by adding a filter where the Product Type is "Gift Card". | ||
| + | # Click the Gift Card product that you want to edit. | ||
| + | # In the Denominations section, click the <code>X</code> icon beside the denomination that you wish to delete. | ||
| + | # In the confirmation dialog, click "OK". | ||
| + | |||
| + | === Add the Gift Card Product to a Collection === | ||
| + | <gallery widths="200px" heights="200px" class="right"> | ||
| + | Image:GiftCardProduct4.png|Add Gift Card Product to Collection | ||
| + | </gallery> | ||
| + | You can add Gift Card products to any sort of collection, just like any other product. You can also add a Gift Card product to an existing standard collection from the Gift Card's product page. | ||
| + | |||
| + | # From your Spiffy Stores admin, go to the "Products" page. | ||
| + | # Optionally filter the product view to show only Gift Card products. This is done by adding a filter where the Product Type is "Gift Card". | ||
| + | # Click the Gift Card product that you want to edit. | ||
| + | # In the Collections section, tick the check-boxes of all the collections that you want to add the Gift Card product to. | ||
| + | |||
| + | === Publish the Gift Card Product === | ||
| + | <gallery widths="200px" heights="200px" class="right"> | ||
| + | Image:GiftCardProduct5.png|Publish the Gift Card Product | ||
| + | </gallery> | ||
| + | By default, a new Gift Card product is published and available for sale in your storefront. | ||
| + | |||
| + | You change the Gift Card product's visibility at any time to hidden or published. | ||
| + | |||
| + | # From your Spiffy Stores admin, go to the "Products" page. | ||
| + | # Optionally filter the product view to show only Gift Card products. This is done by adding a filter where the Product Type is "Gift Card". | ||
| + | # Click the Gift Card product that you want to edit. | ||
| + | # In the Product Visibility section, select either "Published" or "Hidden" to show or hide the product. | ||
| + | |||
| + | === Preview a Gift Card Product === | ||
| + | <gallery widths="200px" heights="200px" class="right"> | ||
| + | Image:GiftCardProduct6.png|Preview a Gift Card Product | ||
| + | </gallery> | ||
| + | You can preview a Gift Card product to see what it looks like to your customers. | ||
| + | |||
| + | # From your Spiffy Stores admin, go to the "Products" page. | ||
| + | # Optionally filter the product view to show only Gift Card products. This is done by adding a filter where the Product Type is "Gift Card". | ||
| + | # Click the Gift Card product that you want to preview. | ||
| + | # Click the "Preview this Product" button. | ||
== Changing Settings == | == Changing Settings == | ||
| + | You can set global Gift Card expiry settings that apply to all Gift Card products in your Spiffy Store. | ||
| + | === Change your Gift Card Expiry Settings === | ||
| + | <gallery widths="200px" heights="200px" class="right"> | ||
| + | Image:GiftCardProduct7.png|Setting an Expiration Interval | ||
| + | </gallery> | ||
| + | Gift cards can be set to expire after a specific amount of time. | ||
| + | |||
| + | By default, Gift Cards don't expire because in many jurisdictions, it is illegal to sell gift cards that have an expiry date. You can set an expiration interval in years, months or days. When setting an expiration interval, verify that you are following the rules and regulations for Gift Cards in your country. | ||
| + | |||
| + | # From your Spiffy Stores admin, go to "Preferences -> General Settings". | ||
| + | # Scroll down to the "Gift Cards Auto-Expiration" section. | ||
| + | # If you want to set an expiration interval option, then choose the option to allow Gift Cards to expire. | ||
| + | # Specify the Interval and Unit (Year/Month/Day) for the interval. | ||
| + | # Click "Apply Settings". | ||
| + | |||
== Issuing Free Gift Cards == | == Issuing Free Gift Cards == | ||
| + | You can issue a free Gift Card with a set value to an existing customer as an incentive, promotion or reward. | ||
| + | === Issue a Gift Card === | ||
| + | <gallery widths="200px" heights="200px" class="right"> | ||
| + | Image:GiftCardProduct8.png|Issue a Gift Card | ||
| + | </gallery> | ||
| + | <gallery widths="200px" heights="200px" class="right"> | ||
| + | Image:GiftCardProduct11.png|Set Value and Expiry Date | ||
| + | </gallery> | ||
| + | When you issue a Gift Card, you generate a Gift Card code that can be emailed to a customer without receiving any payment in return. You decide how much the Gift Card is worth, and the customer who receives it can use this value towards other products in your store. | ||
| + | |||
| + | If you need to know the Gift Card code, then record it when you issue the card. You can't view the full Gift Card code at a later date. | ||
| + | |||
| + | # From your Spiffy Stores admin, go to "Marketing -> Gift Cards". | ||
| + | # Click the "Issue a Gift Card" button. | ||
| + | # Enter the value of the Gift Card. | ||
| + | # If you want to set an expiry date for the Gift Card, then select from one of the pre-defined expiration intervals, or set the expiration date by clicking on the date field and choosing the required date from the popup. The gift card expires at midnight on the expiry date in the store's time zone. Be sure to follow the relevant laws relating to the sale of gift cards in your country. | ||
| + | # Click the "Save Gift Card" button. | ||
| + | |||
| + | <gallery widths="200px" heights="200px" class="right"> | ||
| + | Image:GiftCardProduct9.png|Assign Gift Card to Customer | ||
| + | </gallery> | ||
| + | <gallery widths="200px" heights="200px" class="right"> | ||
| + | Image:GiftCardProduct10.png|Select or Create Customer | ||
| + | </gallery> | ||
| + | <br>The Gift Card has now been created, but has not yet been associated with a customer. | ||
| + | |||
| + | # Click on the Gift Card that you just created. By default, the Gift Cards are listed in order by creation date, so the latest Gift Card will appear at the top of the list. | ||
| + | # The sorting order of the list can be changed by clicking on the column headers to select the sorting order. | ||
| + | # Click on the new Gift Card. The correct Gift Card will not have a customer assigned to the card. | ||
| + | # On the Gift Card page, click the "Add Customer" button. | ||
| + | # Either select a customer using the Search box or create a customer by entering the customer's name and email address. | ||
| + | # Click the "Add Customer" button. An email is sent to the customer containing a link that will display the Gift Card Code that the customer can use at checkout time. | ||
| + | # Optionaly, a note can be added to the Gift Card for your future reference. The note is visible when viewing the Gift Card in your Spiffy Stores admin, but is not visible to the customer. Click on the "Attach a Note" button to create or update a note attached to the Gift Card. | ||
| + | <br>'''Note:''' After a Gift Card is issued, the full Gift Card code is visible only to the customer because Gift Cards are considered equivalent to currency. You can see only the first four and the last four characters in the code for any Gift Card. | ||
| + | |||
| + | === View Information about issued Gift Cards === | ||
| + | You can view the details for your issued Gift Cards in your Spiffy Stores admin. | ||
| + | |||
| + | # From your Spiffy Stores admin, go to "Marketing -> Gift Cards". | ||
| + | # Click on the listed Gift Card's line to view more information about the Gift Card. | ||
| + | # On the Gift Card's page, you can view the following details: | ||
| + | #* The expiration date, if any | ||
| + | #* The balance on the Gift Card | ||
| + | #* The customer details and time and date that the email was sent | ||
| + | #* Any notes that have been added to the Gift Card | ||
| + | #* If the Gift Card has been redeemed, a list of orders that the Gift Card was used for as a means of payment or partial payment | ||
| + | |||
| + | === Edit Customer on an issued Gift Card === | ||
| + | If no customer information was added to a previously issued Gift Card, then you can add customer information. You can't replace existing customer information. | ||
| + | |||
| + | # From your Spiffy Stores admin, go to "Marketing -> Gift Cards". | ||
| + | # Click on the Gift Card you wish to edit. | ||
| + | # On the Gift Card page, click "Add Customer" button to add the customer infomation. | ||
| + | # Either select a customer using the Search box or create a customer by entering the customer's name and email address. | ||
| + | # Click the "Add Customer" button. An email is sent to the customer containing a link that will display the Gift Card Code that the customer can use at checkout time. | ||
| + | <br>If you have already added a customer, you can resend the email to the customer at any time by clicking the "Resend Gift Card" button. | ||
| + | |||
== Managing Gift Cards == | == Managing Gift Cards == | ||
| + | You can view, organize and edit your issued and purchased Gift Cards from the Gift Cards page in your Spiffy Stores admin. | ||
| + | === Filter Gift Cards === | ||
| + | <gallery widths="200px" heights="200px" class="right"> | ||
| + | Image:GiftCardProduct12.png|Filter Gift Cards | ||
| + | </gallery> | ||
| + | You can filter the Gift Cards that are listed on the Gift Cards page. Filtering is useful when you are trying to find Gift Cards that match particular criteria. For example, you could add a Status filter list all the Gift Cards that have been disabled. | ||
| + | |||
| + | # From your Spiffy Stores admin, go to "Marketing -> Gift Cards". | ||
| + | # In the "Filter gift cards view" section, choose the status and balance filters that you want. | ||
| + | # Optionally, you can also choose a date range to limit the displayed Gift Cards to those that were created during a particular period. Select the required range from the options available, then click on the "Apply selected date range" link. | ||
| + | # Finally, you can select how many Gift Cards are to be displayed per page. | ||
| + | === Sort Gift Cards === | ||
| + | You can change the order in which Gift Cards listed on the Gift Cards page. Sorting is useful when you are trying to find Gift Cards that match particular criteria. For example, you could sort by the Expires date (ascending) to view the Gift Cards that are closest to expiring first. | ||
| + | |||
| + | # From your Spiffy Stores admin, go to "Marketing -> Gift Cards". | ||
| + | # Click on the column header that you want to sort. For example, click on "Balance" to sort the Gift Cards by the card balance. | ||
| + | # When click on a header the sorting order will appear as an arrow beside the column title. An "Up" arrow will appear for an ascending sort, and a "Down" arrow for a descending sort. Repeatedly clicking the column header changes the sort order from ascending to descending and back to ascending order. | ||
| + | # Click on a new column header to change to a different sorting order. | ||
| + | |||
| + | The list of Gift Cards is presented in the order you requested. | ||
| + | === Disable a Gift Card === | ||
| + | You can disable a Gift Card from its details page. | ||
| + | |||
| + | '''Caution:''' Disabling a Gift Card is permanent. You cannot enable a disabled Gift Card, and the card can never be used again. | ||
| + | |||
| + | # From your Spiffy Stores admin, go to "Marketing -> Gift Cards". | ||
| + | # Click on the Gift Card that you want to disable. | ||
| + | # On the Gift Card details page, click the "Disable Gift Card" button. | ||
| + | # Click "OK" to confirm on the confirmation dialog. | ||
| + | |||
== Redeeming Gift Cards == | == Redeeming Gift Cards == | ||
| + | Your customers can use their Gift Cards to make purchases from your store during the checkout. | ||
| + | === Customer Experience === | ||
| + | <gallery widths="200px" heights="200px" class="right"> | ||
| + | Image:GiftCardProduct13.png|Checkout with Gift Cards | ||
| + | </gallery> | ||
| + | When making a purchase from your store, a customer can redeem the value of a Gift Card by entering its unique code at checkout. | ||
| + | |||
| + | The Gift Card code generated for your Spiffy Store has built-in safety features to prevent errors in transcribing the code. The code itself is not case sensitive, and also automatically correct for common errors such as entering the letter "O", rather than the digit "0". These features will make it easier for your customers to use the Gift Card codes successfully. | ||
| + | |||
| + | A Gift Card holds a balance, which can be spent over more than one order. Gift card balances are applied to the total value of an order, which can include taxes and shipping. You can view and manage the status of each gift card in your Spiffy Stores admin. | ||
| + | |||
| + | During checkout, customers can enter the Gift Card code in the same field that is used to enter Coupon and Discount codes. Once a valid Gift Card code has been entered, an icon appears showing the value being used for the purchase. If only part of the Gift Card balance is used, the remaining amount is also shown. | ||
| + | |||
| + | Multiple Gift Cards can be used to pay for a single purchase. | ||
| + | |||
| + | Once applied to an order, the Gift Card can be removed from the purchase by clicking the <code>X</code> on the Gift Card icon. | ||
| + | |||
| + | If there is an outstanding balance that needs to be paid after the Gift Cards have been applied, then the checkout can be completed by proceeding with one of the standard payment options that you have available in your Spiffy Store. If the Gift Cards fully cover the balance of the order, then no further payment is required. | ||
| + | |||
| + | '''Note:''' If a customer wants to buy a Gift Card for someone else, then they need to forward the Gift Card email to the recipient. | ||
| + | |||
== Discounting Gift Cards == | == Discounting Gift Cards == | ||
| − | + | All of your Spiffy Store's supported discount methods apply to a Gift Card product, as with any other product. | |
| + | |||
| + | This includes both Coupon Code discounts and Shopping Cart discounts. | ||
Latest revision as of 11:25, 18 February 2022
A Gift Card is a special type of product. Its value can be used as payment towards future orders from your online store.
The Gift Card feature is currently available on all Spiffy Stores plans.
Note: By using Gift Cards, you are agreeing to the Spiffy Stores Gift Cards Terms of Service.
You can use Gift Cards in any of the following ways:
- Sell them in your online store like any other product
- Share links to Gift Card products on social media
- Issue a Gift Card to a customer for free as a reward or incentive
When you fulfill an order with a Gift Card, the customer receives an email that contains a link to a page that displays a unique Gift Card code that they can use at checkout to redeem all or part of its value. Multiple Gift Cards may be used to pay for an order.
There may be restrictions on the use of "Buy Now Pay Later" providers such as AfterPay to purchase Gift Card products, as these are often classified as restricted goods.
Contents
Adding and Updating
Add a Gift Card Product
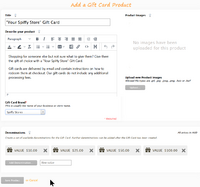
Before you can sell gift cards, you need to create a Gift Card product.
- From your Spiffy Stores admin, go to the "Products" page.
- Click on the "Add a Gift Card Product" button.
- Enter information about the Gift Card product into the following fields:
- Title - Enter a name for this Gift Card product. By default, it's set to "Your store name Gift Card".
- Description - Enter the description for this Gift Card product as you want it to appear in your storefront. Some example text has already been added to the description that you can use.
- Images - Upload one or more product images. If you don't supply an image, a generic Gift Card image will be used.
- Brand - Use an existing brand or vendor, or create a new one. Typically, this will be your own store name.
- Denominations - A number of default denominations are created for a Gift Card product. Each denomination is saved as a variation of the Gift Card product. You can choose to use the default denominations, add new ones or delete any you don't want to use.
- When you're done, click "Save Product".
Most of the Gift Card product options will be set up for you automatically, but you may like to update the title, description or upload a custom image for your Gift Card. A default Gift Card image will be provided for you if you don't provide your own product image.
Once a Gift Card product has been created, it can be managed and updated in the same way as standard products.
Note: Gift Card products need to be added to a collection or to the storefront navigation menu in order for them to be found and made available for purchase.
Add a New Gift Card Product Denomination
- From your Spiffy Stores admin, go to the "Products" page.
- Optionally filter the product view to show only Gift Card products. This is done by adding a filter where the Product Type is "Gift Card".
- Click the Gift Card product that you want to edit.
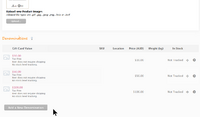
- In the Denominations section, click the "Add a New Denomination" button.
- Enter the required denomination, then click "Save Variation".
Remove a Gift Card Product Denomination
- From your Spiffy Stores admin, go to the "Products" page.
- Optionally filter the product view to show only Gift Card products. This is done by adding a filter where the Product Type is "Gift Card".
- Click the Gift Card product that you want to edit.
- In the Denominations section, click the
Xicon beside the denomination that you wish to delete. - In the confirmation dialog, click "OK".
Add the Gift Card Product to a Collection
You can add Gift Card products to any sort of collection, just like any other product. You can also add a Gift Card product to an existing standard collection from the Gift Card's product page.
- From your Spiffy Stores admin, go to the "Products" page.
- Optionally filter the product view to show only Gift Card products. This is done by adding a filter where the Product Type is "Gift Card".
- Click the Gift Card product that you want to edit.
- In the Collections section, tick the check-boxes of all the collections that you want to add the Gift Card product to.
Publish the Gift Card Product
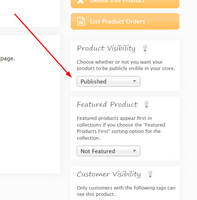
By default, a new Gift Card product is published and available for sale in your storefront.
You change the Gift Card product's visibility at any time to hidden or published.
- From your Spiffy Stores admin, go to the "Products" page.
- Optionally filter the product view to show only Gift Card products. This is done by adding a filter where the Product Type is "Gift Card".
- Click the Gift Card product that you want to edit.
- In the Product Visibility section, select either "Published" or "Hidden" to show or hide the product.
Preview a Gift Card Product
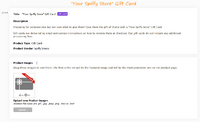
You can preview a Gift Card product to see what it looks like to your customers.
- From your Spiffy Stores admin, go to the "Products" page.
- Optionally filter the product view to show only Gift Card products. This is done by adding a filter where the Product Type is "Gift Card".
- Click the Gift Card product that you want to preview.
- Click the "Preview this Product" button.
Changing Settings
You can set global Gift Card expiry settings that apply to all Gift Card products in your Spiffy Store.
Change your Gift Card Expiry Settings
Gift cards can be set to expire after a specific amount of time.
By default, Gift Cards don't expire because in many jurisdictions, it is illegal to sell gift cards that have an expiry date. You can set an expiration interval in years, months or days. When setting an expiration interval, verify that you are following the rules and regulations for Gift Cards in your country.
- From your Spiffy Stores admin, go to "Preferences -> General Settings".
- Scroll down to the "Gift Cards Auto-Expiration" section.
- If you want to set an expiration interval option, then choose the option to allow Gift Cards to expire.
- Specify the Interval and Unit (Year/Month/Day) for the interval.
- Click "Apply Settings".
Issuing Free Gift Cards
You can issue a free Gift Card with a set value to an existing customer as an incentive, promotion or reward.
Issue a Gift Card
When you issue a Gift Card, you generate a Gift Card code that can be emailed to a customer without receiving any payment in return. You decide how much the Gift Card is worth, and the customer who receives it can use this value towards other products in your store.
If you need to know the Gift Card code, then record it when you issue the card. You can't view the full Gift Card code at a later date.
- From your Spiffy Stores admin, go to "Marketing -> Gift Cards".
- Click the "Issue a Gift Card" button.
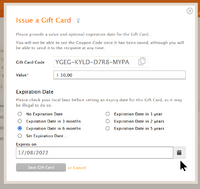
- Enter the value of the Gift Card.
- If you want to set an expiry date for the Gift Card, then select from one of the pre-defined expiration intervals, or set the expiration date by clicking on the date field and choosing the required date from the popup. The gift card expires at midnight on the expiry date in the store's time zone. Be sure to follow the relevant laws relating to the sale of gift cards in your country.
- Click the "Save Gift Card" button.
The Gift Card has now been created, but has not yet been associated with a customer.
- Click on the Gift Card that you just created. By default, the Gift Cards are listed in order by creation date, so the latest Gift Card will appear at the top of the list.
- The sorting order of the list can be changed by clicking on the column headers to select the sorting order.
- Click on the new Gift Card. The correct Gift Card will not have a customer assigned to the card.
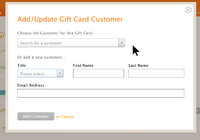
- On the Gift Card page, click the "Add Customer" button.
- Either select a customer using the Search box or create a customer by entering the customer's name and email address.
- Click the "Add Customer" button. An email is sent to the customer containing a link that will display the Gift Card Code that the customer can use at checkout time.
- Optionaly, a note can be added to the Gift Card for your future reference. The note is visible when viewing the Gift Card in your Spiffy Stores admin, but is not visible to the customer. Click on the "Attach a Note" button to create or update a note attached to the Gift Card.
Note: After a Gift Card is issued, the full Gift Card code is visible only to the customer because Gift Cards are considered equivalent to currency. You can see only the first four and the last four characters in the code for any Gift Card.
View Information about issued Gift Cards
You can view the details for your issued Gift Cards in your Spiffy Stores admin.
- From your Spiffy Stores admin, go to "Marketing -> Gift Cards".
- Click on the listed Gift Card's line to view more information about the Gift Card.
- On the Gift Card's page, you can view the following details:
- The expiration date, if any
- The balance on the Gift Card
- The customer details and time and date that the email was sent
- Any notes that have been added to the Gift Card
- If the Gift Card has been redeemed, a list of orders that the Gift Card was used for as a means of payment or partial payment
Edit Customer on an issued Gift Card
If no customer information was added to a previously issued Gift Card, then you can add customer information. You can't replace existing customer information.
- From your Spiffy Stores admin, go to "Marketing -> Gift Cards".
- Click on the Gift Card you wish to edit.
- On the Gift Card page, click "Add Customer" button to add the customer infomation.
- Either select a customer using the Search box or create a customer by entering the customer's name and email address.
- Click the "Add Customer" button. An email is sent to the customer containing a link that will display the Gift Card Code that the customer can use at checkout time.
If you have already added a customer, you can resend the email to the customer at any time by clicking the "Resend Gift Card" button.
Managing Gift Cards
You can view, organize and edit your issued and purchased Gift Cards from the Gift Cards page in your Spiffy Stores admin.
Filter Gift Cards
You can filter the Gift Cards that are listed on the Gift Cards page. Filtering is useful when you are trying to find Gift Cards that match particular criteria. For example, you could add a Status filter list all the Gift Cards that have been disabled.
- From your Spiffy Stores admin, go to "Marketing -> Gift Cards".
- In the "Filter gift cards view" section, choose the status and balance filters that you want.
- Optionally, you can also choose a date range to limit the displayed Gift Cards to those that were created during a particular period. Select the required range from the options available, then click on the "Apply selected date range" link.
- Finally, you can select how many Gift Cards are to be displayed per page.
Sort Gift Cards
You can change the order in which Gift Cards listed on the Gift Cards page. Sorting is useful when you are trying to find Gift Cards that match particular criteria. For example, you could sort by the Expires date (ascending) to view the Gift Cards that are closest to expiring first.
- From your Spiffy Stores admin, go to "Marketing -> Gift Cards".
- Click on the column header that you want to sort. For example, click on "Balance" to sort the Gift Cards by the card balance.
- When click on a header the sorting order will appear as an arrow beside the column title. An "Up" arrow will appear for an ascending sort, and a "Down" arrow for a descending sort. Repeatedly clicking the column header changes the sort order from ascending to descending and back to ascending order.
- Click on a new column header to change to a different sorting order.
The list of Gift Cards is presented in the order you requested.
Disable a Gift Card
You can disable a Gift Card from its details page.
Caution: Disabling a Gift Card is permanent. You cannot enable a disabled Gift Card, and the card can never be used again.
- From your Spiffy Stores admin, go to "Marketing -> Gift Cards".
- Click on the Gift Card that you want to disable.
- On the Gift Card details page, click the "Disable Gift Card" button.
- Click "OK" to confirm on the confirmation dialog.
Redeeming Gift Cards
Your customers can use their Gift Cards to make purchases from your store during the checkout.
Customer Experience
When making a purchase from your store, a customer can redeem the value of a Gift Card by entering its unique code at checkout.
The Gift Card code generated for your Spiffy Store has built-in safety features to prevent errors in transcribing the code. The code itself is not case sensitive, and also automatically correct for common errors such as entering the letter "O", rather than the digit "0". These features will make it easier for your customers to use the Gift Card codes successfully.
A Gift Card holds a balance, which can be spent over more than one order. Gift card balances are applied to the total value of an order, which can include taxes and shipping. You can view and manage the status of each gift card in your Spiffy Stores admin.
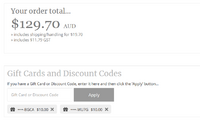
During checkout, customers can enter the Gift Card code in the same field that is used to enter Coupon and Discount codes. Once a valid Gift Card code has been entered, an icon appears showing the value being used for the purchase. If only part of the Gift Card balance is used, the remaining amount is also shown.
Multiple Gift Cards can be used to pay for a single purchase.
Once applied to an order, the Gift Card can be removed from the purchase by clicking the X on the Gift Card icon.
If there is an outstanding balance that needs to be paid after the Gift Cards have been applied, then the checkout can be completed by proceeding with one of the standard payment options that you have available in your Spiffy Store. If the Gift Cards fully cover the balance of the order, then no further payment is required.
Note: If a customer wants to buy a Gift Card for someone else, then they need to forward the Gift Card email to the recipient.
Discounting Gift Cards
All of your Spiffy Store's supported discount methods apply to a Gift Card product, as with any other product.
This includes both Coupon Code discounts and Shopping Cart discounts.
