Adelaide ecommerce theme - connecting your email subscriber form
From Spiffy Stores Knowledge Base

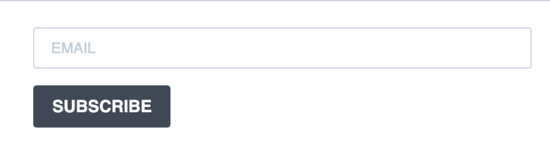
Connecting your email subscribe form

The Adelaide theme allows you to connect the subscribe form in the footer to your MailChimp, Campaign Monitor or Mad Mimi account.
For any of the services, you just select the service, and then paste the form's URL into the "Form action URL" field in your Theme editor.
URL's are entered in the "Store footer" section of your Theme editor. To get to your Theme editor, go to the "Design & Assets -> Theme editor" section of your store's Toolbox.
To add the subscribe form to your store, open the "Store footer" section of your theme editor, scroll down to the "Newsletter subscribe form" section, select the service you are using, paste the URL into the "Form action URL" box, and click the "Save settings" button.
Detailed instructions for setting up each service are below.
MailChimp
To use MailChimp log in to your MailChimp account. If you haven't already created a list there to add subscribers to, create one and then follow the instructions below;
- Click on "Audience" in the top menu.
- Under "Current Audience", select the list you want to use by clicking on it's name.
- In the "Manage Audience" drop-down menu, choose "Signup forms".
- Choose "Embedded forms".
- At the top of the screen, copy the text in the box labeled "Copy paste into your site" to get your form URL. Paste this code into a text editor, highlight ONLY the "form action" URL and copy the text. It should look something like this...
//hellothere.us4.list-manage.com/subscribe/post?u=747fc9927e6c1a5894eba5454&id=c9492288d0
Note that it begins with "//" and ends with "id=" followed by a special code. - Back in your theme editor, choose "MailChimp" in the "Newsletter system" section, and paste the URL into the "Form action URL" box.
- Click the "Save settings" button and test your form in your storefront.
- If entering your email address and clicking subscribe directs you to a MailChimp page asking you to confrim your email address, the form is working. If it doesn't, then you'll need to check the "Form action URL" field to make sure that there aren't any extra or missing characters at the beginning or end of your Form action URL.
- If you'd like to, you can also modify the design of your form in MailChimp by adding your logo and changing the colours to make it match your site.
Campaign Monitor
To use Campaign Monitor, log in to your Campaign Monitor account. If you haven't already created a list there to add subscribers to, create one and then follow the instructions below;
- Click on the "Lists & subscribers" tab.
- Select the list you want to use by clicking on it's name.
- On the left side of the screen, click on the "Signup forms" link.
- Choose "Paste code onto your site".
- Choose "No styling".
- Remove the title, description and any other fields. This form should only have an email address field and a subscribe button. The title and description are added in in the theme editor, not Campaign Monitor.
- Click in the "Save and generate code" button, and copy the entire content in the popup.
- Back in your theme editor, choose "Campaign Monitor" in the "Newsletter system" section, and paste all of the code into the "Form action URL" box.
- Click the "Save settings" button.
Mad Mimi
To use Mad Mimi, log in to your Mad Mimi account. If you haven't already created a list there to add subscribers to, create one and then follow the instructions below;
- Click on the "Webform" link in the top left of your screen.
- Select the list you want to add subscribers to by clicking on it's name in the "Add subscribers to these lists" section on the right.
- Click the "Embed" link above your form preview.
- Choose the "Plain embed" tab.
- In the code window below, copy your form action URL. It should look something like this...
https://madmimi.com/signups/subscribe/12345
- Back in your theme editor, choose "Mad Mimi" in the "Newsletter system" section, and paste the entire URL into the "Form action URL" box.
- Click the "Save settings" button.
- If you'd like to, you can also create a confirmation page in your store, and then add a link to it in the "Confirmation Landing Page" section in Mad Mimi. You can also edit the confirmation email that is sent to your new subscriber, by clicking on the "Edit activation message" button.
Brevo / SendInBlue
To use Brevo/SendInBlue, you'll first want to create a confirmation page on your website. This is because Brevo don't have a customisable confirmation page.
- Log in to your store
- Go to the Pages & Blogs section, and create a new page.
- You'll want to add some text like "Thanks for subscribing!".
- Publish and then preview the page, and either keep the tab open, or save the URL of the page. You'll need it later on.
Once you have done this, log in to your Brevo account. If you haven't already created a list there to add subscribers to, create one and then follow the instructions below;
- Click the "Contacts" link at the top of your screen.
- Click the "Forms" link on the left.
- Click the "Create a new subscription form" button on the top right.
- Name your form and proceed to the Design stage. This form will not be displayed, but must have only a simple Email field and Subscribe button. Any other text and fields will not be displayed. Additional fields will only stop your form from working altogether.
- Select the list you want to add subscribers to.
- Continue to Settings, and ensure you have selected the following settings;
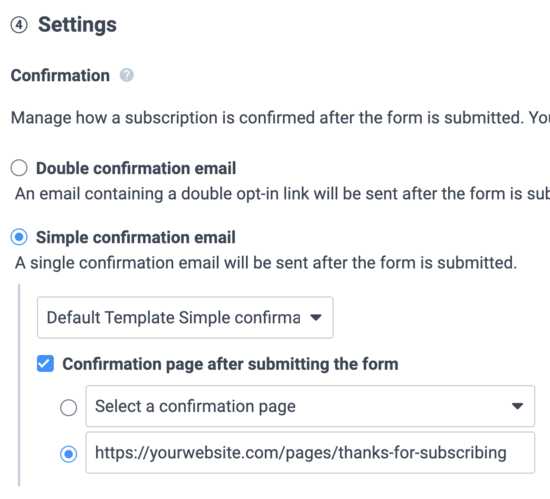
- Confirmation: Simple confirmation email -> and ensure you select the default Simple Confirmation Template;
- Tick the "Confirmation page after submitting the form" box, and enter the URL of the confirmation page you've created in your store. If you haven;t created one, you'd best go do this now. If you don't choose to display a Thank You page, your customer will end up on a blank page when they have subscribed.
- Proceed to the last step, where you will find the Embed section.
- Choose the "Simple HTML" section.
- In the code window below, copy all of the code.
- You'll now need some kind of text editing program to paste this code into, as we need only the form action URL. It should look something like this...
https://ac4d4312.sibforms.com/serve/MUIEAKHCSrYXAhLJ9rxrRbiHqmwA5Gj-kgzgZnd-x_e9K6pgLA5XffbrEXpy298gM859fUVO5WElY2w_IbxvNo5ZB6XmE2UM2UGZltLv2ZWyCzu2Go_Lsj7TqYpf3dX4j9oCfs-czDIfky9mBXV31QgfP4xLeDF2p15oaNHiDGofejX4VwqORuwCvdJDGVG-GK6dE2Y8nhEGoNF2
- Copy ONLY the URL.
- Back in your theme editor, choose "Send In Blue" in the "Newsletter system" section, and paste the URL into the "Form action URL" box.
- Click the "Save settings" button.


Customising the confirmation email
- Click the "Campaigns" link at the top of your screen.
- Click the "Templates" link on the left.
- Click the "Default Template Simple confirmation" template and make your modifications. This email will be sent to people when they subscribe, so if you are doing something like sending them a coupon code when they subscribe, this is the place to add all of that info in.
- You should preview your store and test your form to make sure it's all working. If it isn't, please send us an email for help. If you copy and paste the entire embed code into your email, it will save loads of time getting it sorted for you.
Klaviyo
The theme doesn't include any styling support for Klaviyo forms, but they can be added in. To support a Klaviyo form, you would need to follow these steps...
- Log in to Klaviyo, and go to Signup Forms
- Click the Install Code Snippet button, and copy the code
- In your store's theme editor, choose "Klaviyo" in the "Newsletter system" section, and paste all of the code into the "Form action URL" box.
- Save your theme settings and verify them in Klaviyo.
- Create an embedded form in Klaviyo. There is no built-in styling or support for Klaviyo forms, so you would need to style it in Klaviyo.
- Publish the form, and copy & paste their custom HTML into "Form action URL" box after the other Klaviyo code. You would likely need to view and test, and adjust your styling in Klaviyo.