Difference between revisions of "Sub-categories"
From Spiffy Stores Knowledge Base
| Line 23: | Line 23: | ||
<br> | <br> | ||
| − | ''' | + | '''Second level item''' |
#Create another menu item the same way you created one above | #Create another menu item the same way you created one above | ||
#Click the "Reorder" link | #Click the "Reorder" link | ||
| Line 29: | Line 29: | ||
#Click "Done reordering"<br><br> | #Click "Done reordering"<br><br> | ||
Previewing your store should show your second item as a drop-down. You can do this with multiple levels, and re-arrange your menus by dragging items up, down, left, or right whilst you're in "re-order" mode.<br><br> | Previewing your store should show your second item as a drop-down. You can do this with multiple levels, and re-arrange your menus by dragging items up, down, left, or right whilst you're in "re-order" mode.<br><br> | ||
| + | |||
| + | <br> | ||
| + | |||
| + | '''Third level item''' | ||
| + | #Create another menu item the same way you created one above | ||
| + | #Click the "Reorder" link | ||
| + | #Click and drag the item you want to pop out to the right (so it sits directly underneath and to the right of the one above - see example) | ||
| + | #Click "Done reordering"<br><br> | ||
| + | Previewing your store should show your third item as a pop out item to the right of the item above. You can do this with multiple levels, and re-arrange your menus by dragging items up, down, left, or right whilst you're in "re-order" mode.<br><br> | ||
<br> | <br> | ||
Revision as of 10:06, 13 September 2021
Rather than categories, and sub-categories, Spiffy Stores uses Collections. A collection is where you bring together all similar products and present them together so that your customers can easily browse and find exactly the right products for them to buy. A product can be in a number of collections.
If you want to create a hierarchy of categories, and subcategories, you can do this simply by using menus.
Most of our themes support up to 4 levels of drop-down menus. This should be plenty. If you have more complex menu requirements, then you'll likely want to create a mega menu. The Simple and Adelaide themes support mega menus.
There's no mucking about with code to get your drop-down menus working. You can create them simply by following the simple steps below. One important note though... you can't create links to nothing! If you haven't created the page or collection you want to link to, you need to create them first.
Creating a drop-down menu

First item
- Log in to your store's Toolbox and go to the "Store menus" tab
- Scroll down to the "Top Menu" section, and click "Add new Menu Item"
- Type in the name of your menu item
- Select whether you want your menu item to link to a page, product, or collection
- A new list of options will appear. Select the name of your page that you want to link to.
- Click the "Add menu item" button to save.
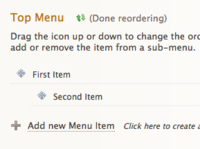
Second level item
- Create another menu item the same way you created one above
- Click the "Reorder" link
- Click and drag the item you want to drop down to the right (so it sits directly underneath and to the right of the one above - see example)
- Click "Done reordering"
Previewing your store should show your second item as a drop-down. You can do this with multiple levels, and re-arrange your menus by dragging items up, down, left, or right whilst you're in "re-order" mode.
Third level item
- Create another menu item the same way you created one above
- Click the "Reorder" link
- Click and drag the item you want to pop out to the right (so it sits directly underneath and to the right of the one above - see example)
- Click "Done reordering"
Previewing your store should show your third item as a pop out item to the right of the item above. You can do this with multiple levels, and re-arrange your menus by dragging items up, down, left, or right whilst you're in "re-order" mode.